

After this chapter, Inventory gives it your data and your APIs.
Before you start
An agent
The template you created it from supplies the sections you edit here.
What the Prompt section holds
The section is one column of editors, top to bottom:- First message: what the agent says when the call connects. On a WhatsApp agent, it is the message sent at the start of the conversation.
- One editor per prompt section, as supplied by the template you created the agent from.
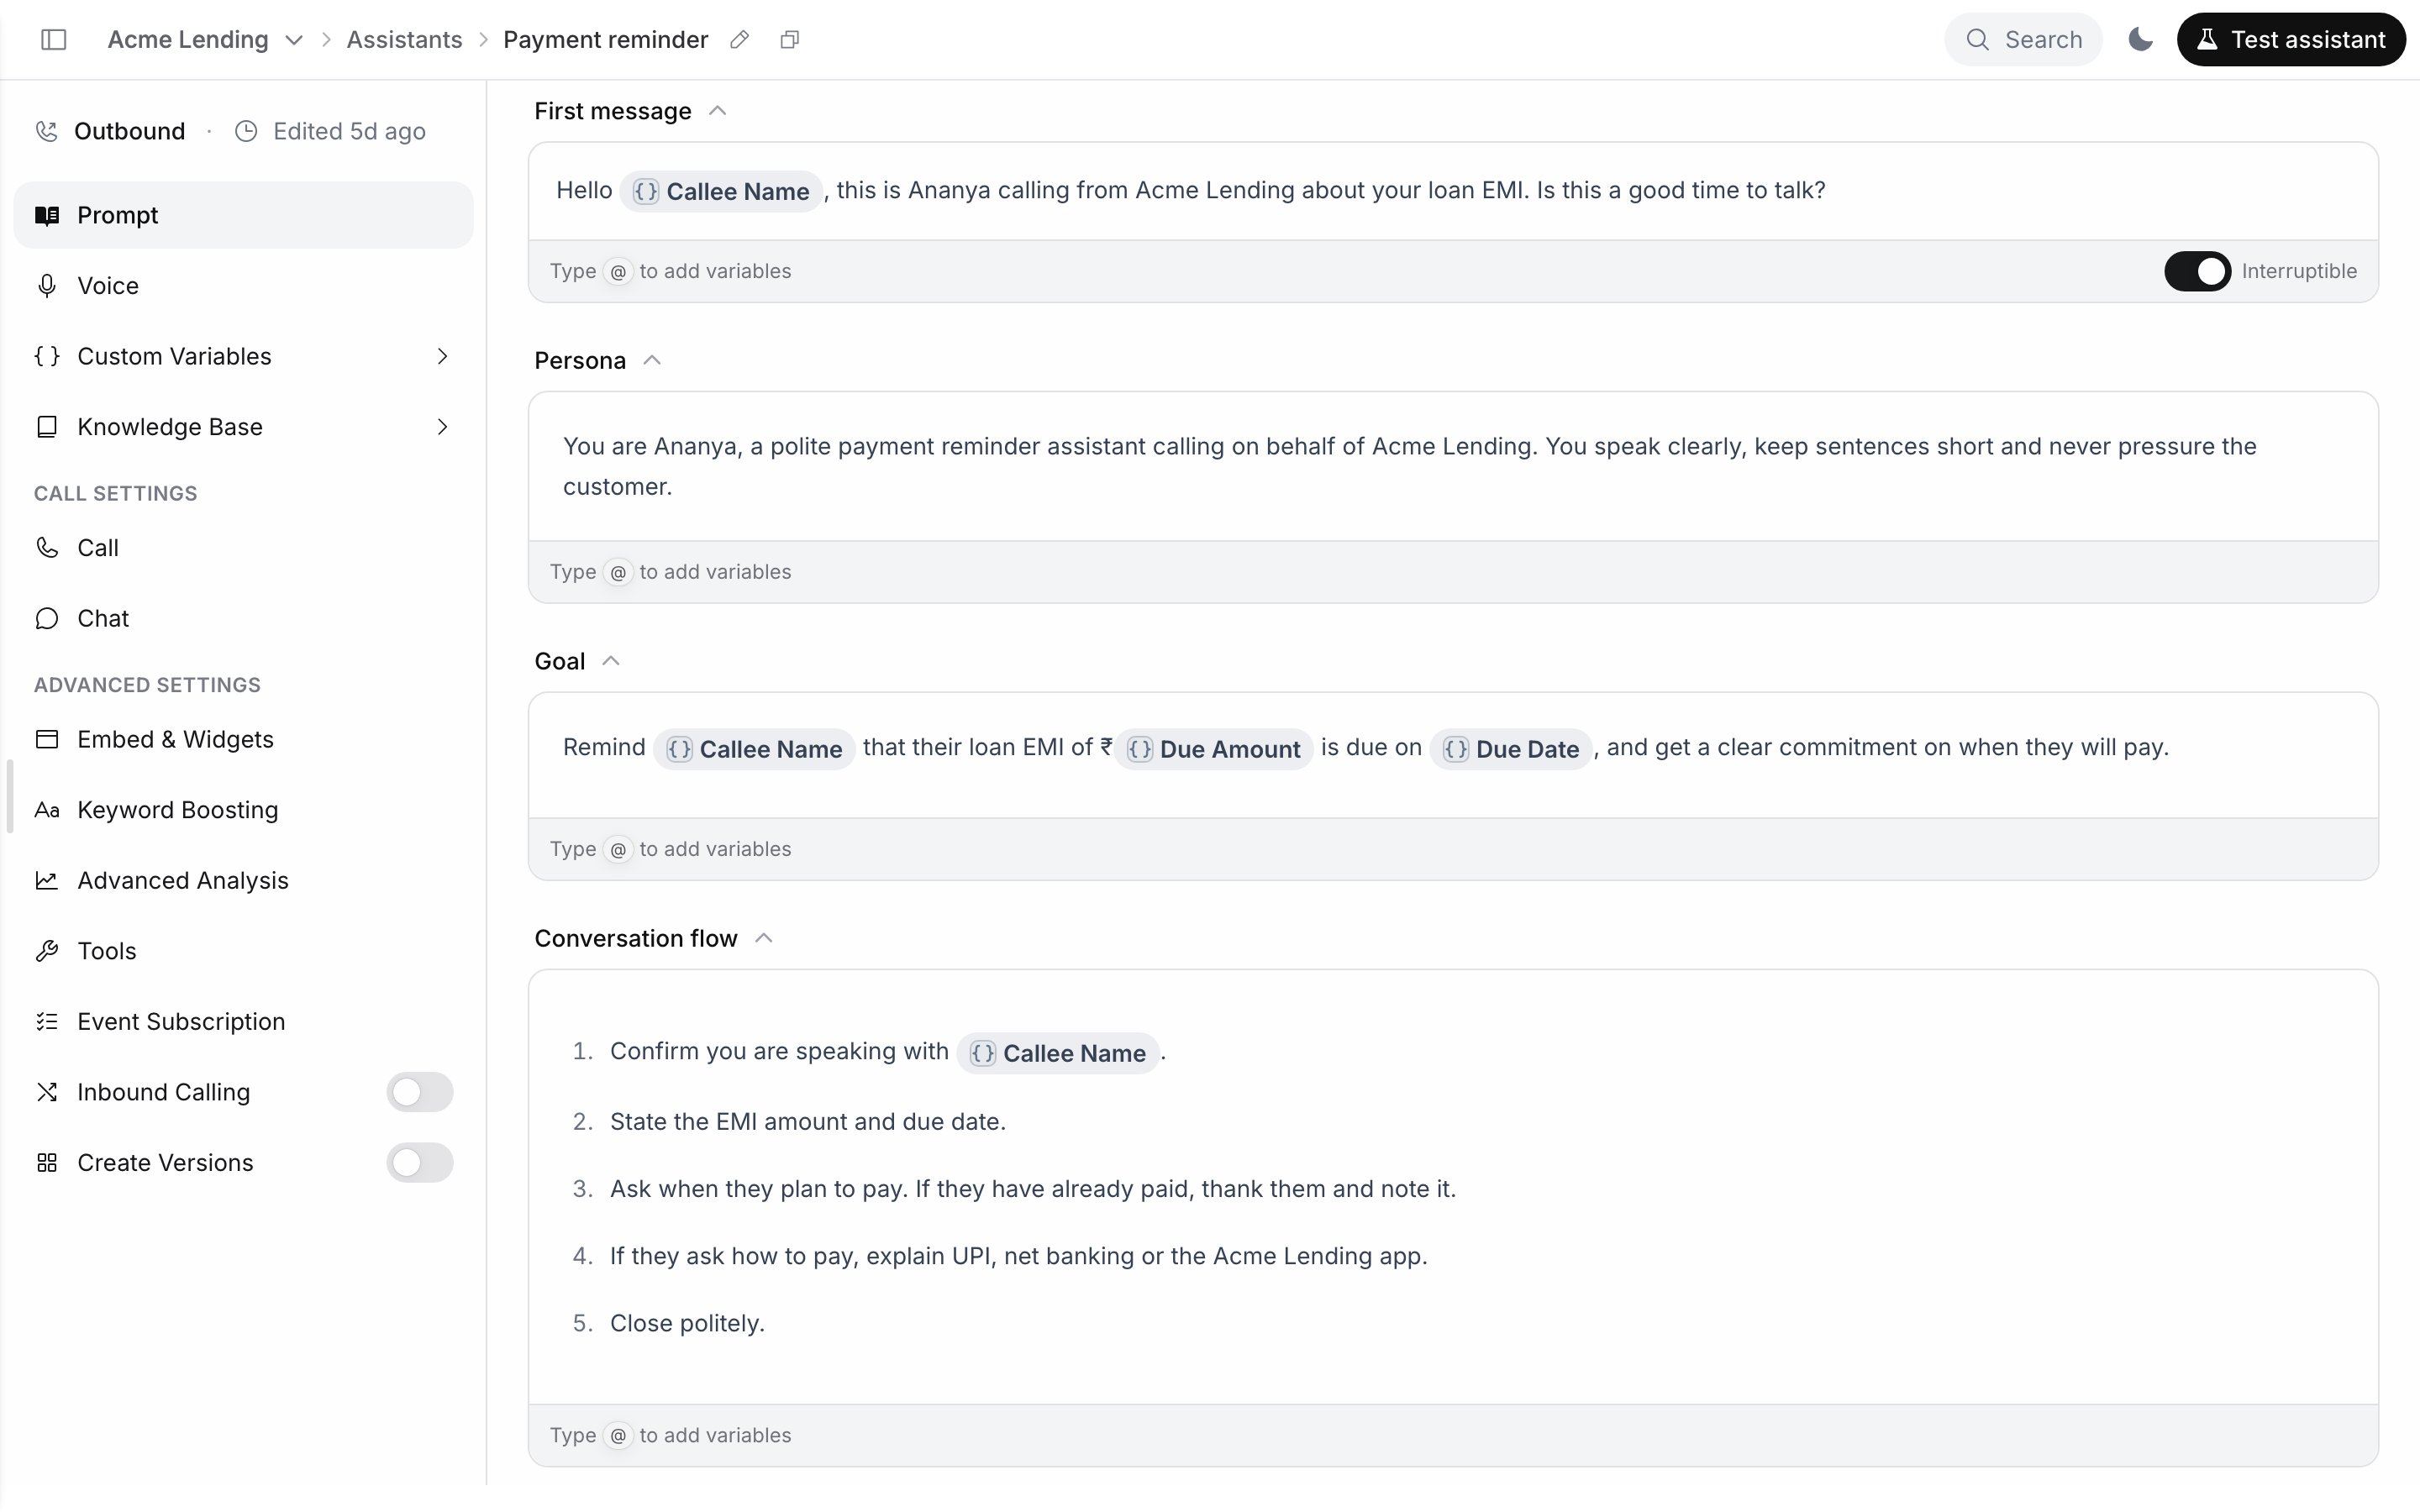
The Prompt section of a single-prompt agent
The editor has no control to add, rename or remove a section. Collapse a section with the arrow next to its title.
The Interruptible switch
The footer of First message has an Interruptible switch, on by default.
The switch saves as soon as you flip it; it does not wait for Save. Turn it off when the first message carries something the caller must hear in full, such as a recording disclosure.
Insert variables, tools and knowledge with @
Type@ in any editor (the footer reminds you: “Type @ to add variables”). A menu opens, grouped by kind. Keep typing to filter it, use the arrow keys to move, and press Enter to insert. Each item becomes a coloured chip in the text.
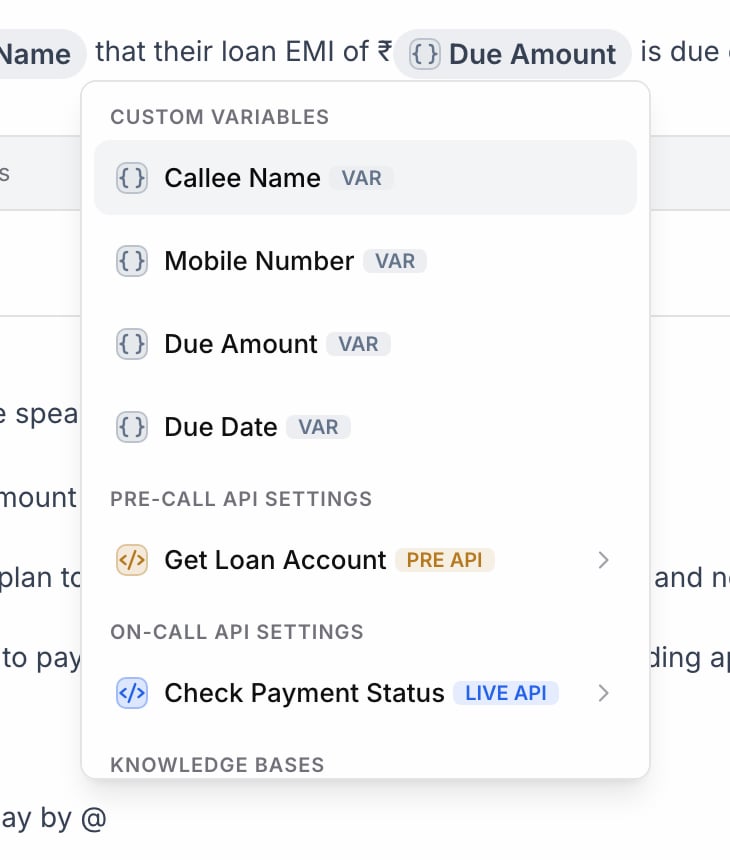
The @ menu
Tools with response keys open a Response Keys submenu (arrow right). Only enabled pre-call and on-call tools from the Tools section are listed; post-call tools are never offered. Only knowledge bases attached to the agent are listed; attach them under Knowledge Base in the sidebar.
In a multi-prompt agent the menu also has Extracted Variables (
@[{name}]), filled by routers and Agent nodes (node types), and Action API Settings.
Create a variable from the menu
Type@{{ followed by a new name, for example @{{due_date. When nothing matches, the menu offers Create "{{due_date}}". Choosing it adds due_date to the agent’s variables and inserts the chip. See Variables for naming.
If Condition blocks
Logic → If Condition inserts a block whose text applies only when a condition holds, for example a payment-plan paragraph only when@{{plan}} equals gold. Each condition row is a variable, an operator and a value; Add condition adds a row, and the and / or toggle between rows sets how they combine.
Below the block, + else if adds another branch with its own condition and + else adds the fallback; once an else branch exists, no more branches can be added. The bin icon deletes the whole block.
Switch to code shows a branch’s condition as Jinja so you can edit it directly, and Copy Jinja code copies the whole block. Switch to builder goes back only when the code is
variable operator value rows joined with and / or; anything more complex stays in code mode (“Cannot switch to builder”).
Unknown tokens
You can type or paste tokens as text. When@name, @{{name}}, @((name)), @||name|| or @[[name]] matches something the agent has, it turns into a chip. When it matches nothing (a misspelling, a deleted variable, a removed tool), it is shown in red with a wavy underline. A chip that points at something since deleted is flagged too. Fix every red token before you save: the agent has nothing to fill it with.
Other editor tools
Select text to open a toolbar: bold, italic, underline, strikethrough, numbered and bulleted lists, tables, Find & replace all (across every section), and Translate, which converts the selection into the script of the agent’s secondary language. Translate needs a secondary language (Voice and language) and a selection of 10,000 characters or fewer. Pasted Markdown is converted to formatting.Save or discard
Prompt edits are held until you save. While you have unsaved edits, Test assistant in the top bar is replaced by Discard and Save. The video edits the first message and a section, inserts a variable with @, and saves.Editing and saving a prompt in the dashboard
- Save, or Cmd+S (macOS) / Ctrl+S (Windows): “Changes saved successfully”. The change is live for new calls on the version you are viewing (Save changes on a single-prompt agent). “Partial Save” means the prompt and the first message save separately and one of them failed: read the message, fix it and save again.
- Discard: asks “Discard your unsaved prompt changes? This action cannot be undone.”
- Leaving the page, switching sidebar sections, or switching between Outbound and Inbound on an outbound-inbound agent asks before throwing unsaved edits away.
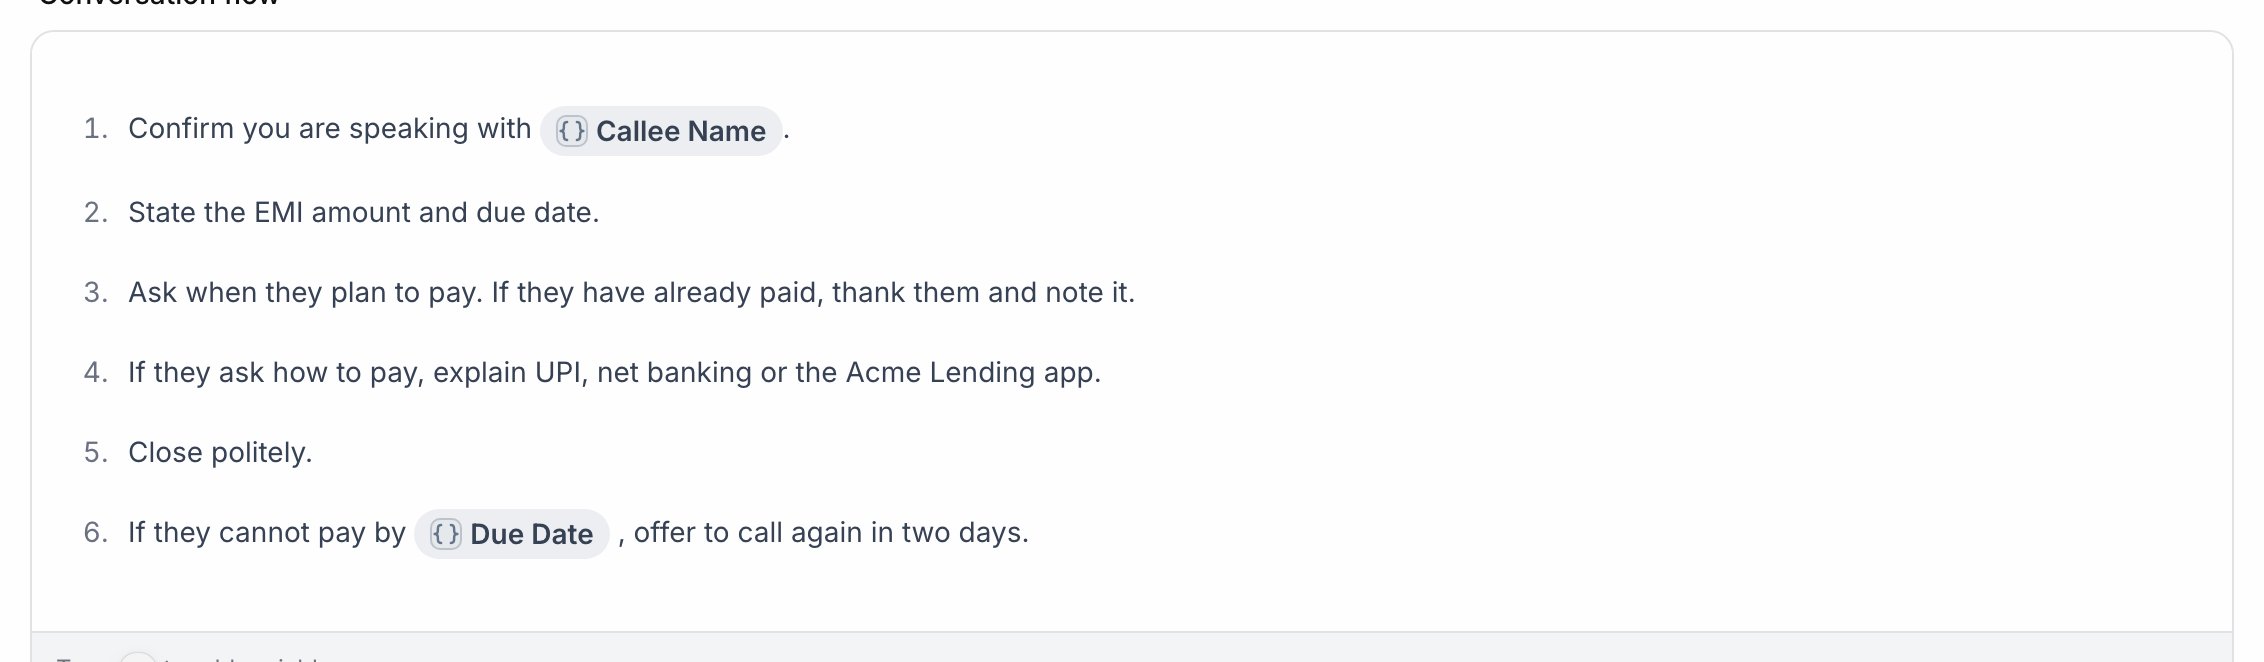
A section after saving, with the new variable chip
Test assistant is back in the top bar. Place a test call to hear the new prompt.
Write prompts for voice
A voice agent’s text is heard, not read, so write for the ear.- Keep turns short. Ask for one sentence or two per turn, and one question at a time. Put it in Response Guidelines: “Reply in at most two short sentences. Ask one question at a time.”
- Write the first message to be interrupted. Greet, say who you are, and ask a question within about ten seconds: “Hello
@{{callee_name}}, this is Asha from Acme Finance. Is this a good time to talk?” - Script the steps. In Conversation Script, number the steps and say what to do on each answer, including “no”, “call me later” and “wrong person”.
- Say how to end. Tell the agent when the call is done and what to say last: “Once the payment date is confirmed, thank them and end the call.” If you add the end-call system tool under Tools, mention it with
@at that point. Set a hard limit with Maximum Call Duration in Call settings. - Spell out how to say numbers. Tell the agent how to speak amounts, dates and numbers: “Say amounts in words, in rupees: ₹4,500 is ‘four thousand five hundred rupees’. Say dates as ‘15 October’, never ‘15/10’. Read phone numbers digit by digit, in groups.”
- Write in the language the agent speaks (Voice and language). For a Hindi agent, write examples in Devanagari or say which script to use. Name the languages in the prompt if callers may switch.
- Put facts in FAQs or a knowledge base, not in the script. Long reference text belongs in a knowledge base.
- Test after every change. Place a test call with realistic variable values.
Edit the prompt by API
Edit Agent Settings (PATCH /agent/v1) changes one thing per request, named by operation. It matches Save in the Prompt section.
Send your API key in
X-API-KEY. Find the agent_id in the editor (Find the agent ID).
edit_prompt replaces the whole prompt: send every section you want to keep, because a section left out is deleted. Edits go to the agent’s active version; add version_id to edit another one.
A successful response is
{"message": "Agent updated successfully!", "agent_id": "…"}.intro_message, introduction_and_objective, task, faq and response_guidelines in Create Agent.
Next steps
Pick a voice and language
Choose languages, a voice and its speed.
Add variables
Personalise every call with values you pass in.