

@{{callee_name}} in the prompt becomes the right name on every call.
In the dashboard: Sidebar → Monitor → Campaigns → Create campaign → Upload calling list.
Uploading a list, setting the country code, mapping a variable by hand, ticking Remove invalid rows and transliteration, then the verification result
Before you start
An outbound agent
The campaign’s agent. Its variables decide the columns you need.
The agent's variables
Add a variable for each value that changes per contact.
File rules
Required columns
Every agent has two variables that cannot be removed, so every CSV needs at least two columns:string
required
The phone number to call (format). The column can have any header; you map it to
mobile_number.string
required
The person’s name. The column can have any header; you map it to
callee_name.@{{amount_due}} is due on @{{due_date}}”, the CSV needs columns for amount_due and due_date.
Example
A calling list for a “Payment reminder” agent whose prompt usescallee_name, mobile_number, amount_due and due_date:
payment-reminders.csv
customer_id, so it stays in the file unmapped.
Map variables to columns
After you choose a file, the Calling list settings card shows Map variables to CSV columns: one row per agent variable, each with a column dropdown (Select CSV column).- Auto-mapped variables are filled in (exact-name rule); map the rest by hand. Next stays disabled until every variable has a column.
- The variables listed are those of the agent’s latest version. A variable added to the agent later is asked for on the next campaign.
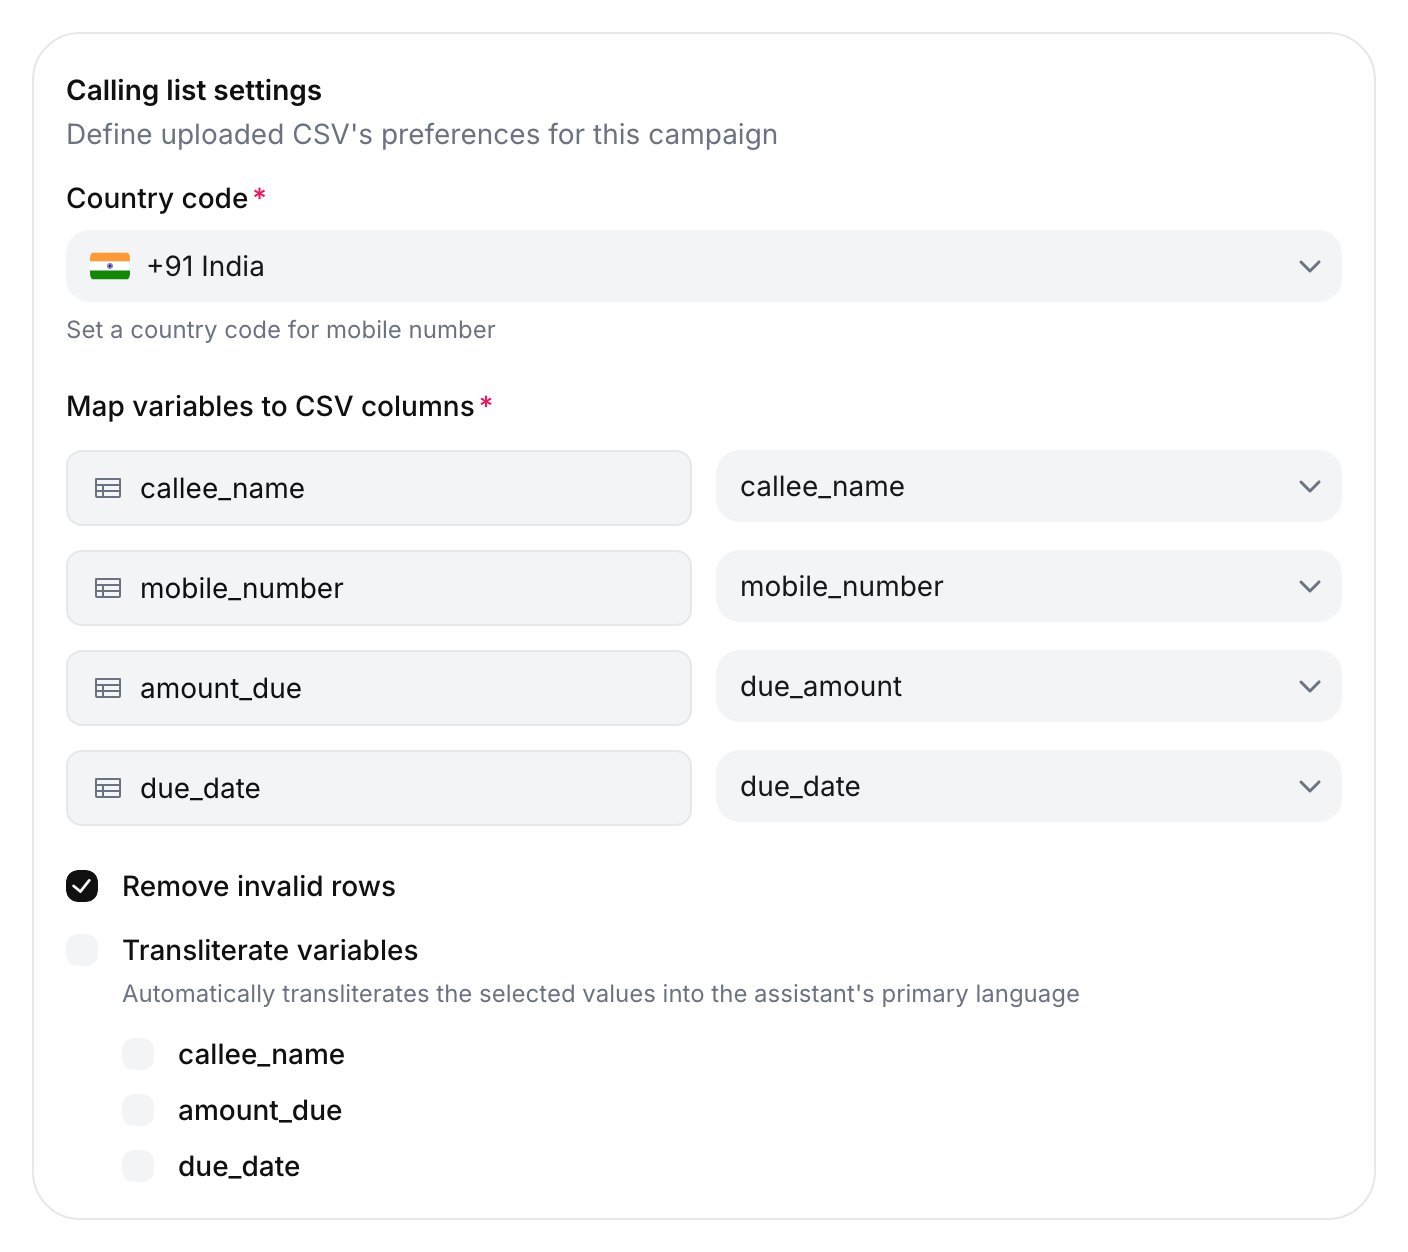
Calling list settings after mapping variables
variables_map field of Upload campaign contact list and Upload large campaign CSV:
string
required
A JSON string of
{"variable_name": "CSV column"}, one entry per agent variable.After Next, the dashboard shows “CSV verified successfully” and opens step 2 of Create a campaign.
Phone numbers and country code
You pick one Country code for the whole list (“Set a country code for mobile number”). It defaults to +91. Choose the country of the people on the list, for example +1 for a US list. Write numbers in national format,9876543210 for an Indian mobile under +91, or with the code: +919876543210, 919876543210 and 09876543210 are read the same way. Spaces, dashes, dots and brackets are ignored.
In an Assistant campaign, the selected code replaces any code already on a number. Under +91, +447700900123 is dialled as +917700900123. To call several countries, create one campaign per country code.
Invalid rows
During verification, Ringg checks each row and counts the ones it can’t call as invalid. A row is invalid when its phone number is missing, when the number is not valid for the chosen Country code, or when itscallee_name could not be transliterated. Duplicate numbers are not invalid: each row gets its own call.
- Invalid rows are never called; the rest of the list is used. Remove invalid rows is on by default. Off, you also get an email with the invalid rows attached.
- Through the API, Upload campaign contact list (
POST /campaign/save) withremove_invalid_rowsset tofalsefails the whole upload if any row is invalid. - When verification finishes, step 2 shows Total rows, Valid contacts, Successful upload (for example
98/100 uploaded) and, if any, Invalid rows with a Download invalid rows button. The download is a CSV of the rejected rows (invalid_entries.csv). - After launch, the campaign’s detail panel shows “N invalid entries” with a Download button.
- If every row is invalid, the campaign gets the status No Valid Contacts and a “No valid contacts” message appears (what to do).
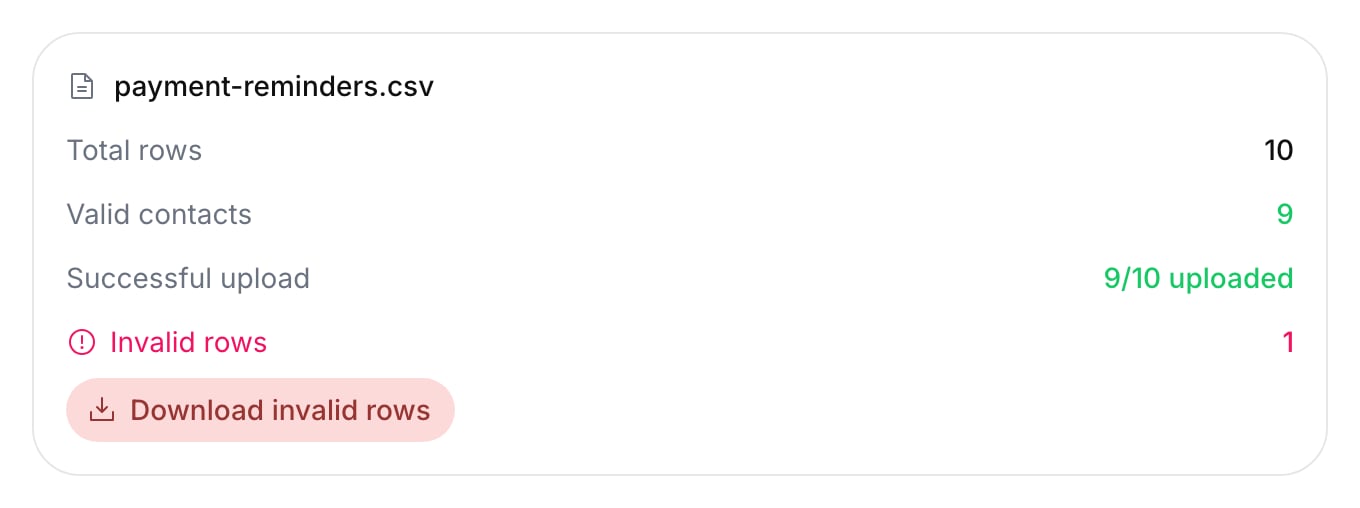
Upload summary after verification
Transliteration
Transliterate variables rewrites the values of the variables you tick into the agent’s primary language before the calls. Use it when the list holds names in Latin script and the agent speaks Hindi, soPriya Sharma is read out naturally.
It is off by default. Tick the parent checkbox to select every variable, or tick single ones. mobile_number is not offered.
Through the API:
transliterate_fieldsis a JSON string array of the agent’s variable names (not CSV headers), such as["callee_name"]. Each must be mapped invariables_map;mobile_numberis refused with400. This is the field the dashboard sends.transliterate_callee_name(trueorfalse) coverscallee_nameonly. Sent withtransliterate_fields, the two are combined.
POST /campaign/upload-csv) and Upload campaign contact list (POST /campaign/save) accept both fields. If the agent has no language set, values are left as they are.
Troubleshooting
Next stays disabled after I upload the file
Next stays disabled after I upload the file
A variable is still unmapped: every variable needs a column in Map variables to CSV columns. Other causes are in Create a campaign.
A column is not auto-mapped
A column is not auto-mapped
Auto-mapping needs the header to match the variable name exactly, including case and underscores. Rename the header (
callee_name, not Name) or pick the column by hand.Campaign shows No Valid Contacts
Campaign shows No Valid Contacts
Every row failed verification. Check the phone numbers against the chosen Country code first. Download the invalid rows, fix them, and create a new campaign.
Next steps
Create a campaign
Upload this file, set calling windows and retries, and launch.
Launch a workflow campaign
Start one workflow run per row of the same kind of list.