

Objective
Know when a multi-prompt agent beats a single prompt, and read a flow of nodes and routers.The scenario
Ananya does fine with one prompt. Acme’s loan application line has strict steps: confirm identity, capture a PIN code, check eligibility in an API, branch on the result. That is a multi-prompt agent, a graph of nodes where each does one job. A single prompt is simpler to build and maintain; choose multi-prompt for keypad menus, capture or an API lookup before the next question. Ananya stays single-prompt; this lesson builds a small flow beside her as a sandbox. If her editor offers Convert to multi-prompt under More (only for a prompt Ringg judges large enough), that works too: it creates a separate agent and leaves her unchanged.Hands-on
Working on the multi-prompt canvas
1
Create it
Click Assistants, then Create agent. On the Outbound tab, under Create from scratch, click Multi Prompt. There is no form: the canvas opens on Untitled Workflow with a Start node and the variables
callee_name and mobile_number.2
Add an Agent node
Click the dot on Start’s output. The picker lists the node types; those the connection rules block are greyed out, and hovering explains why. Pick Agent. In the panel on the right, write an Objective (“Greet the caller and confirm you are speaking to the loan applicant”) and an Intro Message. Click Save.
3
Add a router
From the Agent node’s output, pick Router, then LLM Router. Write two Conditions in plain language: “When the caller confirms their identity” and “When it is the wrong person”. The Agent node before it makes the routing decision, so this router shows no Retry behavior or Fallback.
4
End both branches
From each router branch, add End. Click Organize nodes to lay the flow out left to right.
5
Read Global Settings
Click empty canvas. The right panel shows Global Settings: voice, custom variables, knowledge base, Advanced Analysis, pre-call and post-call tools. On-call tools attach per Agent node.
6
Publish
The banner above the canvas reads This workflow has not yet been published. Click Publish and confirm. If the banner turns red, click Review issues, fix each one and publish again.
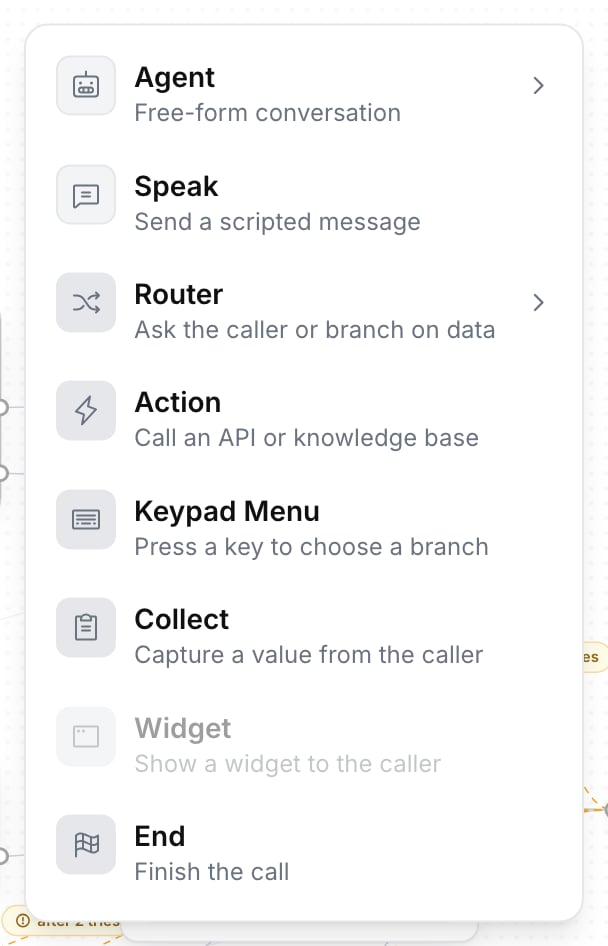
The node picker, opened from a router branch
Checkpoint
The canvas shows Start → Agent → LLM Router, with each branch ending in End. After the publish, the banner is gone and Test assistant is back in the top bar. On the Agents page, the agent sits under the Multi-node filter.
Exercise
From the Start node, try to add an End node directly. Expected result: End is greyed out in the picker, and hovering it gives the reason: Start connects only to Agent, Speak, Logic Router or Action. Keep the agent as a sandbox; Ananya is unaffected.What you learned
- A multi-prompt agent is a graph: Agent nodes talk, Speak says a fixed line, routers branch (LLM Router on what the caller says, Logic Router on data), Action calls an API, Collect captures a value.
- Edits go into a draft and reach callers when you publish; a single-prompt agent goes live on Save.
- The picker enforces the connection rules: an Agent node hands off only to an LLM Router or End.