> ## Documentation Index
> Fetch the complete documentation index at: https://docs.ringg.ai/llms.txt
> Use this file to discover all available pages before exploring further.
# Exotel Integration
> Configure Exotel as your Ringg telephony provider for inbound and outbound calls
## Overview
Use this guide to connect an Exotel account to Ringg for BYOT voice calling. Exotel requires separate applet setup for outbound and inbound calls:
* **Outbound calls** use a **Ringg Outbound** Voicebot applet. This applet ID is added to the Ringg Exotel provider configuration.
* **Inbound calls** use a **Ringg Inbound** Voicebot applet. Each inbound number must be attached to this applet in Exotel before you import or assign the number in Ringg.
## Prerequisites
Before you start, make sure you have:
* An active Exotel account with API access
* Exotel account SID, API key, API token, and subdomain
* At least one Exotel phone number, also called an ExoPhone
* A Ringg workspace with admin access
* A Ringg assistant ready to receive calls
## Step 1: Prepare Exotel
### Create or verify your Exotel account
1. Sign in to the [Exotel Dashboard](https://my.exotel.com).
2. Complete KYC verification if it is required for your account.
3. Add enough credits for number rental and calling.
### Get API credentials
In the Exotel dashboard, go to **Settings** → **API Settings** and copy these values:
```bash Credentials theme={null}
ACCOUNT_SID=example1234
API_KEY=a1b2*********ci9j0
API_TOKEN=z9y************t3s2r1q0
SUB_DOMAIN=api.exotel.com
```
You will enter these values in Ringg when you add Exotel as a telephony provider.
## Outbound setup
Use this section when you want Ringg to place outbound calls or campaigns through Exotel.
### Step 2: Create the Ringg Outbound applet
Create a custom Exotel Voicebot applet for outbound calls.
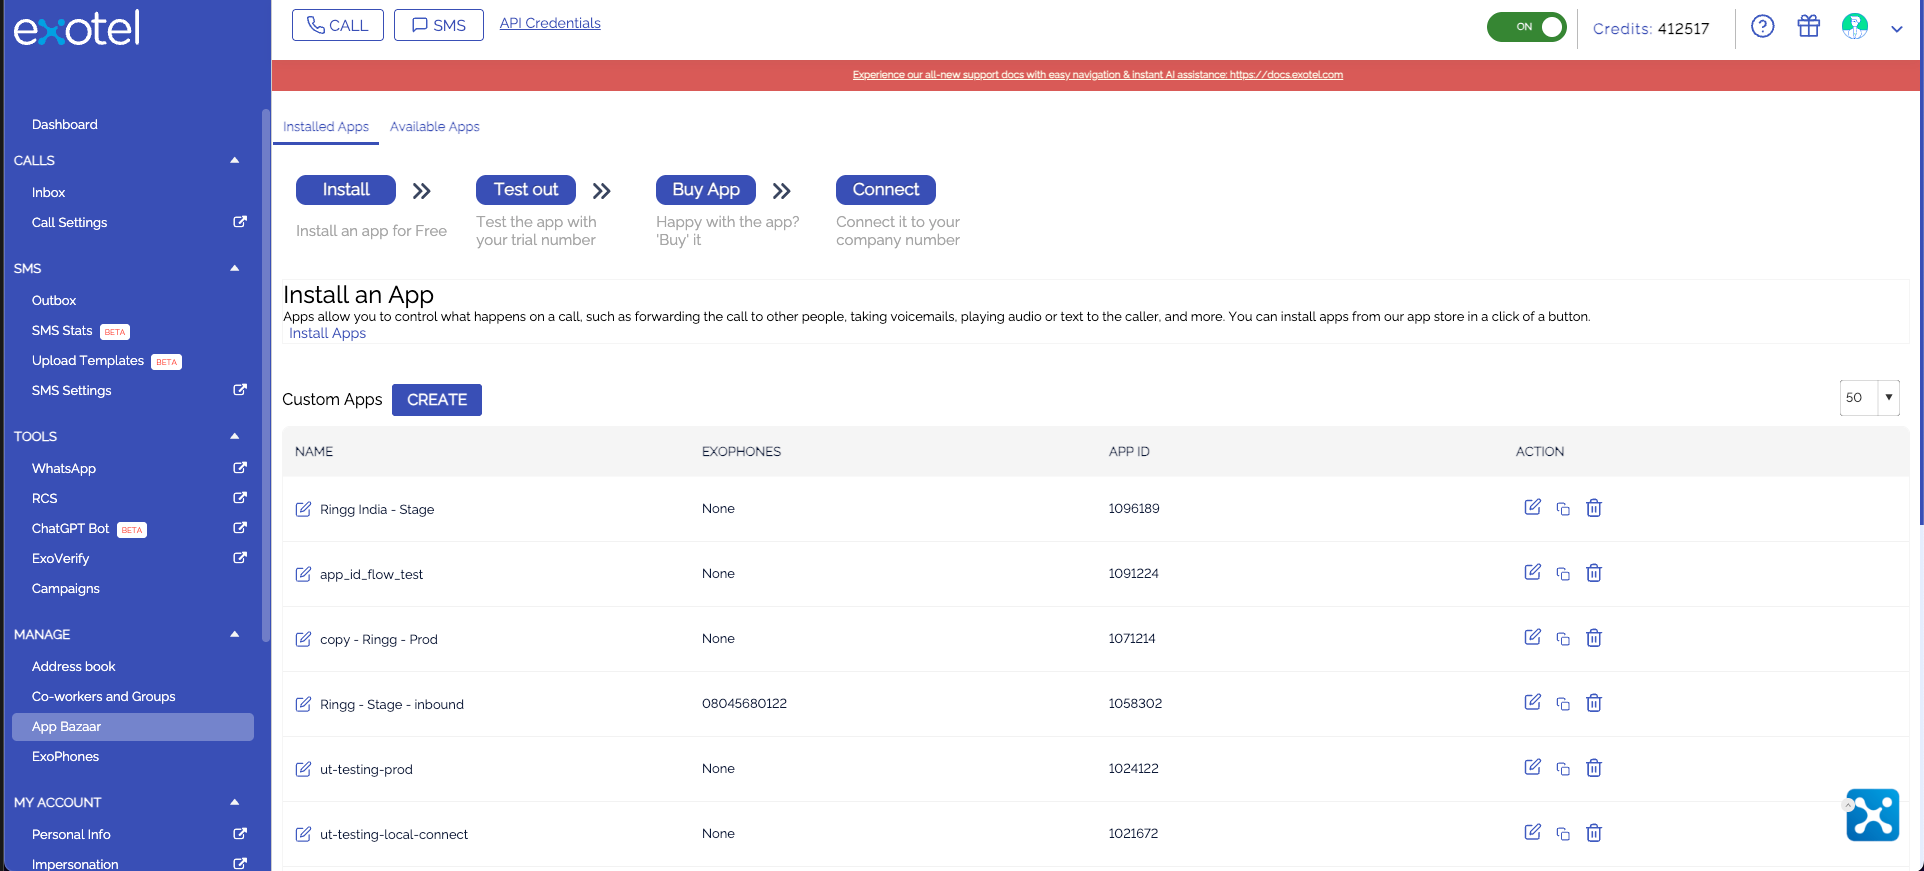
In the Exotel console, open **App Bazaar** and create a custom app.
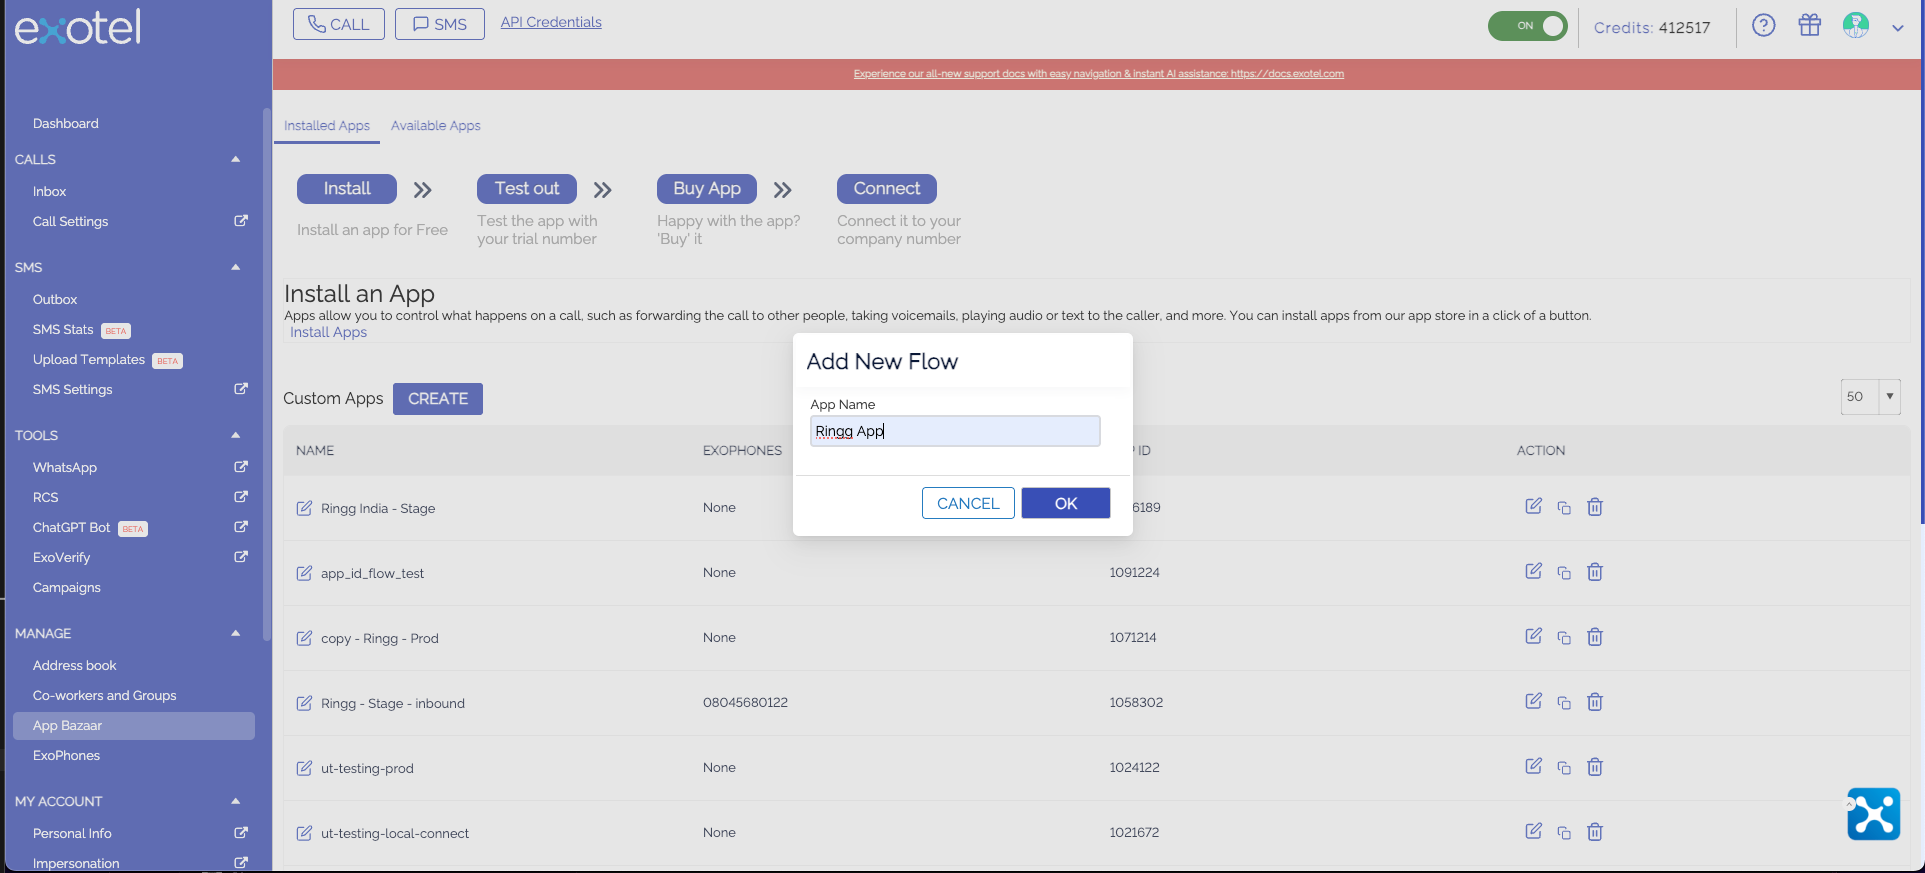
 Name the applet `Ringg Outbound`.
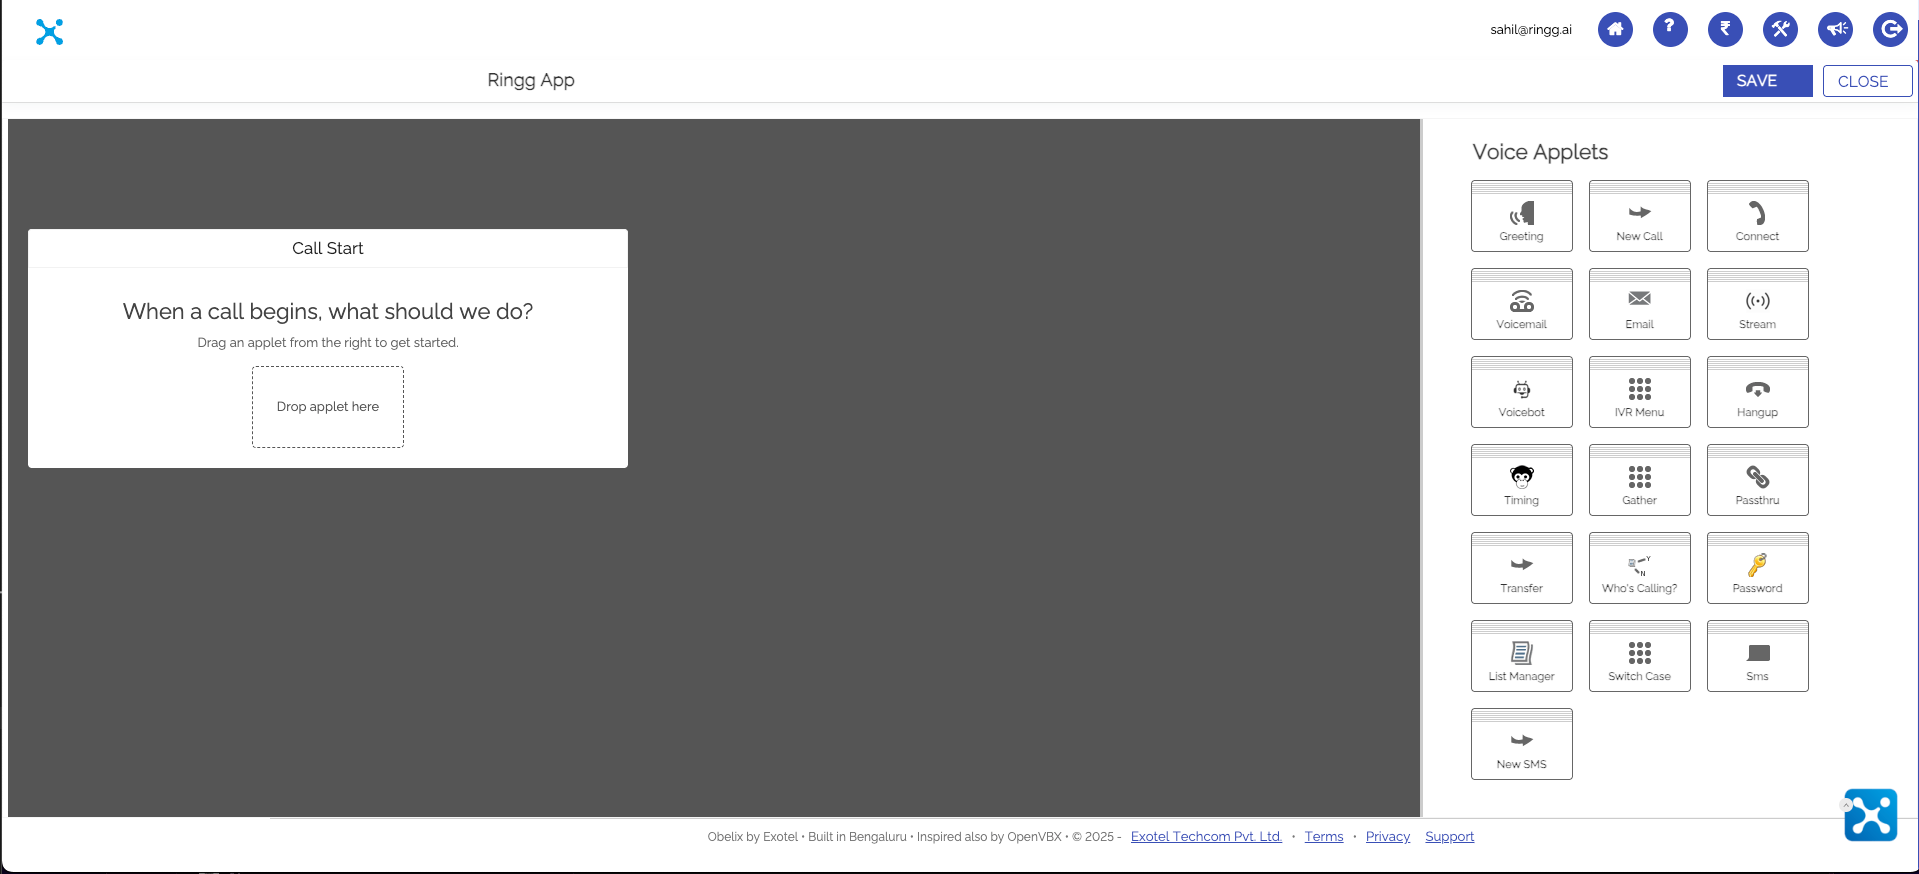
 Drag the **Voicebot** component into the applet flow.
 Configure the Voicebot component with the Ringg outbound WebSocket URL:
```text theme={null}
wss://use1-api.ringg.ai/pc/v1/exotel/ws
```
Configure the Voicebot component with the Ringg outbound WebSocket URL:
```text theme={null}
wss://use1-api.ringg.ai/pc/v1/exotel/ws
```
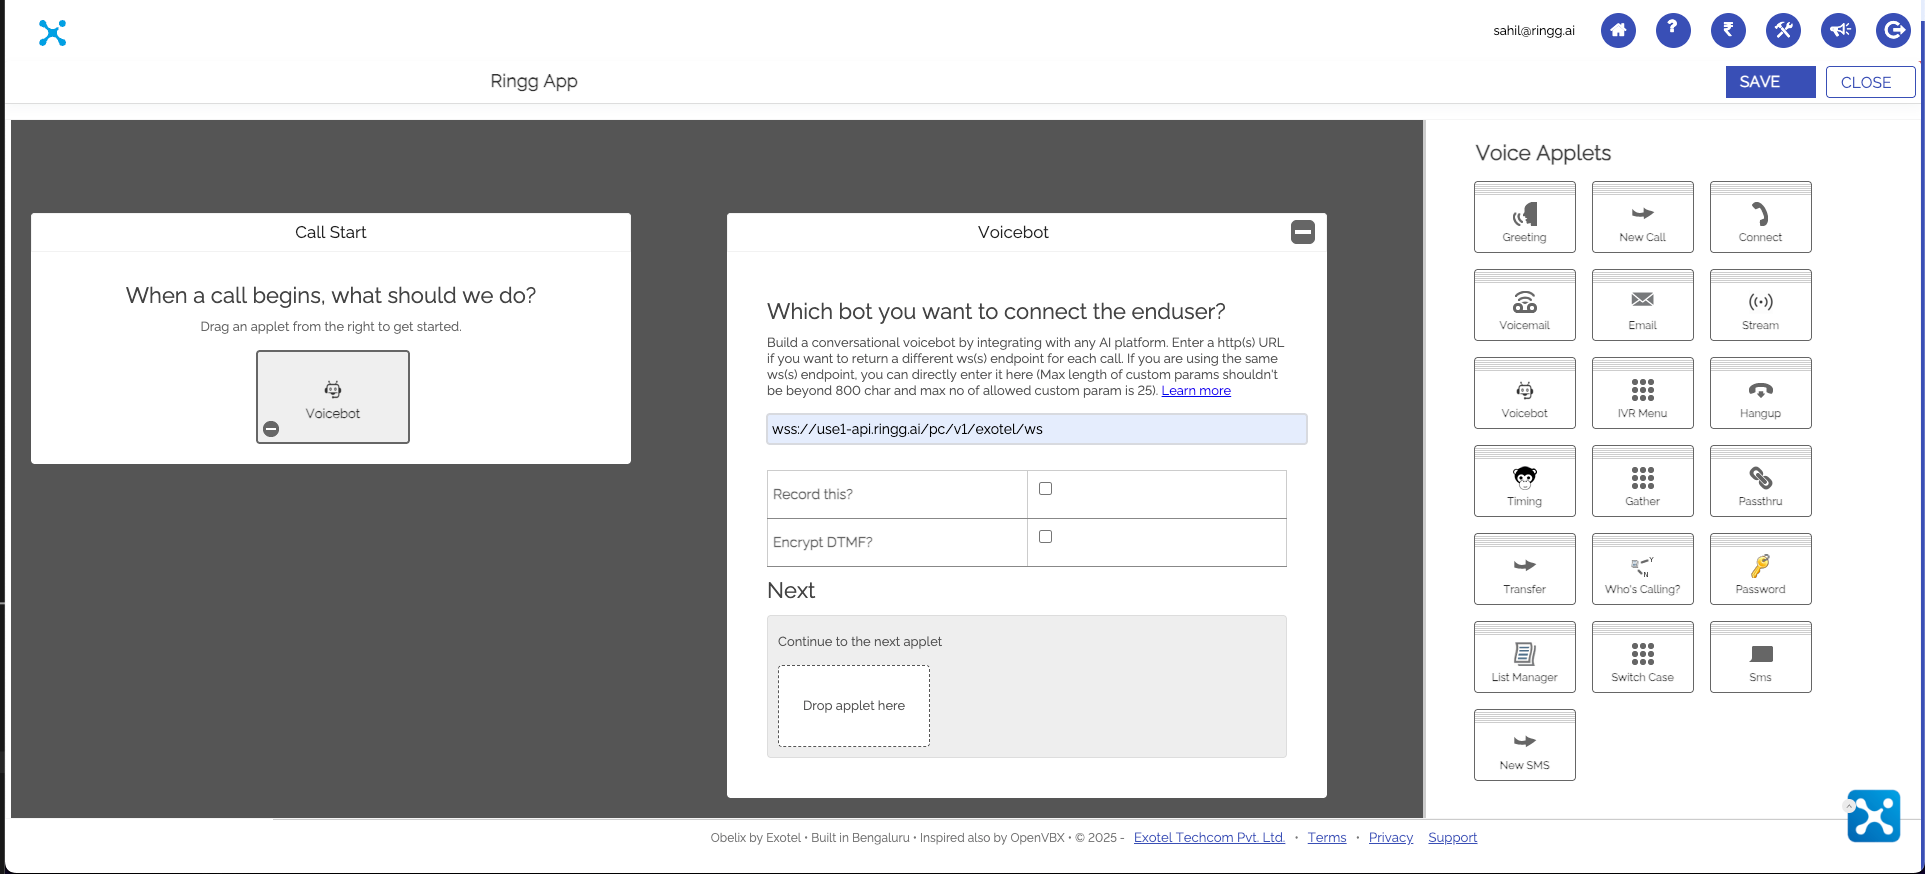 Save the applet and copy its app ID. You will enter this value as `APP_ID` in Ringg.
The outbound applet ID is different from the API key and API token. Keep it with the other Exotel credentials so you can complete the provider setup in Ringg.
### Step 3: Connect Exotel to Ringg for outbound
In the Ringg dashboard, go to **Integrations** → **Telephony Integration**.
Click **Add Telephony Provider** and select **Exotel**.
Save the applet and copy its app ID. You will enter this value as `APP_ID` in Ringg.
The outbound applet ID is different from the API key and API token. Keep it with the other Exotel credentials so you can complete the provider setup in Ringg.
### Step 3: Connect Exotel to Ringg for outbound
In the Ringg dashboard, go to **Integrations** → **Telephony Integration**.
Click **Add Telephony Provider** and select **Exotel**.
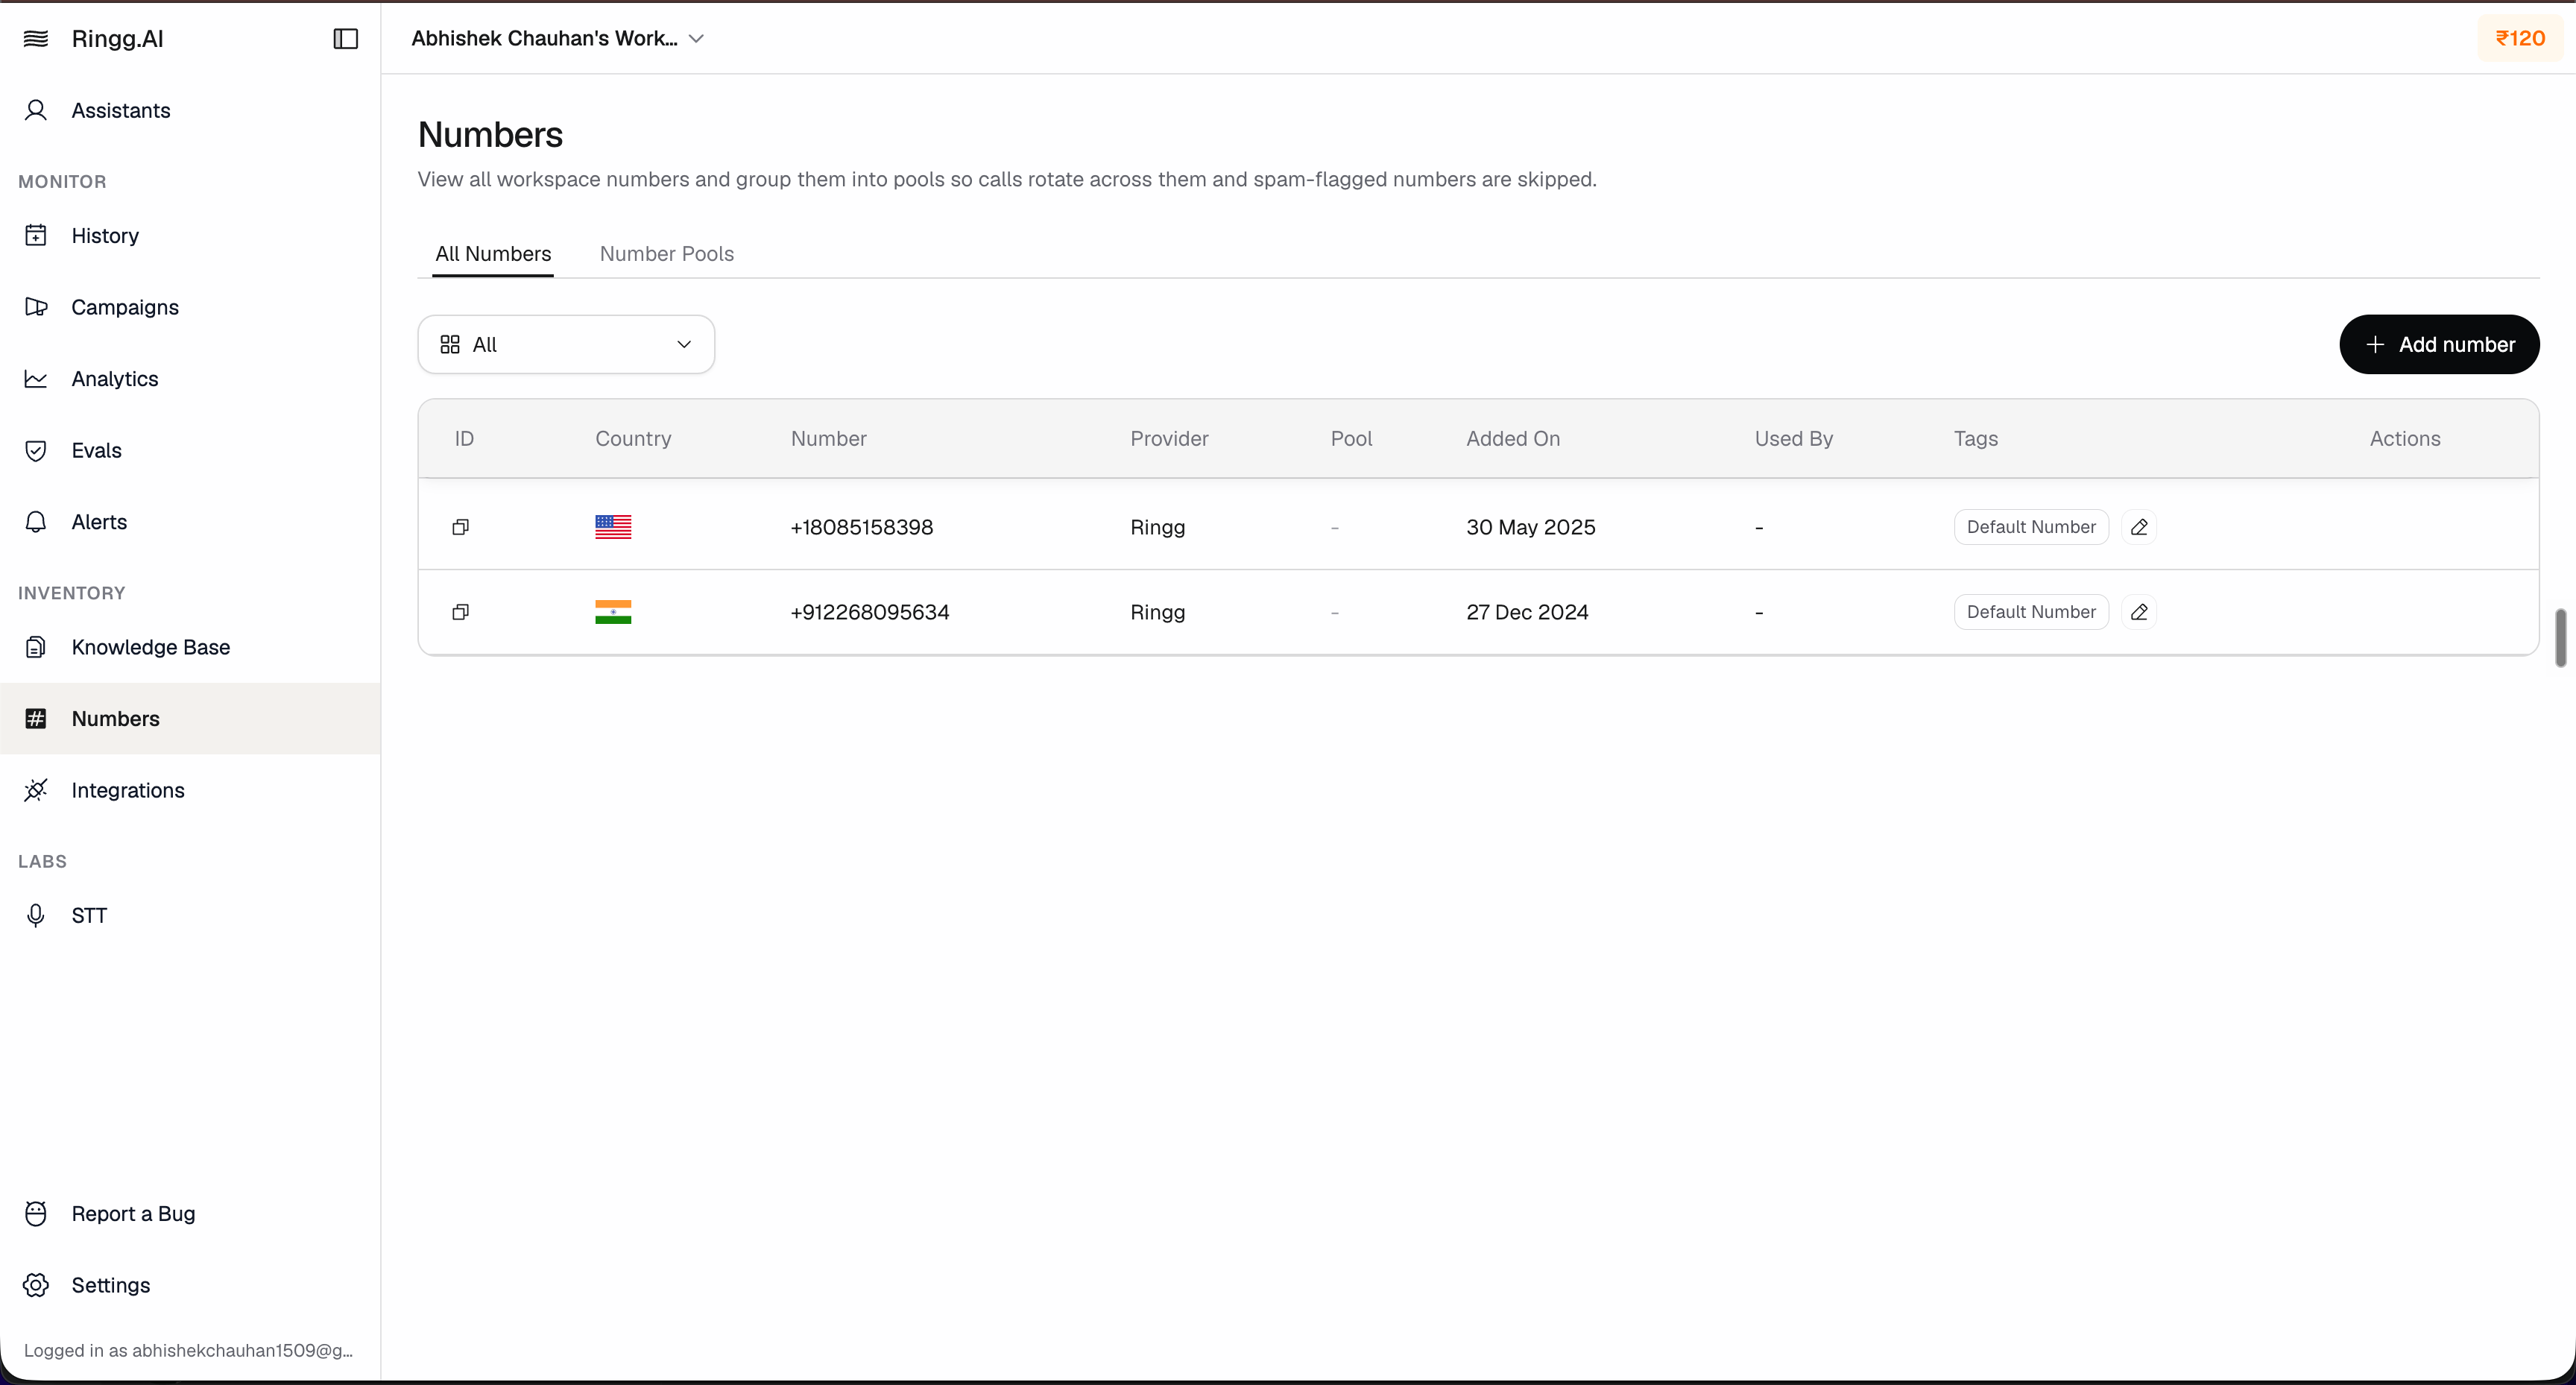 Fill in the Exotel provider form.
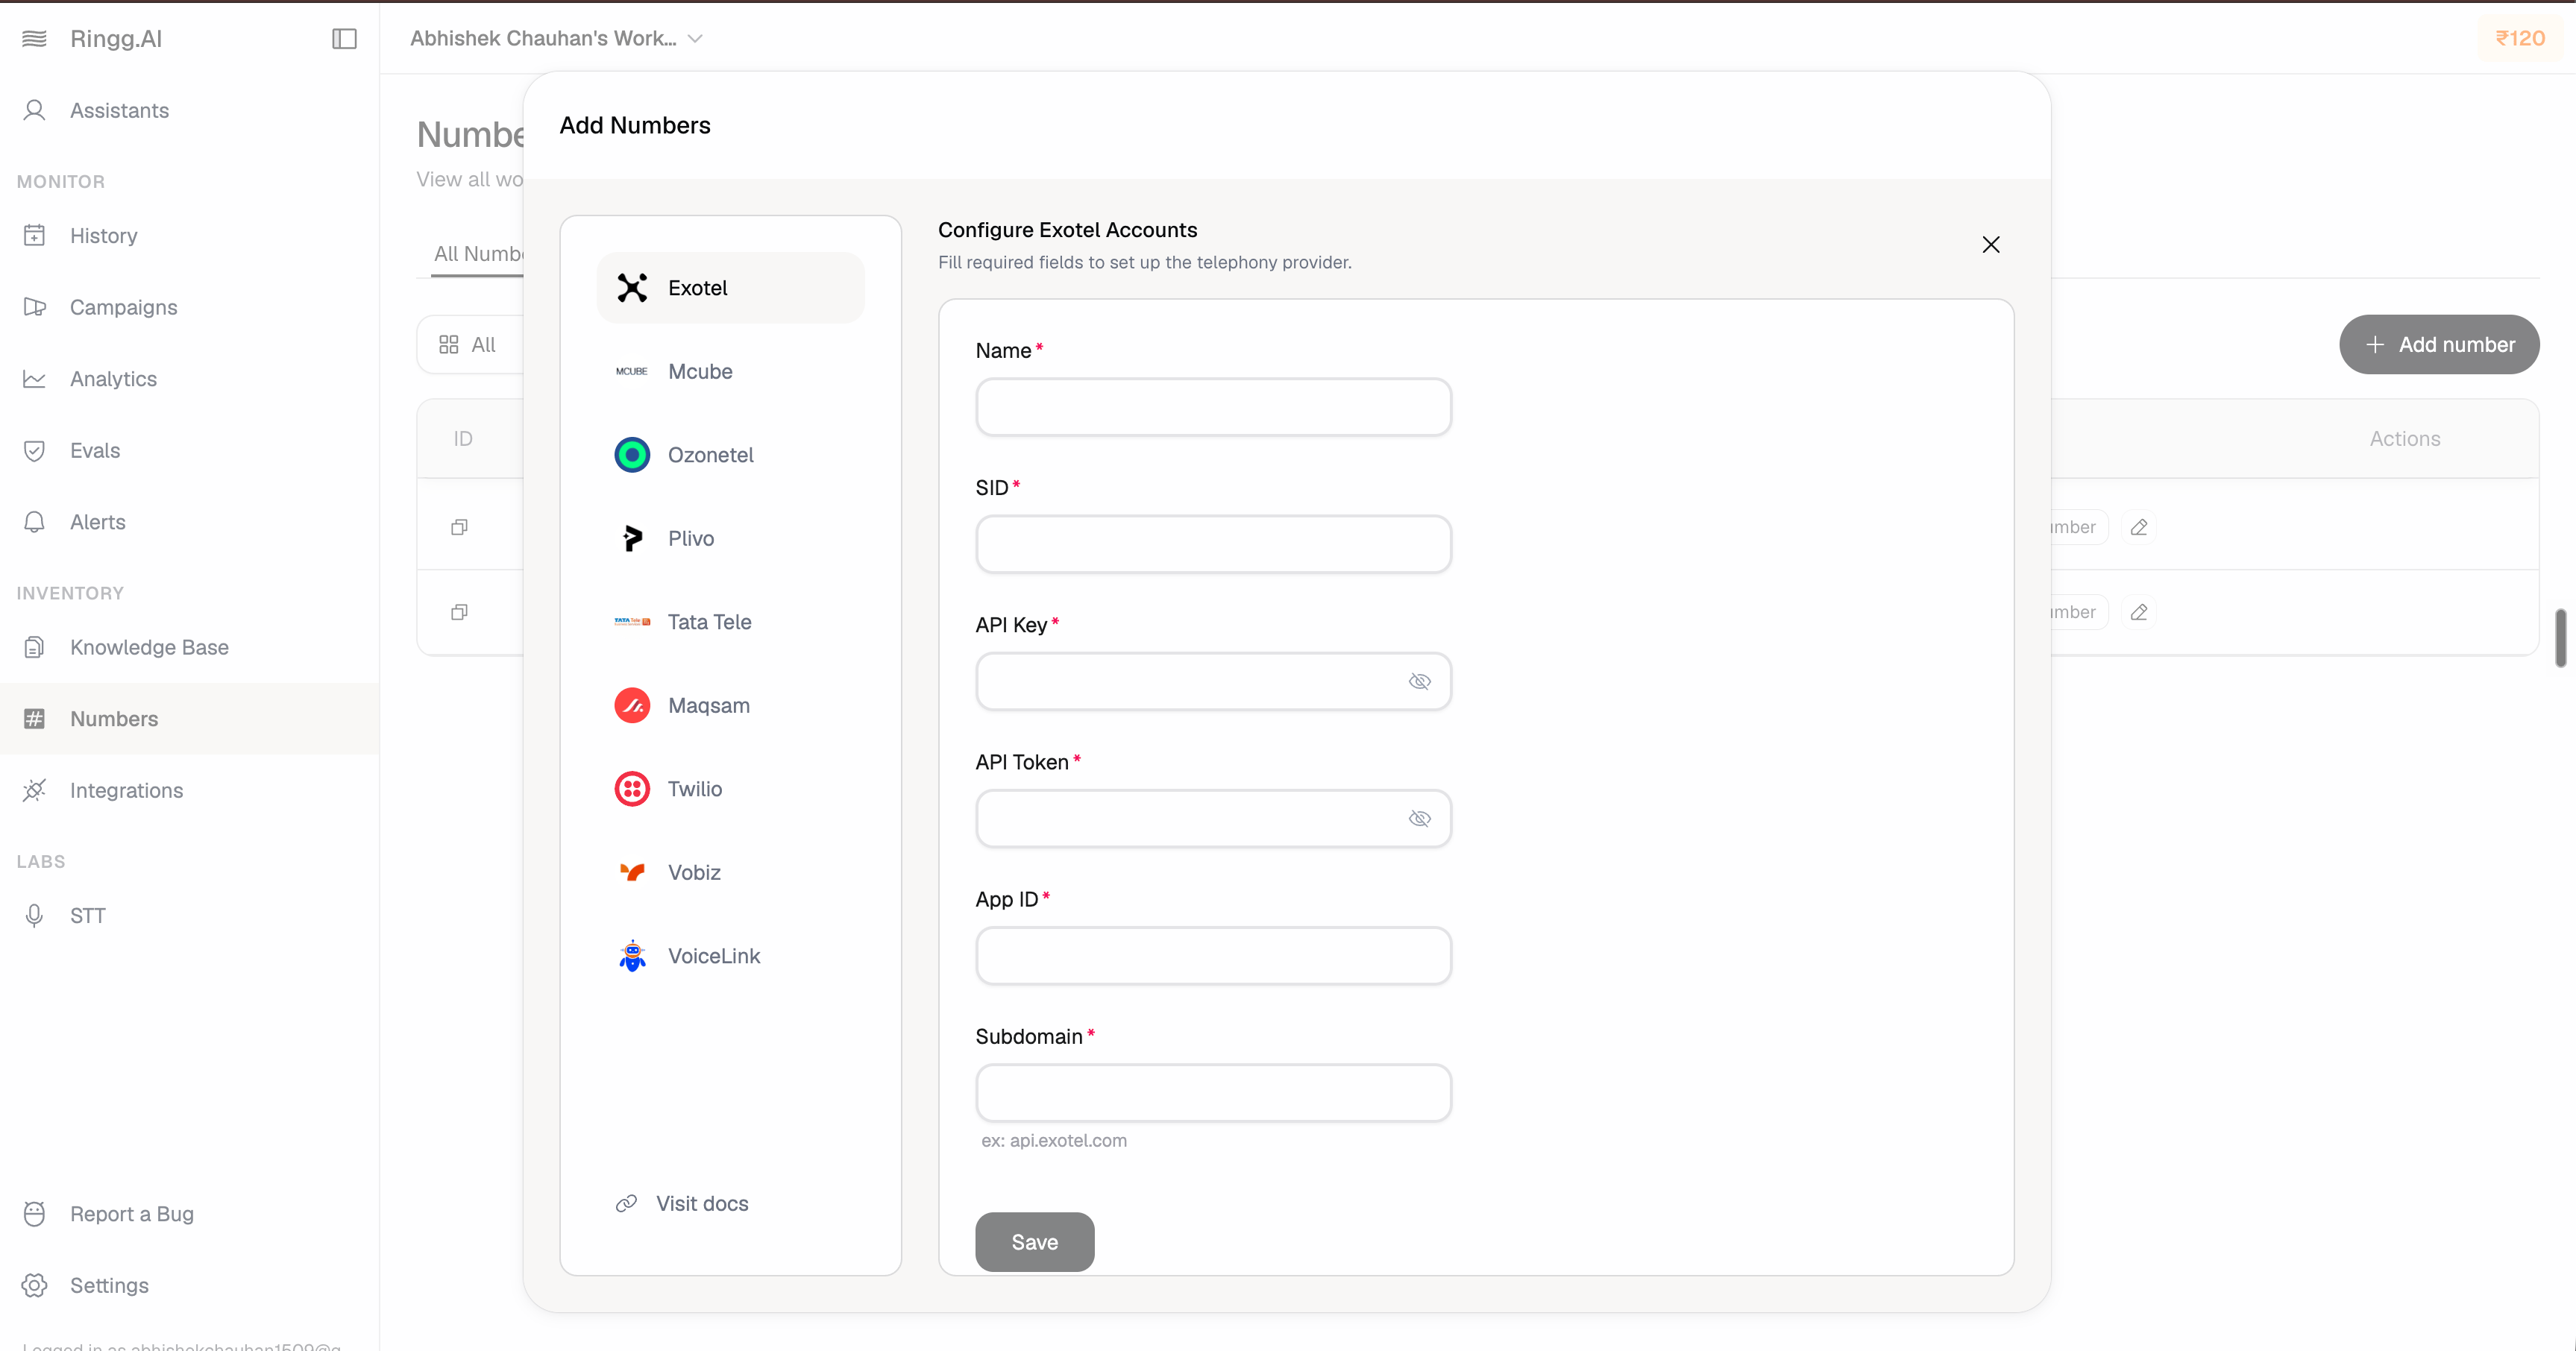 | Field | Value |
| ------------- | ------------------------------------------------------- |
| `ACCOUNT_SID` | Your Exotel account SID |
| `API_KEY` | Your Exotel API key |
| `API_TOKEN` | Your Exotel API token |
| `SUB_DOMAIN` | Your Exotel API subdomain, for example `api.exotel.com` |
| `APP_ID` | The `Ringg Outbound` applet ID from Exotel |
Click **Test Connection**. After the connection succeeds, save the provider.
After the provider is saved, Exotel appears in your Ringg workspace and can be used for outbound calls.
### Step 4: Use Exotel numbers for outbound calls
After Exotel is connected, manage outbound caller numbers from the Ringg dashboard:
* Buy numbers from the provider, if supported for your workspace
* Import existing Exotel numbers
* Use Exotel numbers as caller IDs for outbound calling
See [Number Management](/telephony/number-management) for the full number workflow.
For API-driven individual outbound calls, provide exactly one caller-number option: `from_number_id` or `from_number`.
## Inbound setup
Use this section when you want inbound calls to an Exotel number to reach a Ringg assistant.
### Step 5: Prepare the number for inbound import
To import and use an inbound Exotel number in Ringg, complete these three steps in order:
In the Exotel console, create a custom Voicebot applet and name it `Ringg Inbound`.
Add the Ringg inbound HTTP URL to the Voicebot component.
```text theme={null}
https://use1-api.ringg.ai/pc/v1/exotel/inbound
```
Attach the Exotel number to the `Ringg Inbound` applet in Exotel. Then import that number in the Ringg dashboard.
Every time you attach an Exotel number to an assistant in Ringg, attach that same number to the `Ringg Inbound` applet in Exotel. If the number is not attached to the inbound applet, inbound calls may not reach Ringg.
### Step 6: Assign the imported number to an assistant
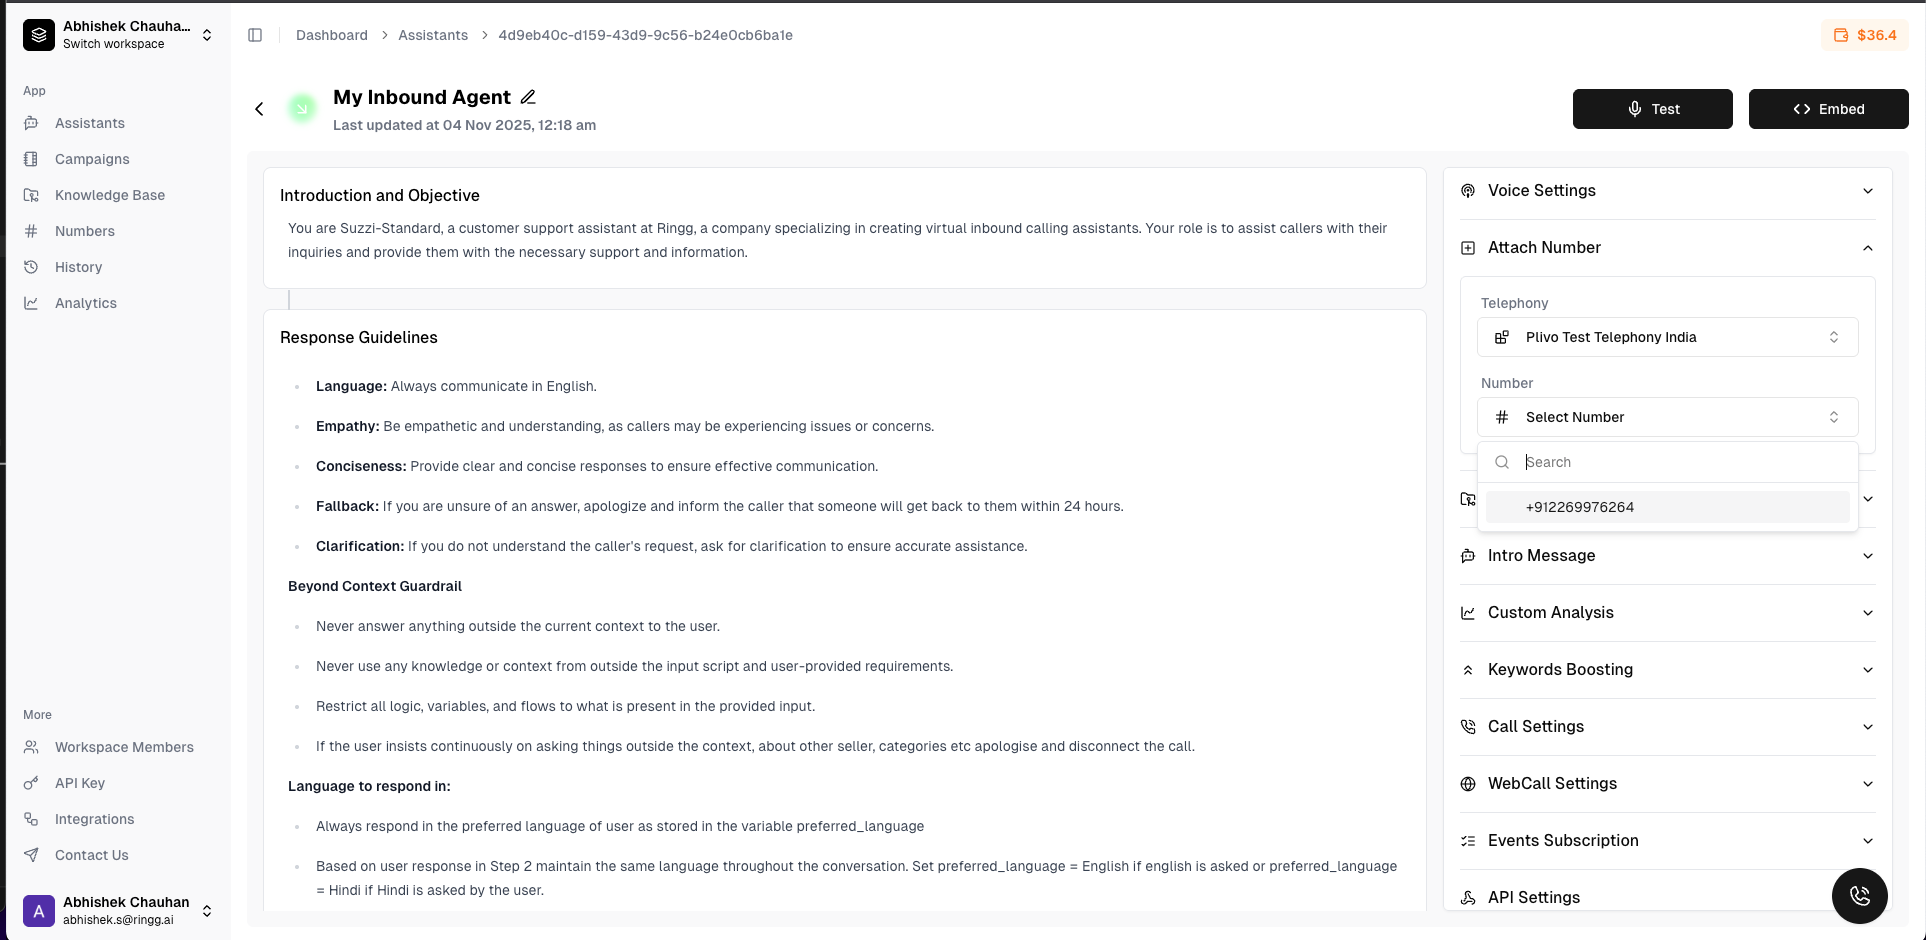
After the number is attached to the inbound applet and imported in Ringg, assign it to the assistant that should answer calls.
In the Ringg dashboard, go to **Numbers** → **Manage Numbers**.
Choose the imported Exotel number you want to configure.
Select the Ringg assistant that should answer inbound calls to this number.
Confirm recording, transcription, and webhook settings for the assistant or workspace.
Save the number configuration.
| Field | Value |
| ------------- | ------------------------------------------------------- |
| `ACCOUNT_SID` | Your Exotel account SID |
| `API_KEY` | Your Exotel API key |
| `API_TOKEN` | Your Exotel API token |
| `SUB_DOMAIN` | Your Exotel API subdomain, for example `api.exotel.com` |
| `APP_ID` | The `Ringg Outbound` applet ID from Exotel |
Click **Test Connection**. After the connection succeeds, save the provider.
After the provider is saved, Exotel appears in your Ringg workspace and can be used for outbound calls.
### Step 4: Use Exotel numbers for outbound calls
After Exotel is connected, manage outbound caller numbers from the Ringg dashboard:
* Buy numbers from the provider, if supported for your workspace
* Import existing Exotel numbers
* Use Exotel numbers as caller IDs for outbound calling
See [Number Management](/telephony/number-management) for the full number workflow.
For API-driven individual outbound calls, provide exactly one caller-number option: `from_number_id` or `from_number`.
## Inbound setup
Use this section when you want inbound calls to an Exotel number to reach a Ringg assistant.
### Step 5: Prepare the number for inbound import
To import and use an inbound Exotel number in Ringg, complete these three steps in order:
In the Exotel console, create a custom Voicebot applet and name it `Ringg Inbound`.
Add the Ringg inbound HTTP URL to the Voicebot component.
```text theme={null}
https://use1-api.ringg.ai/pc/v1/exotel/inbound
```
Attach the Exotel number to the `Ringg Inbound` applet in Exotel. Then import that number in the Ringg dashboard.
Every time you attach an Exotel number to an assistant in Ringg, attach that same number to the `Ringg Inbound` applet in Exotel. If the number is not attached to the inbound applet, inbound calls may not reach Ringg.
### Step 6: Assign the imported number to an assistant
After the number is attached to the inbound applet and imported in Ringg, assign it to the assistant that should answer calls.
In the Ringg dashboard, go to **Numbers** → **Manage Numbers**.
Choose the imported Exotel number you want to configure.
Select the Ringg assistant that should answer inbound calls to this number.
Confirm recording, transcription, and webhook settings for the assistant or workspace.
Save the number configuration.
 ## Test the integration
### Test outbound calls
1. Start a small test call or campaign from Ringg.
2. Use an Exotel number that is imported and available in Ringg.
3. Confirm the recipient receives the call.
4. Verify call status and call logs in Ringg.
### Test inbound calls
1. Confirm the number is attached to the `Ringg Inbound` applet in Exotel.
2. Confirm the number is imported in Ringg and assigned to the correct assistant.
3. Call the Exotel number from a real phone.
4. Confirm the assigned Ringg assistant answers the call.
5. Check Ringg call history for the call record, transcript, recording, and analysis.
6. Check Exotel logs if the call does not reach Ringg.
## Troubleshooting
* Confirm `ACCOUNT_SID`, `API_KEY`, `API_TOKEN`, and `SUB_DOMAIN` were copied from Exotel without extra spaces.
* Confirm the `APP_ID` belongs to the `Ringg Outbound` applet.
* Confirm the Exotel account has API access and is not suspended.
* Confirm the account has enough credits for calling.
* Recreate the API token in Exotel if you suspect it was rotated or copied incorrectly.
* Confirm the `Ringg Outbound` Voicebot applet is saved and uses `wss://use1-api.ringg.ai/pc/v1/exotel/ws`.
* Confirm the `APP_ID` in Ringg matches the `Ringg Outbound` applet ID.
* Confirm the caller number is active, voice-enabled, and available in Ringg.
* Check Ringg call history and Exotel logs for the failed call.
* Confirm the Exotel number is attached to the `Ringg Inbound` applet in Exotel.
* Confirm the `Ringg Inbound` applet uses the inbound HTTP URL provided by Ringg.
* Confirm the number is imported into Ringg and assigned to the correct assistant.
* Confirm the Exotel number is active and voice-enabled.
* Confirm the assistant is active and assigned to the Exotel number.
* Check Ringg call history for failed call records or error states.
* Review the assistant's configuration, knowledge base status, and webhook settings.
* Test with another Exotel number if only one number is failing.
* Test from a stable phone network and retry with a second device.
* Check Exotel service status and call logs for regional issues.
* Confirm each Voicebot applet contains only the required call flow for Ringg.
* Contact Ringg support with the Ringg call ID and Exotel call SID.
## Support
Review Exotel API and Voicebot documentation
Contact Exotel for account, number, and provider-side issues
Join our Discord community for tips and support
Reach out to Ringg for integration assistance
## Test the integration
### Test outbound calls
1. Start a small test call or campaign from Ringg.
2. Use an Exotel number that is imported and available in Ringg.
3. Confirm the recipient receives the call.
4. Verify call status and call logs in Ringg.
### Test inbound calls
1. Confirm the number is attached to the `Ringg Inbound` applet in Exotel.
2. Confirm the number is imported in Ringg and assigned to the correct assistant.
3. Call the Exotel number from a real phone.
4. Confirm the assigned Ringg assistant answers the call.
5. Check Ringg call history for the call record, transcript, recording, and analysis.
6. Check Exotel logs if the call does not reach Ringg.
## Troubleshooting
* Confirm `ACCOUNT_SID`, `API_KEY`, `API_TOKEN`, and `SUB_DOMAIN` were copied from Exotel without extra spaces.
* Confirm the `APP_ID` belongs to the `Ringg Outbound` applet.
* Confirm the Exotel account has API access and is not suspended.
* Confirm the account has enough credits for calling.
* Recreate the API token in Exotel if you suspect it was rotated or copied incorrectly.
* Confirm the `Ringg Outbound` Voicebot applet is saved and uses `wss://use1-api.ringg.ai/pc/v1/exotel/ws`.
* Confirm the `APP_ID` in Ringg matches the `Ringg Outbound` applet ID.
* Confirm the caller number is active, voice-enabled, and available in Ringg.
* Check Ringg call history and Exotel logs for the failed call.
* Confirm the Exotel number is attached to the `Ringg Inbound` applet in Exotel.
* Confirm the `Ringg Inbound` applet uses the inbound HTTP URL provided by Ringg.
* Confirm the number is imported into Ringg and assigned to the correct assistant.
* Confirm the Exotel number is active and voice-enabled.
* Confirm the assistant is active and assigned to the Exotel number.
* Check Ringg call history for failed call records or error states.
* Review the assistant's configuration, knowledge base status, and webhook settings.
* Test with another Exotel number if only one number is failing.
* Test from a stable phone network and retry with a second device.
* Check Exotel service status and call logs for regional issues.
* Confirm each Voicebot applet contains only the required call flow for Ringg.
* Contact Ringg support with the Ringg call ID and Exotel call SID.
## Support
Review Exotel API and Voicebot documentation
Contact Exotel for account, number, and provider-side issues
Join our Discord community for tips and support
Reach out to Ringg for integration assistance