> ## Documentation Index
> Fetch the complete documentation index at: https://docs.ringg.ai/llms.txt
> Use this file to discover all available pages before exploring further.
> ## Agent Instructions
> To search or read these docs, connect the Ringg docs MCP server at https://docs.ringg.ai/mcp (no key needed; tools search_ringg_ai and query_docs_filesystem_ringg_ai) instead of browsing pages one by one. Setup for each client: https://docs.ringg.ai/resources/mcp-server/docs-mcp-server/mcp-for-ai-assistants.md
> The dashboard labels agents "Assistants"; these docs say "agent". Both mean the same object, identified by agent_id.
> API base URL: https://prod-api.ringg.ai/ca/api/v0. Send the workspace API key in the X-API-KEY header, from server-side code only.
> Placing a call dials a real phone number and spends credits. Confirm the number with the user before calling.
> To act on a Ringg workspace (place calls, edit agents, read transcripts), use the separate Ringg workspace MCP server at https://mcp.ringg.ai/mcp: https://docs.ringg.ai/resources/mcp-server/workspace-mcp-server/overview.md
# Lesson: Variables
> Add due_amount, due_date and loan_account as custom variables on the EMI reminder agent, insert them in the prompt with @, and fill them in Test assistant.
export const Quiz = ({question, answers, correctFeedback, incorrectFeedback}) => {
const [selected, setSelected] = React.useState(null);
const [checked, setChecked] = React.useState(false);
const quizId = React.useId();
const isCorrect = checked && answers[selected]?.correct;
const reset = () => {
setSelected(null);
setChecked(false);
};
const optionStyle = (answer, i) => {
const base = {
display: "flex",
alignItems: "flex-start",
gap: "0.6rem",
padding: "0.6rem 0.8rem",
marginTop: "0.5rem",
borderRadius: "0.6rem",
border: "1px solid rgba(128, 128, 128, 0.35)",
cursor: checked ? "default" : "pointer",
lineHeight: 1.45
};
if (checked && answer.correct) {
return {
...base,
borderColor: "rgba(22, 163, 74, 0.8)",
background: "rgba(22, 163, 74, 0.12)"
};
}
if (checked && selected === i && !answer.correct) {
return {
...base,
borderColor: "rgba(220, 38, 38, 0.8)",
background: "rgba(220, 38, 38, 0.1)"
};
}
if (!checked && selected === i) {
return {
...base,
borderColor: "currentColor",
background: "rgba(128, 128, 128, 0.12)"
};
}
return base;
};
const buttonStyle = disabled => ({
marginTop: "0.9rem",
padding: "0.45rem 0.9rem",
borderRadius: "0.5rem",
border: "1px solid rgba(128, 128, 128, 0.5)",
background: "rgba(128, 128, 128, 0.1)",
color: "inherit",
font: "inherit",
fontSize: "0.9em",
cursor: disabled ? "not-allowed" : "pointer",
opacity: disabled ? 0.5 : 1
});
return
;
**Part 3: Making your agent smarter · Lesson 1 of 4 · 10 minutes**
## Objective
Add the three values that change on every reminder call as custom variables and use them in the prompt, so one agent serves every customer.
## The scenario
In part 2, Ananya said the same thing to everyone. Rahul Verma owes ₹12,450 on 15 October; Priya Sharma owes ₹4,500 on 18 October. The amount, the date and the loan account change per call, so they become variables: the prompt names them once, and each call fills in its own values, from the **Test assistant** dialog now and from a campaign CSV in part 4.
## Hands-on
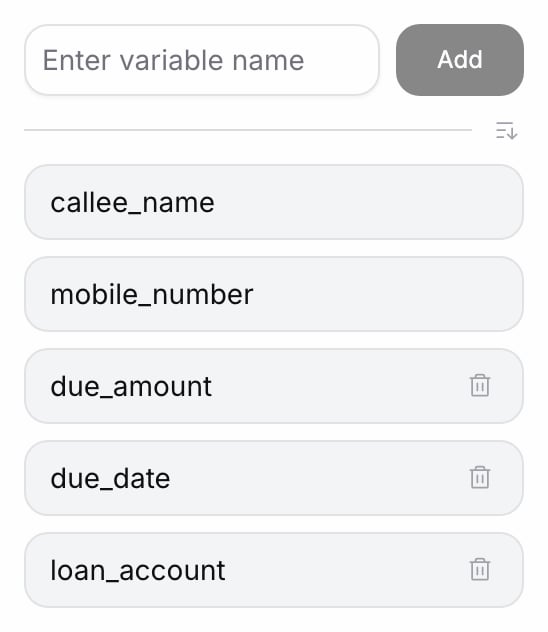
In Ananya's editor sidebar, click **Custom Variables**. The panel lists `callee_name` and `mobile_number`, the two permanent variables, with no remove button.
Type `Due Amount` into **Enter variable name**. As you type, letters become lowercase and spaces become `_`, so the field reads `due_amount`. Click **Add** or press Enter: "Variables updated successfully". There is no separate Save.
Repeat for `due_date` and `loan_account`. The three new rows sit at the bottom of the list, each with a bin icon.
Open **Prompt**. In **Conversation Script**, type `@` where a value belongs and pick it under **Custom Variables**; it becomes a chip. Rewrite the steps so they read:
* Confirm you are speaking to `@{{callee_name}}` about loan account `@{{loan_account}}`.
* Tell them their EMI of `@{{due_amount}}` is due on `@{{due_date}}`.
* Ask when they will pay.
A call goes ahead even when a variable has no value. A variable sent empty is left blank; one that is not sent at all stays in the prompt as the literal text `@{{due_date}}`. So add a line to the script: "If the due date is not known, ask the customer to check their statement." Click **Save**: "Changes saved successfully".
## Checkpoint
**Custom Variables** lists `due_amount`, `due_date` and `loan_account` below `callee_name` and `mobile_number`. The prompt shows them as chips with no red underline, and **Test assistant** shows one field for each.
## Exercise
Create a variable from the prompt instead of the panel: in any section, type `@{{branch_name` and choose **Create** `"{{branch_name}}"` from the menu. Expected result: a `branch_name` chip in the text and a new row in **Custom Variables**. Then remove the variable with its bin icon: the chip turns red with a wavy underline, because the agent has nothing to fill it with. Delete the chip before you save.
## What you learned
* A variable is written once in the prompt and filled per call: from **Test assistant** now, from a CSV column or the API's `custom_args_values` later.
* Names are lowercase with `_` and unique per agent; the input converts as you type.
* A red token names something the agent does not have. Fix every one before you save.
This documentation is built and hosted on [Mintlify](https://mintlify.com), a developer documentation platform.
 ## Checkpoint