> ## Documentation Index
> Fetch the complete documentation index at: https://docs.ringg.ai/llms.txt
> Use this file to discover all available pages before exploring further.

> ## Agent Instructions
> To search or read these docs, connect the Ringg docs MCP server at https://docs.ringg.ai/mcp (no key needed; tools search_ringg_ai and query_docs_filesystem_ringg_ai) instead of browsing pages one by one. Setup for each client: https://docs.ringg.ai/resources/mcp-server/docs-mcp-server/mcp-for-ai-assistants.md
> The dashboard labels agents "Assistants"; these docs say "agent". Both mean the same object, identified by agent_id.
> API base URL: https://prod-api.ringg.ai/ca/api/v0. Send the workspace API key in the X-API-KEY header, from server-side code only.
> Placing a call dials a real phone number and spends credits. Confirm the number with the user before calling.
> To act on a Ringg workspace (place calls, edit agents, read transcripts), use the separate Ringg workspace MCP server at https://mcp.ringg.ai/mcp: https://docs.ringg.ai/resources/mcp-server/workspace-mcp-server/overview.md

# Lesson: The dashboard

> Walk the Ringg AI dashboard's sidebar, top bar and Settings, open the command palette, and find where to copy the agent, number, campaign and call IDs.

export const Quiz = ({question, answers, correctFeedback, incorrectFeedback}) => {
  const [selected, setSelected] = React.useState(null);
  const [checked, setChecked] = React.useState(false);
  const quizId = React.useId();
  const isCorrect = checked && answers[selected]?.correct;
  const reset = () => {
    setSelected(null);
    setChecked(false);
  };
  const optionStyle = (answer, i) => {
    const base = {
      display: "flex",
      alignItems: "flex-start",
      gap: "0.6rem",
      padding: "0.6rem 0.8rem",
      marginTop: "0.5rem",
      borderRadius: "0.6rem",
      border: "1px solid rgba(128, 128, 128, 0.35)",
      cursor: checked ? "default" : "pointer",
      lineHeight: 1.45
    };
    if (checked && answer.correct) {
      return {
        ...base,
        borderColor: "rgba(22, 163, 74, 0.8)",
        background: "rgba(22, 163, 74, 0.12)"
      };
    }
    if (checked && selected === i && !answer.correct) {
      return {
        ...base,
        borderColor: "rgba(220, 38, 38, 0.8)",
        background: "rgba(220, 38, 38, 0.1)"
      };
    }
    if (!checked && selected === i) {
      return {
        ...base,
        borderColor: "currentColor",
        background: "rgba(128, 128, 128, 0.12)"
      };
    }
    return base;
  };
  const buttonStyle = disabled => ({
    marginTop: "0.9rem",
    padding: "0.45rem 0.9rem",
    borderRadius: "0.5rem",
    border: "1px solid rgba(128, 128, 128, 0.5)",
    background: "rgba(128, 128, 128, 0.1)",
    color: "inherit",
    font: "inherit",
    fontSize: "0.9em",
    cursor: disabled ? "not-allowed" : "pointer",
    opacity: disabled ? 0.5 : 1
  });
  return <div style={{
    marginTop: "1.5rem",
    padding: "1rem 1.1rem",
    borderRadius: "0.8rem",
    border: "1px solid rgba(128, 128, 128, 0.35)"
  }}>
      <Badge color="green">Quiz</Badge>
      <p id={quizId + "-question"} style={{
    fontWeight: 600,
    margin: "0.6rem 0 0.2rem"
  }}>
        {question}
      </p>
      <div role="radiogroup" aria-labelledby={quizId + "-question"} aria-disabled={checked}>
        {answers.map((answer, i) => <label key={i} style={optionStyle(answer, i)}>
            <input type="radio" name={"quiz-" + quizId} checked={selected === i} onChange={() => !checked && setSelected(i)} disabled={checked} style={{
    marginTop: "0.3rem",
    flexShrink: 0
  }} />
            <span>{answer.text}</span>
          </label>)}
      </div>
      {checked && <div role="status" aria-live="polite" aria-atomic="true" style={{
    marginTop: "0.9rem",
    padding: "0.7rem 0.9rem",
    borderRadius: "0.6rem",
    lineHeight: 1.5,
    background: isCorrect ? "rgba(22, 163, 74, 0.12)" : "rgba(220, 38, 38, 0.1)"
  }}>
          <strong style={{
    marginRight: "0.4rem"
  }}>{isCorrect ? "✓" : "✗"}</strong>
          {isCorrect ? correctFeedback : incorrectFeedback}
        </div>}
      {!checked ? <button type="button" onClick={() => selected !== null && setChecked(true)} disabled={selected === null} style={buttonStyle(selected === null)}>
          Check answer
        </button> : <button type="button" onClick={reset} style={buttonStyle(false)}>
          Try again
        </button>}
    </div>;
};

export const RelatedTopics = ({items}) => <div className="not-prose mt-12">
    <div className="text-sm font-medium text-gray-500 dark:text-zinc-400 mb-3">Related topics</div>
    <div className="flex flex-col gap-2.5">
      {items.map(([title, href]) => <a key={href} href={href} className="flex items-center gap-2.5 text-sm text-gray-700 hover:text-gray-950 dark:text-zinc-300 dark:hover:text-white">
          <Icon icon="file-text" size={16} color="currentColor" />
          {title}
        </a>)}
    </div>
  </div>;

**Part 1: Getting to know Ringg AI · Lesson 3 of 3 · 15 minutes**

## Objective

Find every section of the dashboard, and know where to copy the IDs your developers will ask for.

## The scenario

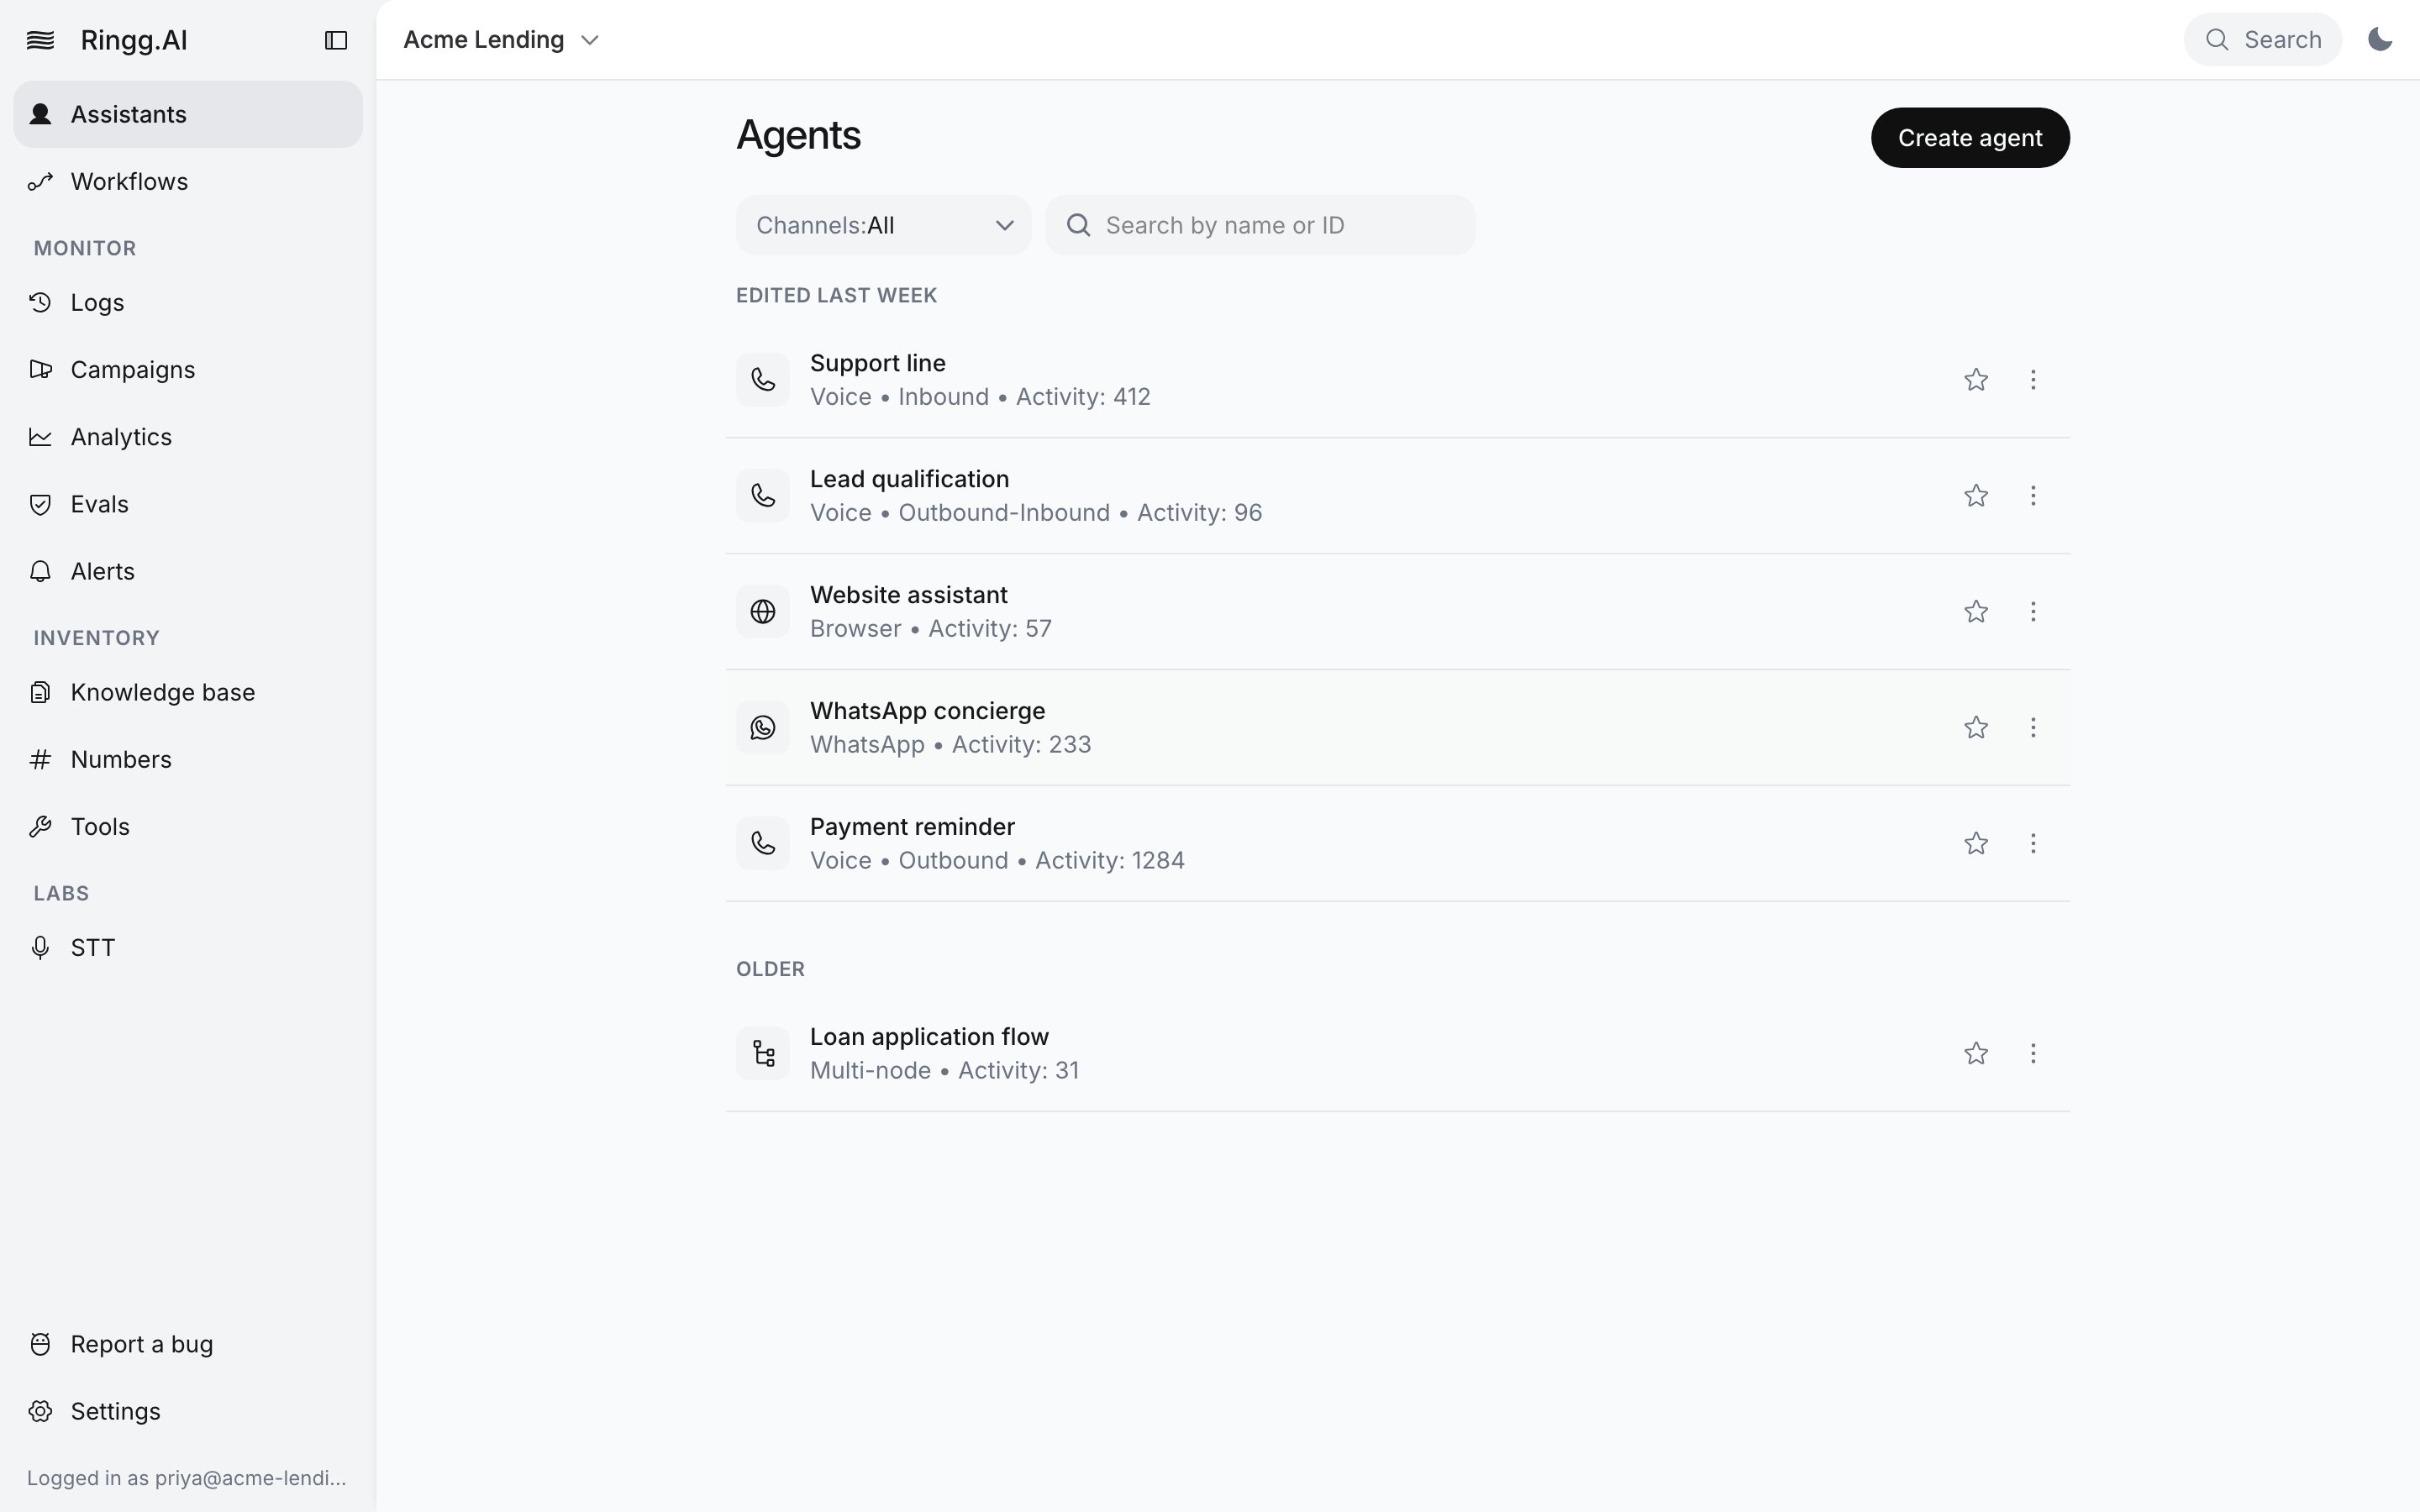
Acme's team will share the dashboard: you build Ananya, a colleague uploads the calling list, and a developer wires the results into the CRM. Each needs a different section, and the developer needs IDs. This lesson walks the screen once so later lessons can say "open **Monitor → Logs**".

## Hands-on

<Frame caption="A tour of the dashboard sections">
  <video alt="A tour of the dashboard sections" aria-label="A tour of the dashboard sections" controls muted playsInline className="w-full rounded-xl" style={{ aspectRatio: "16 / 10" }} preload="metadata" controlsList="nodownload noremoteplayback" poster="/media/dashboard-tour/poster.webp">
    <source src="https://mintcdn.com/ringgai-0da73d20/XUOcNie5hfK3q--Y/media/dashboard-tour/video.webm?fit=max&auto=format&n=XUOcNie5hfK3q--Y&q=85&s=11689018afa860cd15192a39f93aa432" type="video/webm; codecs=&#x22;av01.0.09M.08&#x22;" data-path="media/dashboard-tour/video.webm" />
  </video>
</Frame>

<Steps>
  <Step title="Read the sidebar">
    The sidebar groups its items under **Monitor**, **Inventory** and **Labs**, with **Assistants** and **Workflows** above the groups. Collapse or expand it with <kbd>⌘</kbd> + <kbd>.</kbd> (<kbd>Ctrl</kbd> + <kbd>.</kbd> on Windows and Linux).

    <Frame caption="The dashboard: sidebar, top bar and the Agents page">
      <img src="https://mintcdn.com/ringgai-0da73d20/XUOcNie5hfK3q--Y/media/dashboard-tour/dashboard-shell.webp?fit=max&auto=format&n=XUOcNie5hfK3q--Y&q=85&s=4f45e45dda1083373aa9b9f1ab5e14dd" alt="Ringg AI dashboard with the sidebar (Assistants, Workflows, Monitor, Inventory and Labs groups, Report a bug, Settings), the top bar with the Acme Lending workspace switcher and Search, and the Agents page listing six agents" width="2880" height="1800" data-path="media/dashboard-tour/dashboard-shell.webp" />
    </Frame>

    If your sidebar shows only **Logs**, **Analytics**, **Alerts** and **Settings**, you are in a primary workspace: switch to a Ringg Space with the workspace switcher to build agents.
  </Step>

  <Step title="Open each Monitor item">
    Click through **Logs**, **Campaigns**, **Analytics**, **Evals** and **Alerts**. Logs has three tabs, **Phone**, **WhatsApp** and **Workflows**; Ananya's calls land under **Phone**. Campaigns is where the calling list goes in part 4.
  </Step>

  <Step title="Open each Inventory item">
    **Knowledge base** holds the files and web pages agents look up. **Numbers** has a **Phone** tab, with **All Numbers** and **Number Pools**, and a **WhatsApp** tab. **Tools** holds tools you set up once and reuse in any agent; its URL is `/integrations`.
  </Step>

  <Step title="Use the top bar">
    The first crumb is the workspace switcher; **Copy workspace ID** sits beside each workspace in its menu. **Search** opens the command palette (<kbd>⌘</kbd> + <kbd>K</kbd> or <kbd>Ctrl</kbd> + <kbd>K</kbd>). The credits figure shows your balance (prepaid) or used / limit (postpaid); click it to open **Billing plan**.
  </Step>

  <Step title="Look at Settings">
    **Settings**, at the bottom of the sidebar, has its own menu under **Workspace**, **Access** and **Billing**. Two items matter for these lessons: **Company details** (<Tooltip tip="Know your customer: the business verification Ringg needs before some calls.">KYC</Tooltip>), needed for some test calls, and **API key**, which the developer needs for the capstone.
  </Step>

  <Step title="Note where the IDs are">
    Each object has a copy button next to its ID:

    * Agent: beside the agent name in the top bar of the editor, or from the URL `/assistants/<agent_id>`.
    * Number: the **ID** column on **Numbers**.
    * Campaign: beside the ID in the campaign's detail panel.
    * Call: beside the call ID in the call panel in **Logs**.

    The API key is shown once, when generated under **Settings → API key**. Share it through a secret manager.
  </Step>
</Steps>

## Checkpoint

<Check>
  You can open every item under **Monitor** and **Inventory** from memory, the command palette opens with <kbd>⌘</kbd> + <kbd>K</kbd>, and you know which button or column holds each ID.
</Check>

## Exercise

Press <kbd>⌘</kbd> + <kbd>K</kbd> (or <kbd>Ctrl</kbd> + <kbd>K</kbd>) and type `Billing`. Expected result: the palette offers the **Billing plan** settings page; opening it shows your balance, concurrency, transactions and invoices.

## What you learned

* **Assistants** and **Workflows** sit at the top of the sidebar; the rest is under **Monitor**, **Inventory** and **Labs**, with **Settings** at the bottom.
* The command palette finds any section or settings page by name, and shortcuts open an agent, log or campaign by ID.
* Every ID a developer needs has a copy button on its own page, and the API key is shown only once.

<Quiz
  question="A developer asks you for the agent ID of EMI reminder - Hindi and the workspace ID. Where do you get them?"
  answers={[
{ text: "Both from the command palette, which lists every ID", correct: false },
{ text: "Both under Settings → API key, next to the key", correct: false },
{ text: "The agent ID beside the agent name in the editor's top bar (or its URL), the workspace ID from the workspace switcher's menu", correct: true },
{ text: "Both from the Monitor → Logs call panel", correct: false },
]}
  correctFeedback="Right. Every object carries its own copy button: the agent ID sits beside the name in the editor top bar and in the /assistants/<agent_id> URL, and Copy workspace ID is in the workspace switcher's menu. The API key page holds only the key, shown once."
  incorrectFeedback="Not quite. IDs are copied where the object lives: the agent ID in the agent editor's top bar or URL, the workspace ID from the workspace switcher's menu. The palette opens objects by ID but does not list IDs, and the API key page shows only the key."
/>

<RelatedTopics items={[["Dashboard tour", "/get-started/dashboard-tour"], ["Find an agent's ID", "/documentation/build-agents/agents/agent-types#find-the-agent-id"]]} />


This documentation is built and hosted on [Mintlify](https://mintlify.com), a developer documentation platform.