> ## Documentation Index
> Fetch the complete documentation index at: https://docs.ringg.ai/llms.txt
> Use this file to discover all available pages before exploring further.
> ## Agent Instructions
> To search or read these docs, connect the Ringg docs MCP server at https://docs.ringg.ai/mcp (no key needed; tools search_ringg_ai and query_docs_filesystem_ringg_ai) instead of browsing pages one by one. Setup for each client: https://docs.ringg.ai/resources/mcp-server/docs-mcp-server/mcp-for-ai-assistants.md
> The dashboard labels agents "Assistants"; these docs say "agent". Both mean the same object, identified by agent_id.
> API base URL: https://prod-api.ringg.ai/ca/api/v0. Send the workspace API key in the X-API-KEY header, from server-side code only.
> Placing a call dials a real phone number and spends credits. Confirm the number with the user before calling.
> To act on a Ringg workspace (place calls, edit agents, read transcripts), use the separate Ringg workspace MCP server at https://mcp.ringg.ai/mcp: https://docs.ringg.ai/resources/mcp-server/workspace-mcp-server/overview.md
# Lesson: Multi-prompt agents
> Learn when a multi-prompt agent beats a single prompt, build a flow of Agent, LLM Router and End nodes on the canvas, publish it, and read the connection rules.
export const Quiz = ({question, answers, correctFeedback, incorrectFeedback}) => {
const [selected, setSelected] = React.useState(null);
const [checked, setChecked] = React.useState(false);
const quizId = React.useId();
const isCorrect = checked && answers[selected]?.correct;
const reset = () => {
setSelected(null);
setChecked(false);
};
const optionStyle = (answer, i) => {
const base = {
display: "flex",
alignItems: "flex-start",
gap: "0.6rem",
padding: "0.6rem 0.8rem",
marginTop: "0.5rem",
borderRadius: "0.6rem",
border: "1px solid rgba(128, 128, 128, 0.35)",
cursor: checked ? "default" : "pointer",
lineHeight: 1.45
};
if (checked && answer.correct) {
return {
...base,
borderColor: "rgba(22, 163, 74, 0.8)",
background: "rgba(22, 163, 74, 0.12)"
};
}
if (checked && selected === i && !answer.correct) {
return {
...base,
borderColor: "rgba(220, 38, 38, 0.8)",
background: "rgba(220, 38, 38, 0.1)"
};
}
if (!checked && selected === i) {
return {
...base,
borderColor: "currentColor",
background: "rgba(128, 128, 128, 0.12)"
};
}
return base;
};
const buttonStyle = disabled => ({
marginTop: "0.9rem",
padding: "0.45rem 0.9rem",
borderRadius: "0.5rem",
border: "1px solid rgba(128, 128, 128, 0.5)",
background: "rgba(128, 128, 128, 0.1)",
color: "inherit",
font: "inherit",
fontSize: "0.9em",
cursor: disabled ? "not-allowed" : "pointer",
opacity: disabled ? 0.5 : 1
});
return
;
**Part 5: Designing multi-step conversations · Lesson 1 of 3 · 15 minutes**
## Objective
Know when a multi-prompt agent beats a single prompt, and read a flow of nodes and routers.
## The scenario
Ananya does fine with one prompt. Acme's loan application line has strict steps: confirm identity, capture a PIN code, check eligibility in an API, branch on the result. That is a multi-prompt agent, a graph of nodes where each does one job. A single prompt is simpler to build and maintain; choose multi-prompt for keypad menus, OTP capture or an API lookup before the next question.
Ananya stays single-prompt; this lesson builds a small flow beside her as a sandbox. If her editor offers **Convert to multi-prompt** under **More** (only for a prompt Ringg judges large enough), that works too: it creates a separate agent and leaves her unchanged.
## Hands-on
Click **Assistants**, then **Create agent**. On the **Outbound** tab, under **Create from scratch**, click **Multi Prompt**. There is no form: the canvas opens on **Untitled Workflow** with a **Start** node and the variables `callee_name` and `mobile_number`.
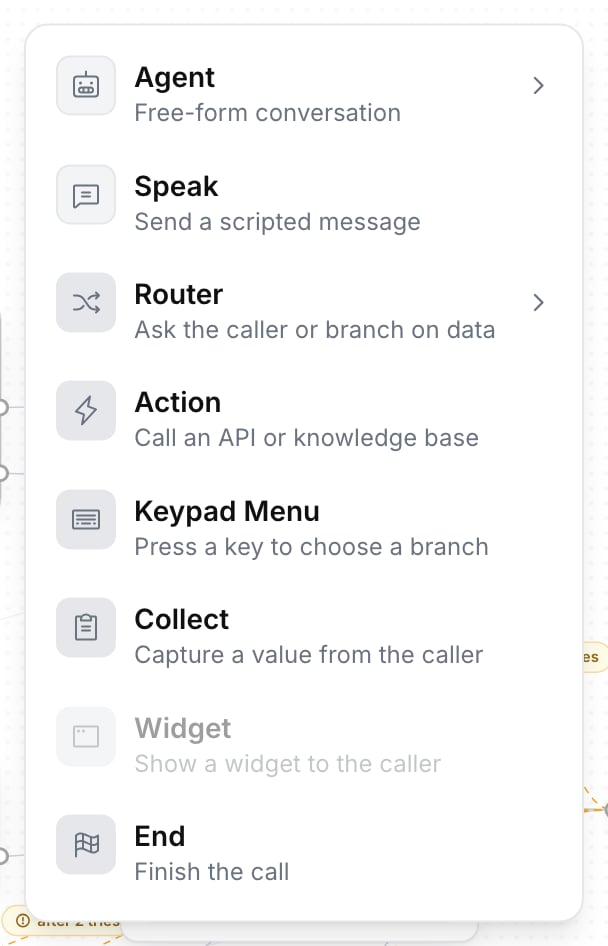
Click the dot on **Start**'s output. The picker lists the node types; those the connection rules block are greyed out, and hovering explains why. Pick **Agent**. In the panel on the right, write an **Objective** ("Greet the caller and confirm you are speaking to the loan applicant") and an **Intro Message**. Click **Save**.
From the Agent node's output, pick **Router**, then **LLM Router**. Write two **Conditions** in plain language: "When the caller confirms their identity" and "When it is the wrong person". The Agent node before it makes the routing decision, so this router shows no **Retry behavior** or **Fallback**.
From each router branch, add **End**. Click **Organize nodes** to lay the flow out left to right.
Click empty canvas. The right panel shows **Global Settings**: voice, custom variables, knowledge base, Advanced Analysis, pre-call and post-call tools. On-call tools attach per Agent node.
The banner above the canvas reads **This workflow has not yet been published**. Click **Publish** and confirm. If the banner turns red, click **Review issues**, fix each one and publish again.
## Checkpoint
The canvas shows **Start → Agent → LLM Router**, with each branch ending in **End**. After the publish, the banner is gone and **Test assistant** is back in the top bar. On the Agents page, the agent sits under the **Multi-node** filter.
## Exercise
From the **Start** node, try to add an **End** node directly. Expected result: **End** is greyed out in the picker, and hovering it gives the reason: Start connects only to Agent, Speak, Logic Router or Action. Keep the agent as a sandbox; Ananya is unaffected.
## What you learned
* A multi-prompt agent is a graph: Agent nodes talk, Speak says a fixed line, routers branch (LLM Router on what the caller says, Logic Router on data), Action calls an API, Collect captures a value.
* Edits go into a draft and reach callers when you publish; a single-prompt agent goes live on **Save**.
* The picker enforces the connection rules: an Agent node hands off only to an LLM Router or End.
This documentation is built and hosted on [Mintlify](https://mintlify.com), a developer documentation platform.
 ## Checkpoint