> ## Documentation Index
> Fetch the complete documentation index at: https://docs.ringg.ai/llms.txt
> Use this file to discover all available pages before exploring further.
> ## Agent Instructions
> To search or read these docs, connect the Ringg docs MCP server at https://docs.ringg.ai/mcp (no key needed; tools search_ringg_ai and query_docs_filesystem_ringg_ai) instead of browsing pages one by one. Setup for each client: https://docs.ringg.ai/resources/mcp-server/docs-mcp-server/mcp-for-ai-assistants.md
> The dashboard labels agents "Assistants"; these docs say "agent". Both mean the same object, identified by agent_id.
> API base URL: https://prod-api.ringg.ai/ca/api/v0. Send the workspace API key in the X-API-KEY header, from server-side code only.
> Placing a call dials a real phone number and spends credits. Confirm the number with the user before calling.
> To act on a Ringg workspace (place calls, edit agents, read transcripts), use the separate Ringg workspace MCP server at https://mcp.ringg.ai/mcp: https://docs.ringg.ai/resources/mcp-server/workspace-mcp-server/overview.md
# Drafts and versions
> Save and publish Ringg AI agent changes, create versions, split call traffic for A/B tests, compare results and finalize a winner, or call a version by API.
A version is a complete copy of an agent's configuration (prompt or flow, voice, tools and settings) that you can edit and send calls to on its own. Every agent starts with one version, `v1`. Add more versions when you want to A/B test a change on real traffic before you commit to it; for a one-off fix, edit the agent and save or publish instead.
In the dashboard: **Sidebar → Assistants →** open an agent. Single-prompt agents use **Create Versions** in the editor sidebar; [multi-prompt agents](/documentation/build-agents/agents/multi-prompt-agents/overview) use the version tabs above the canvas.
## Before you start
Ideally already [tested](/documentation/build-agents/test-and-improve/test-an-agent) with the change you want to split traffic on.
Optional: only to call a specific version from your backend.
## How changes go live
Single-prompt and multi-prompt agents save changes differently.
| | Single-prompt agent | Multi-prompt agent |
| - | - | - |
| Prompt or flow edits | Held as unsaved edits until you click **Save** (or press Cmd/Ctrl+S) | Written to a draft as you edit |
| Other settings | Most save as soon as you change them | Saved to the draft |
| Top bar while changes are pending | **Discard** and **Save** | **Discard** and **Publish** |
| What makes changes live | **Save** | **Publish**, then confirm |
| Testing | Save first; **Test assistant** returns after saving | Publish or discard first; **Test assistant** returns after |
### Save changes on a single-prompt agent
**Save** (or Cmd/Ctrl+S) stores the prompt on the version you are viewing; **Discard** throws the unsaved edits away. The editor's save behaviour is in [Save or discard](/documentation/build-agents/customize-agent-behaviour/agent-prompt#save-or-discard).
### Publish changes on a multi-prompt agent
Edits on the canvas, in node panels and in **Global Settings** go into a draft, and a banner above the canvas reads **This workflow has unpublished changes** (or **This workflow has not yet been published** for a new agent). Callers keep getting the last published flow until you publish.
Click **Publish** in the top bar. The **Publish Changes** dialog asks: "Are you sure you want to publish these changes? This will make them live." Click **Publish**.
Ringg checks the flow on every publish. If it finds problems, the banner turns red with "Review and resolve each issue before publishing." Click **Review issues**, open each issue to jump to the node or connection, fix it and publish again ([connection rules](/documentation/build-agents/agents/multi-prompt-agents/node-types-and-connections#connection-rules)).
The draft banner disappears and **Test assistant** returns to the top bar. [Test the agent](/documentation/build-agents/test-and-improve/test-an-agent) to hear the published flow.
**Discard** reverts the draft to the last published version. Its dialog warns: "Are you sure you want to discard all changes? This action cannot be undone." Discard stays available even when the draft has issues.
If a draft already exists when you open the agent (for example, from an earlier session or the [MCP server](/resources/mcp-server/workspace-mcp-server/overview)), the editor opens in draft mode and shows **Draft Mode Enabled**.
## A/B test a single-prompt agent
An A/B test splits calls between versions of the same agent:
```mermaid theme={null}
flowchart LR
C[Calls to the agent] -->|70%| V1[V1]
C -->|30%| V2[V2]
V1 --> A[A/B Analytics]
V2 --> A
A -->|Finalize| W[Winner gets 100%]
```
The video turns on Create Versions, adds V2, adds a note to it, and splits traffic 70/30.
In the editor sidebar under **Advanced Settings**, switch on **Create Versions** ("A/B Testing Enabled — You can now create multiple versions"). A version bar appears above the editor, showing **V1**.
Click **+** in the version bar. With one version, the new one copies it. With two or more, pick the **Base** version to copy from. An agent can have up to 5 versions.
Click a version to switch to it, then change its prompt or settings. Each version keeps its own configuration ([prompt](/documentation/build-agents/customize-agent-behaviour/agent-prompt), [voice](/documentation/build-agents/customize-agent-behaviour/voice-and-language), [variables](/documentation/build-agents/customize-agent-behaviour/custom-variables), [knowledge base](/documentation/build-agents/customize-agent-behaviour/attach-a-knowledge-base)). Open a version's menu to **Add notes**, **Copy version ID** ([use it in the API](#call-a-specific-version-with-the-api)), or **Delete version** (offered when more than one version exists).
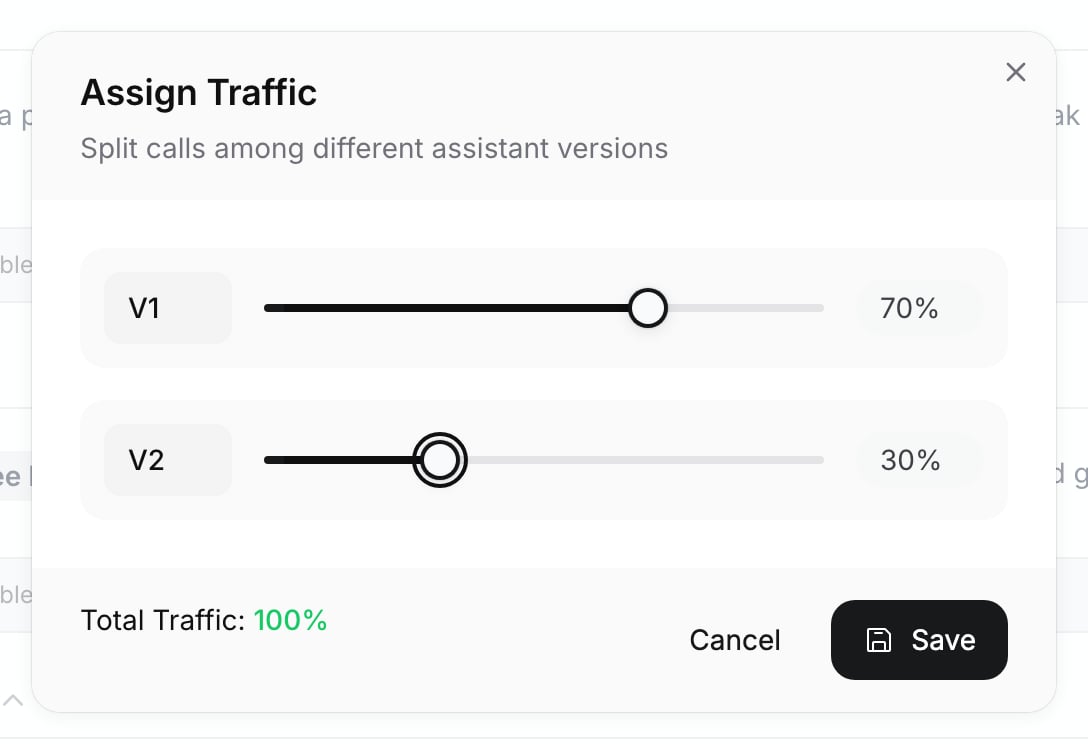
Click the gear in the version bar and choose **Assign Traffic** ("Split calls among different assistant versions"). Set each version's share with its slider and click **Save**; it stays greyed out until the running total reads 100%.
From the same gear menu, choose **View Analytics**. **A/B Analytics** compares the versions over the last 7 days.
Once two or more versions exist, the sidebar row reads **A/B Tests Live!** with a **Finalize** button. Click it, select the winning version in the analytics table, and click **Confirm & Finalize**. All traffic goes to that version and A/B testing is turned off ("Version \[slug] is now live. A/B testing has been disabled.").
New calls use the winning version only. Review the calls in [Logs](/documentation/monitor/logs).
A green dot next to a version means it receives traffic; a red dot means 0%. Deleting a version asks for confirmation and warns: "If you delete, all traffic will shift to other versions uniformly." Its share is split equally among the remaining versions: delete the 50% version of a 50/30/20 split and the others get 55/45.
WhatsApp agents do not offer **Create Versions**; the row appears only while a test is already live, so you can finalize it.
## A/B test a multi-prompt agent
The multi-prompt editor has no switch that starts an A/B test; to start one on a multi-prompt agent, contact Ringg. On a multi-prompt agent where A/B testing is already live, version tabs (`V1`, `V2` …) appear above the canvas:
* **Switch versions:** click a tab. The canvas and Global Settings load that version, and your edits apply to it.
* **Add a version:** click **+** at the end of the tabs. The editor switches to the new version.
* **Delete a version:** open the tab's **…** menu and choose **Delete version** (shown when more than one version exists). It is deleted at once, with no confirmation.
* **Split traffic:** click the gear to open **Manage Traffic Split**, set each version's slider and click **Save Changes**.
The multi-prompt editor has no **Finalize** action. To send all calls to one version, delete the others.
## Traffic split rules
| Rule | Single-prompt (**Assign Traffic**) | Multi-prompt (**Manage Traffic Split**) |
| - | - | - |
| Total | Must equal exactly 100% to save | Must equal exactly 100% to save |
| Step | 5% | 5% |
| Minimum per version | 0% | 5% |
| Maximum versions | 5 | 5 |
Calls are shared between versions in proportion to their traffic. Each API, inbound or workflow call picks a version at random, weighted by the split. A campaign divides its contact list by count, in list order: with 70/30, roughly the first 70% of the list goes to one version, so shuffle the list if its order matters. A retry keeps its call's version, and a callback uses the version of the call it follows up. Each call records the version it used: see `version_slug` in [webhook payloads](/documentation/build-agents/customize-agent-behaviour/webhooks/call-events) (sent by [Event Subscription](/documentation/build-agents/customize-agent-behaviour/event-subscription)) and `agent.version` in [call history](/api-reference/endpoint/history/get-call-history).
## Call a specific version with the API
[Initiate Individual Call](/api-reference/endpoint/calling/initiate-individual-call) accepts an optional `version_id`. With it, the call uses that version and skips the traffic split. Without it, the call uses the agent's active version, or follows the traffic split while an A/B test runs. Campaigns can't pin a version. Copy a single-prompt version's ID from its menu in the version bar.
Send your [API key](/documentation/manage-account/api-key) in `X-API-KEY`. `from_number` is the [caller ID](/documentation/inventory/phone-numbers/inbound-agent-number#outbound-choose-the-caller-id).
```bash cURL theme={null}
curl -X POST https://prod-api.ringg.ai/ca/api/v0/calling/outbound/individual \
-H "X-API-KEY: $RINGG_API_KEY" \
-H "Content-Type: application/json" \
-d '{
"name": "Priya Sharma",
"mobile_number": "+919876543210",
"agent_id": "b1972188-038e-4605-916c-3926e9d7bde4",
"from_number": "+919876500000",
"version_id": "e301689c-3701-4665-9b1a-06cc12a88974"
}'
```
```javascript JavaScript theme={null}
const response = await fetch("https://prod-api.ringg.ai/ca/api/v0/calling/outbound/individual", {
method: "POST",
headers: {
"X-API-KEY": process.env.RINGG_API_KEY,
"Content-Type": "application/json",
},
body: JSON.stringify({
name: "Priya Sharma",
mobile_number: "+919876543210",
agent_id: "b1972188-038e-4605-916c-3926e9d7bde4",
from_number: "+919876500000",
version_id: "e301689c-3701-4665-9b1a-06cc12a88974",
}),
});
console.log(await response.json());
```
```python Python theme={null}
import os
import requests
response = requests.post(
"https://prod-api.ringg.ai/ca/api/v0/calling/outbound/individual",
headers={"X-API-KEY": os.environ["RINGG_API_KEY"]},
json={
"name": "Priya Sharma",
"mobile_number": "+919876543210",
"agent_id": "b1972188-038e-4605-916c-3926e9d7bde4",
"from_number": "+919876500000",
"version_id": "e301689c-3701-4665-9b1a-06cc12a88974",
},
)
print(response.json())
```
[Initiate Individual Call v2](/api-reference/endpoint/calling/initiate-individual-call-v2) takes the same optional `version_id` and calls from a [number pool](/documentation/inventory/phone-numbers/number-pools). Pinning a version lets you test a new version from your backend before you give it traffic.
## Next steps
The checklist before a phone agent goes live.
Send real traffic through the split.
Tick the agent, then untick all but the ones you want in the charts.
This documentation is built and hosted on [Mintlify](https://mintlify.com), a developer documentation platform.