> ## Documentation Index
> Fetch the complete documentation index at: https://docs.ringg.ai/llms.txt
> Use this file to discover all available pages before exploring further.
> ## Agent Instructions
> To search or read these docs, connect the Ringg docs MCP server at https://docs.ringg.ai/mcp (no key needed; tools search_ringg_ai and query_docs_filesystem_ringg_ai) instead of browsing pages one by one. Setup for each client: https://docs.ringg.ai/resources/mcp-server/docs-mcp-server/mcp-for-ai-assistants.md
> The dashboard labels agents "Assistants"; these docs say "agent". Both mean the same object, identified by agent_id.
> API base URL: https://prod-api.ringg.ai/ca/api/v0. Send the workspace API key in the X-API-KEY header, from server-side code only.
> Placing a call dials a real phone number and spends credits. Confirm the number with the user before calling.
> To act on a Ringg workspace (place calls, edit agents, read transcripts), use the separate Ringg workspace MCP server at https://mcp.ringg.ai/mcp: https://docs.ringg.ai/resources/mcp-server/workspace-mcp-server/overview.md
# Advanced Analysis
> Define the typed variables Ringg AI extracts after each conversation, mark a Boolean goal, test on a past call, and read results in Logs, Analytics and webhooks.
Use Advanced Analysis on an [agent](/documentation/build-agents/agents/agent-types) for facts you want to report on, filter by or send to your systems, such as `payment_promised` (a Boolean) or `promised_date` (a Date). Status, duration and transcript are already in [Logs](/documentation/monitor/logs) without it.
In the dashboard: Agents (listed under **Assistants** in the sidebar) → open an agent → **Advanced Settings → Advanced Analysis**. On a [multi-prompt agent](/documentation/build-agents/agents/multi-prompt-agents/overview), open **Global Settings → Advanced Analysis** (see [Global Settings](/documentation/build-agents/agents/multi-prompt-agents/global-settings#global-settings)).
## Before you start
The agent whose conversations you want analysed.
Optional: needed to **Test** your variables. Place a test call first.
## Add variables
Open **Advanced Analysis** and click **Add a new variable**. The **Add variables** dialog opens.
* **Variable name** (required): lower-case; spaces become `_` as you type.
* **Type**: one of the types below. The default is **Boolean**.
* **Enum options** (required for **Enum**): type an option and press Enter or **Add**. Options are stored lower-case with `_` for spaces.
* **Description** (required): "What the analysis should extract from the call." Write it as an instruction, for example "True if the customer agreed to pay by a specific date."
* **Default value**: "Fallback used when nothing is extracted."
* **Use as goal**: Boolean variables only (see [The goal](#the-goal)).
Analysis variables are separate from the agent's [custom variables](/documentation/build-agents/customize-agent-behaviour/custom-variables), which you fill before a call.
Click **Add new variable** inside the dialog for another blank form. The button at the bottom changes to **Add 2**, **Add 3** and so on.
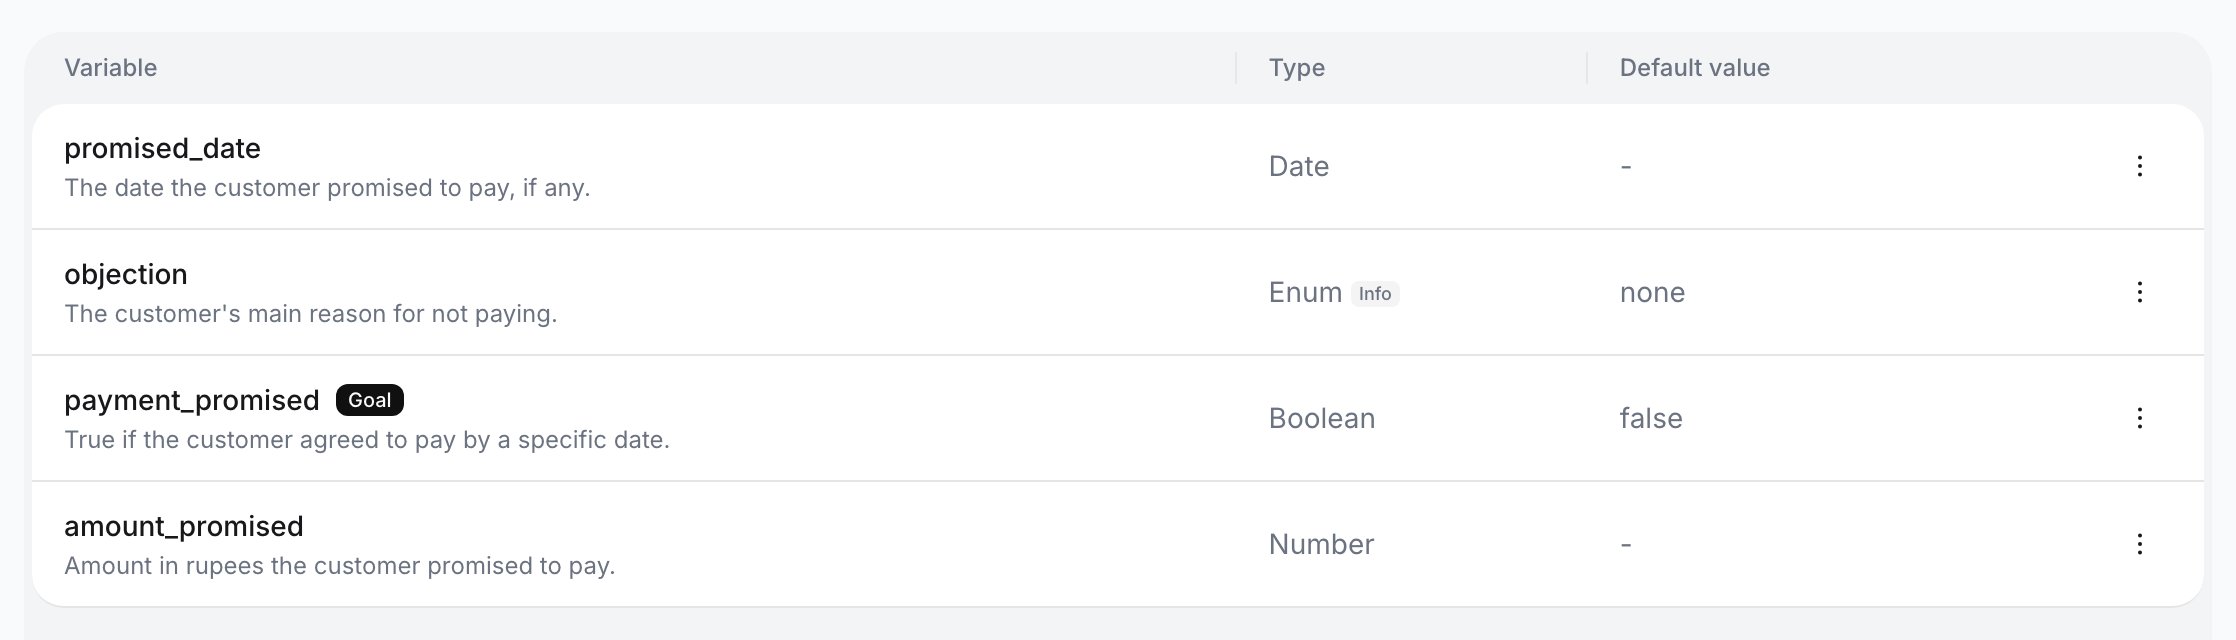
Click **Add**. You see "Variable added" and the variable appears in the table with its **Variable**, **Type** and **Default value**. The goal variable carries a **Goal** chip.
The table lists your variable, and **Test** is now enabled.
To change a variable, click its row (the dialog is titled **Configure variable**) or use the row menu: **Edit** or **Delete**. Each change saves immediately.
A change applies to conversations analysed after you save it. Calls already analysed keep their results and can't be re-analysed. On a multi-prompt agent, changes go into the draft and apply once you [publish](/documentation/build-agents/test-and-improve/drafts-and-versions#publish-changes-on-a-multi-prompt-agent).
### Default values
The default is typed text, converted when the meaning is clear:
| You type | Stored as |
| - | - |
| `null` (any case) | A real `null` |
| `true` / `false` on a Boolean | A Boolean |
| A whole number on an Integer, any number on a Number | A number |
| Anything else | Text |
### Paste variables as JSON
While adding, paste a JSON array (or one object) into a **Variable name** field, or drop a JSON file onto the dialog, to fill one form per item:
```json theme={null}
[
{ "variableName": "payment_promised", "type": "boolean", "description": "True if the customer agreed to pay by a specific date.", "defaultValue": false, "useAsGoal": true },
{ "variableName": "promised_date", "type": "date", "description": "The date the customer promised to pay, if any." },
{ "variableName": "objection", "type": "enum", "values": ["already_paid", "no_money", "dispute", "none"], "description": "The customer's main reason for not paying." }
]
```
Names are converted to `snake_case`. A type Ringg does not recognise becomes **String**, with the warning "Some types weren't recognized". Review the forms, then click **Add**.
## Variable types
Each variable has one type. The name below is the value used in JSON; the label is what the **Type** menu shows.
A list of mixed values.Several amounts or counts, such as EMIs mentioned.Several items, such as products asked about.Yes/no facts.A day, such as a promised payment date.A day and time, such as a callback slot.One of a fixed set of options you list.Whole numbers, such as number of family members.Any number, such as an amount in rupees.Free text, such as a short summary of the complaint.
### Names you cannot use
* `revenue_collected` is reserved by the platform ("This name is reserved by the platform.").
* A name already in the table ("A variable with this name already exists.").
* The same name twice in one dialog ("Another variable above uses this name.").
## The goal
The goal is one Boolean variable that says whether the conversation succeeded, for example `payment_promised`. [Analytics](/documentation/monitor/analytics#where-the-goal-comes-from) uses it to calculate the agent's success rate.
* Only a **Boolean** can be the goal. On other types the switch reads "Only boolean variables can be used as goals."
* An agent has one goal at a time. Turning on **Use as goal** for another variable asks **Replace current goal?** first.
* Changing the goal variable's type asks **Change variable type?** and removes it as the goal.
## Context and tool calls
Below the table:
* **Context** ("Include additional context for better results"): one free-text note for the whole analysis, such as what counts as a valid promise to pay. Click **Save**; you see "Context saved".
* **Log tool calls** ("Include tool call logs to enhance advanced analysis."): a switch. On, the analysis also reads the [tool](/documentation/build-agents/customize-agent-behaviour/tools/overview) calls made during the conversation, such as an API lookup's result.
## Test on a past call
Click **Test**. It is disabled until you have saved at least one variable.
In **Test advanced analysis**, paste a **Call ID** (copy it from the call panel in [Logs](/documentation/monitor/logs#the-call-panel)), or pick from **Or select from recent call log**. The list shows this agent's completed calls; sort it by date or duration. Picking a call from the list runs the test straight away.
If you pasted a Call ID, click **Run analysis**. You see the **Analysis result** next to the **Call transcript** (copy and download buttons). The link icon opens the call in [Logs](/documentation/monitor/logs). Click **Test another** to try a different one.
The test is a preview: it doesn't change the call's stored results or send a webhook.
**Analysis result** shows a value for each variable that matches what was said in the transcript.
## Where results appear
| Where | What you see |
| - | - |
| [Logs](/documentation/monitor/logs) | The call's **Advanced analysis** tab, once the call has results. While it runs: "Advanced analysis is currently under process!" |
| [Logs filters](/documentation/monitor/logs#custom-variables-and-advanced-analysis) | **Advanced analysis** filters calls by a variable's value. Select exactly one agent first. |
| [Analytics](/documentation/monitor/analytics) | **Goal achieved** and **Cost per goal**, once you pick an agent or campaign. Boolean and Enum variables appear as [**Cohort analysis**](/documentation/monitor/analytics#cohort-analysis) charts. With one agent selected, a slice opens the matching calls in Logs. |
| [Event Subscription](/documentation/build-agents/customize-agent-behaviour/event-subscription) | The **Advanced Analysis Complete** event (`client_analysis_completed`) delivers the results to your server. See the [payload](/documentation/build-agents/customize-agent-behaviour/webhooks/call-events#client-analysis-event). |
| [Tools](/documentation/build-agents/customize-agent-behaviour/tools/post-call-tools#post-call-tools) | Post-call tools and condition groups can read **Advanced Analysis** fields (`client_analysis`). |
| [Alerts](/documentation/monitor/alerts#alert-on-an-advanced-analysis-field) | An alert rule can fire on an Advanced Analysis field. |
## Agents with the older prompt editor
Agents that saved an analysis prompt or keys before the variable table existed keep the older editor. It has a **Prompt** box ("Enter your prompt for Advanced Analysis"), a list of keys (**Define required keys for the prompt**) with a type and default value, a tool-call-logs switch, **Save** and **Test Analysis**. Its types are String, Number, Integer, Boolean, Array, Date and DateTime. It has no goal. Everyone else gets the variable table described above.
## Do this with the API
Advanced Analysis variables are set up in the dashboard only; the public API has no operation for them. Read results per call from [Get Call Details](/api-reference/endpoint/history/get-call-details) (the `client_analysis` field, returned when you send `send_analysis=true`) or from the `client_analysis_completed` webhook ([Event Subscription](/documentation/build-agents/customize-agent-behaviour/event-subscription)). You need an [API key](/documentation/manage-account/api-key) and the call's ID.
```bash cURL theme={null}
curl "https://prod-api.ringg.ai/ca/api/v0/calling/call-details?id=550e8400-e29b-41d4-a716-446655440000&send_analysis=true" \
-H "X-API-KEY: $RINGG_API_KEY"
```
```javascript JavaScript theme={null}
const params = new URLSearchParams({
id: "550e8400-e29b-41d4-a716-446655440000",
send_analysis: "true",
});
const response = await fetch(
`https://prod-api.ringg.ai/ca/api/v0/calling/call-details?${params}`,
{ headers: { "X-API-KEY": process.env.RINGG_API_KEY } },
);
console.log(await response.json());
```
```python Python theme={null}
import os
import requests
response = requests.get(
"https://prod-api.ringg.ai/ca/api/v0/calling/call-details",
headers={"X-API-KEY": os.environ["RINGG_API_KEY"]},
params={"id": "550e8400-e29b-41d4-a716-446655440000", "send_analysis": "true"},
)
print(response.json())
```
## Troubleshooting
The dialog shows the server's reason, or "Failed to run analysis" with "Check the call ID and make sure you have saved at least one variable before testing." Check the call ID belongs to this agent and the call completed, then click **Retry**.
Yes. Every agent, WhatsApp included, offers the **Advanced Analysis Complete** event and shows results in Logs. Only the **Test** dialog is limited to completed calls.
Rewrite its **Description** as a precise instruction, add a **Default value**, and use **Context** for definitions. Then run **Test** on a call where you know the answer.
## Next steps
The **Advanced Analysis Complete** event carries every field.
Place a call, then check its **Advanced analysis** tab in Logs.
Goal achieved, cost per goal and cohort charts per variable.
This documentation is built and hosted on [Mintlify](https://mintlify.com), a developer documentation platform.