> ## Documentation Index
> Fetch the complete documentation index at: https://docs.ringg.ai/llms.txt
> Use this file to discover all available pages before exploring further.
> ## Agent Instructions
> To search or read these docs, connect the Ringg docs MCP server at https://docs.ringg.ai/mcp (no key needed; tools search_ringg_ai and query_docs_filesystem_ringg_ai) instead of browsing pages one by one. Setup for each client: https://docs.ringg.ai/resources/mcp-server/docs-mcp-server/mcp-for-ai-assistants.md
> The dashboard labels agents "Assistants"; these docs say "agent". Both mean the same object, identified by agent_id.
> API base URL: https://prod-api.ringg.ai/ca/api/v0. Send the workspace API key in the X-API-KEY header, from server-side code only.
> Placing a call dials a real phone number and spends credits. Confirm the number with the user before calling.
> To act on a Ringg workspace (place calls, edit agents, read transcripts), use the separate Ringg workspace MCP server at https://mcp.ringg.ai/mcp: https://docs.ringg.ai/resources/mcp-server/workspace-mcp-server/overview.md
# WhatsApp Flows with live data
> Fill a WhatsApp Flow's screens while the customer is using it, such as free appointment slots from Calendly, Google Calendar or Cal.com, through Ringg AI.
export const RelatedTopics = ({items}) =>
;
A static Flow only shows what you typed when you built it. A **dynamic Flow** asks for fresh information while the customer is inside it. In the dashboard, a Flow's **Data source** says where that information comes from, and the **Live data** column of the Flows tab shows it. For example, the customer picks a date and the next screen lists the times still free in your calendar that day.
Ringg does the technical part for you. It hosts the connection WhatsApp needs (the *endpoint*), handles WhatsApp's encryption, and fetches the data. You choose where the data comes from:
| Source | Use it for | Who sets it up |
| - | - | - |
| **Calendar** | Showing free appointment slots from Calendly, Google Calendar or Cal.com | Anyone, by following this page. No code needed. |
| **Server** | Anything from your own systems: branches near a pincode, stock, prices, order status | A developer on your team. See [Live data from your server](/documentation/build-agents/agents/whatsapp-agents/flows-your-server). |
Read [WhatsApp Flows](/documentation/build-agents/agents/whatsapp-agents/flows) first. Adding a Flow to an assistant, the prompt, and where answers show up all work the same way with live data.
## How a booking Flow works
```mermaid theme={null}
sequenceDiagram
participant C as Customer
participant W as WhatsApp
participant R as Ringg
participant Cal as Your calendar
C->>W: Taps "Book a visit"
W->>R: Which screen first?
R-->>W: Date screen, today to 30 days ahead
C->>W: Picks 2 Oct, taps "See times"
W->>R: Free times on 2 Oct?
R->>Cal: Free slots on 2 Oct
Cal-->>R: 10:00, 10:30, 14:00
R-->>W: Time screen with those slots
C->>W: Picks 10:00, adds name and email, taps "Book"
W->>R: The answers, into the chat
R->>Cal: Your assistant books 10:00 with its booking tool
R-->>C: "You're booked for 2 Oct at 10:00 AM"
```
The Flow itself doesn't book anything. It shows the free times and sends the customer's choice back to the chat. Your assistant then books the slot with the calendar's booking tool and confirms, just as it would on a call.
## Set up appointment booking
### Before you start
* A WhatsApp assistant with a **Ready** WhatsApp number attached. See [Create a WhatsApp agent](/documentation/build-agents/agents/whatsapp-agents/create-an-agent).
* Calendly, Google Calendar or Cal.com connected under **Tools** in Ringg.
### The booking design
Both ways below use this design: a **Pick a date** screen, then a **Pick a time** screen that lists the free times and asks for the customer's name and email.
```json theme={null}
{
"version": "6.3",
"data_api_version": "3.0",
"routing_model": { "PICK_DATE": ["PICK_SLOT"], "PICK_SLOT": [] },
"screens": [
{
"id": "PICK_DATE",
"title": "Pick a date",
"data": {
"min_date": { "type": "string", "__example__": "2026-10-01" },
"max_date": { "type": "string", "__example__": "2026-10-31" }
},
"layout": {
"type": "SingleColumnLayout",
"children": [
{
"type": "DatePicker",
"name": "date",
"label": "Date",
"required": true,
"min-date": "${data.min_date}",
"max-date": "${data.max_date}"
},
{
"type": "Footer",
"label": "See times",
"on-click-action": { "name": "data_exchange", "payload": { "date": "${form.date}" } }
}
]
}
},
{
"id": "PICK_SLOT",
"title": "Pick a time",
"terminal": true,
"data": {
"date": { "type": "string", "__example__": "2026-10-02" },
"slots": {
"type": "array",
"items": {
"type": "object",
"properties": { "id": { "type": "string" }, "title": { "type": "string" } }
},
"__example__": [{ "id": "2026-10-02T10:00:00+05:30", "title": "10:00 AM" }]
}
},
"layout": {
"type": "SingleColumnLayout",
"children": [
{
"type": "RadioButtonsGroup",
"name": "slot",
"label": "Available times",
"data-source": "${data.slots}",
"required": true
},
{ "type": "TextInput", "name": "name", "label": "Your name", "required": true },
{ "type": "TextInput", "name": "email", "label": "Email", "input-type": "email", "required": true },
{
"type": "Footer",
"label": "Book",
"on-click-action": {
"name": "complete",
"payload": {
"date": "${data.date}",
"slot": "${form.slot}",
"name": "${form.name}",
"email": "${form.email}"
}
}
}
]
}
}
]
}
```
### The quick way: build it in Ringg
Plan about 5 minutes.
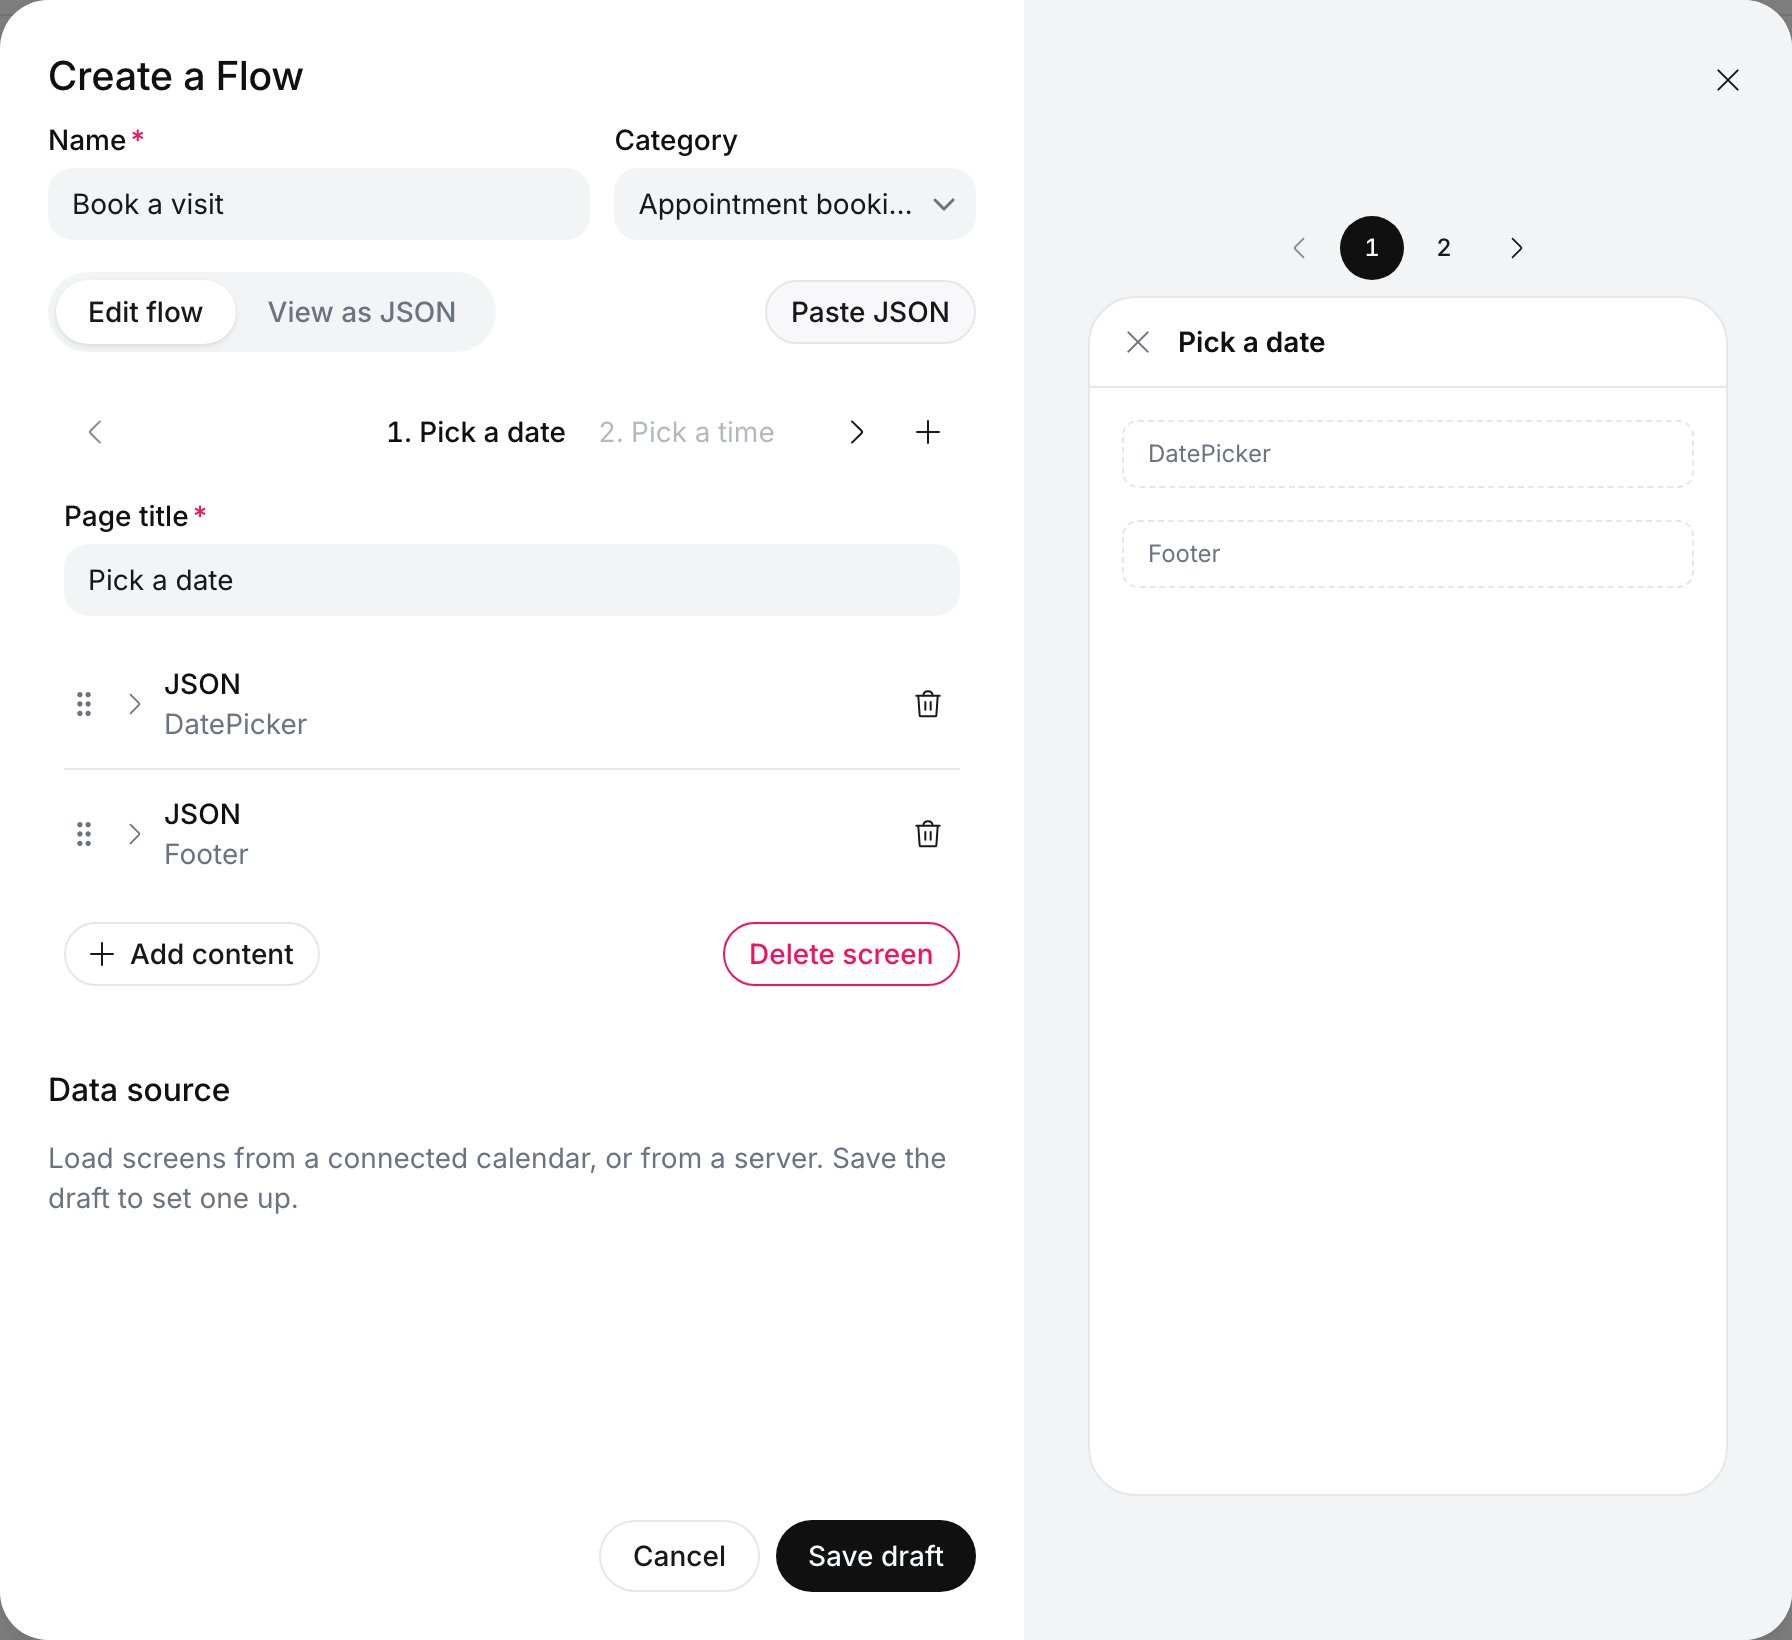
Go to **Tools → WhatsApp Business**, select the **Flows** tab, then **Create Flow**. Name it, for example *Book a visit*, and choose the category **Appointment booking**.
Copy the [booking design](#the-booking-design) above, then select **Paste JSON** in the builder. The **Pick a date** and **Pick a time** screens appear. The parts that read live data stay as **JSON** rows, which is expected: Ringg sends them to Meta exactly as written.
Select **Save draft**, then **Cancel** to see the Flow's details.
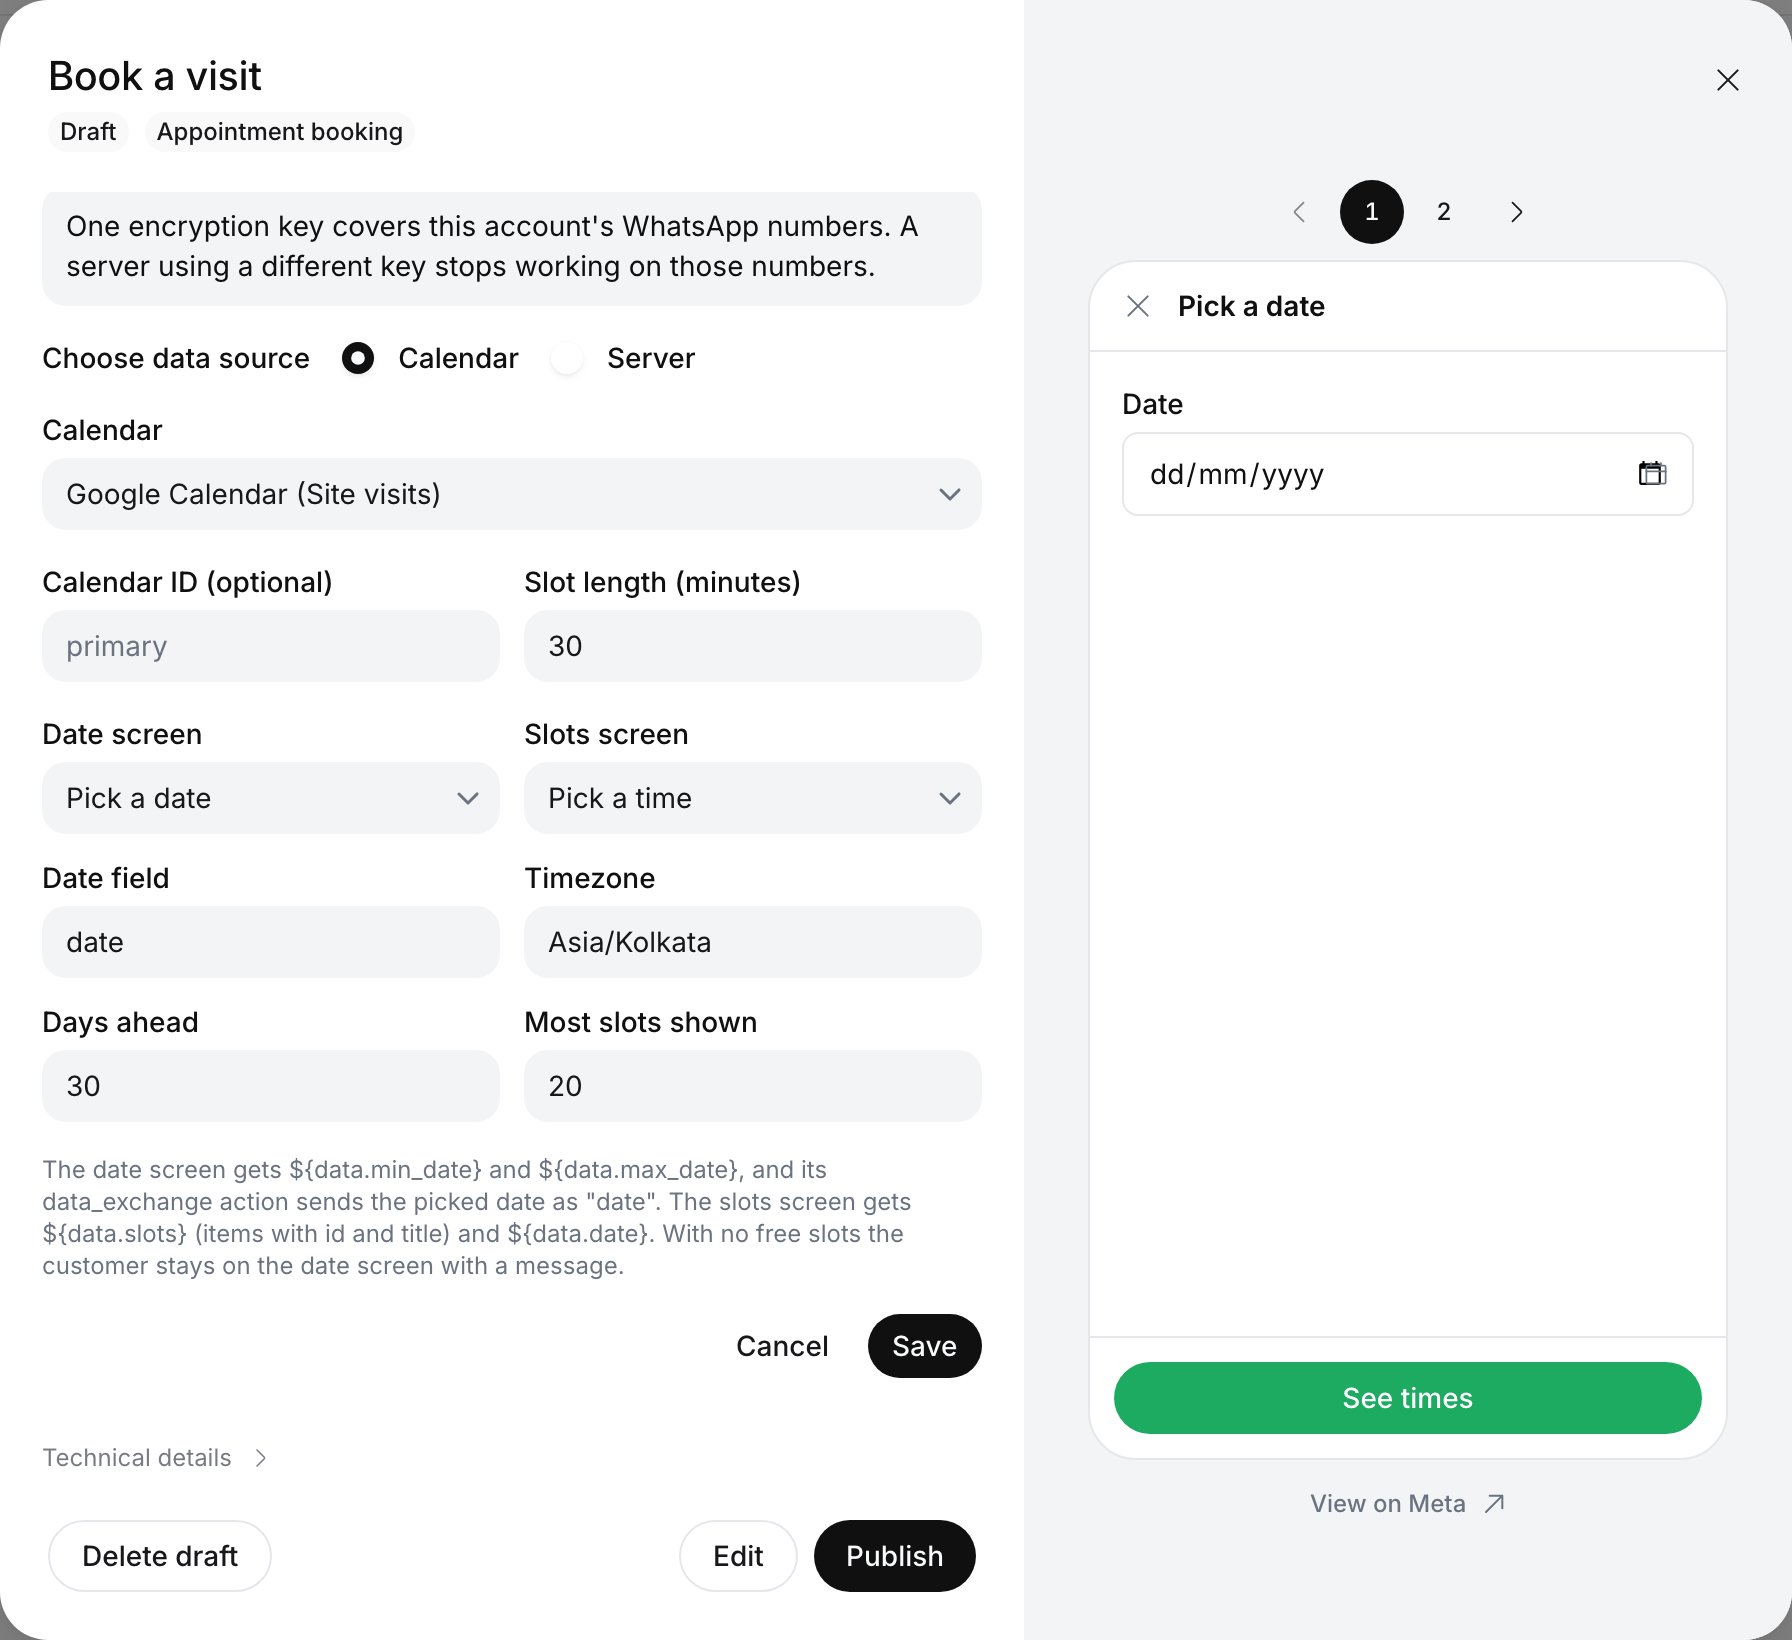
Under **Data source**, select **Set up data source**. Keep **Calendar** and pick your connected calendar. **Date screen** and **Slots screen** are already set to **Pick a date** and **Pick a time**. Check the **Timezone**; the other settings are explained in the **Connect your calendar** step of [Or design it in WhatsApp Manager](#or-design-it-in-whatsapp-manager). Select **Save**.
**Data source** lists the calendar, the date screen and the slots screen.
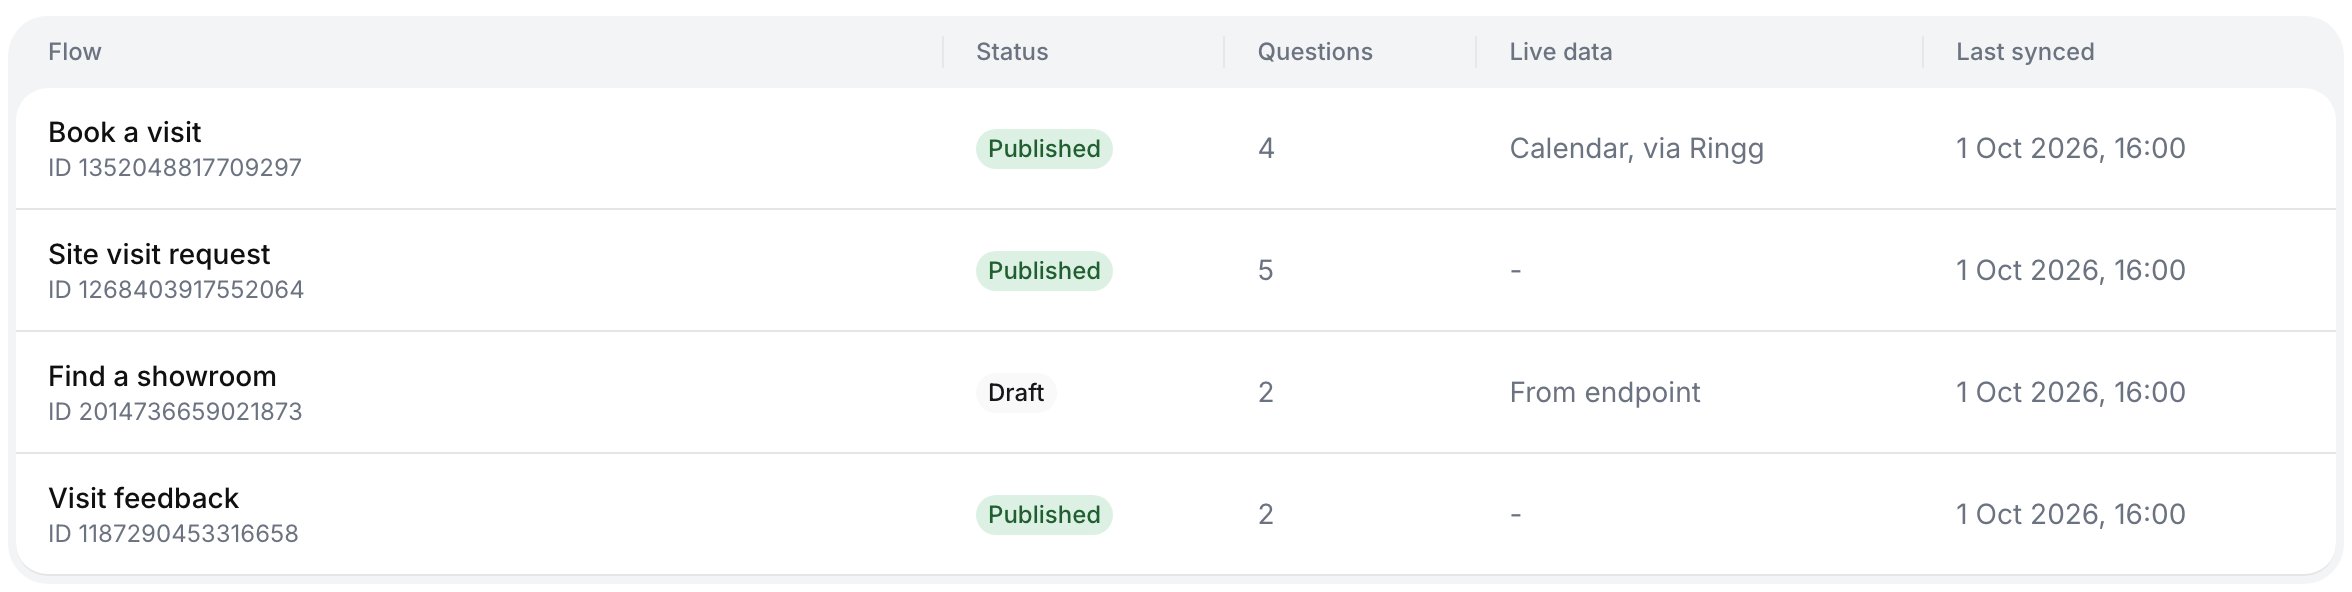
Select **Publish**, then **Publish** again to confirm. In the **Flows** tab, **Live data** shows **Calendar, via Ringg**.
Now [let your assistant send it and book](#let-your-assistant-send-it-and-book).
### Or design it in WhatsApp Manager
If you'd rather keep the Flow in WhatsApp Manager, for example to edit its layout there, build it from the same design. You need access to the same WhatsApp Business account in Meta's [WhatsApp Manager](https://business.facebook.com/wa/manage/home/). Plan about 15 minutes.
In WhatsApp Manager, open **Account tools → Flows** and select **Create Flow**. Name it, for example *Book a visit*, choose the category **Appointment booking**, and start from a blank Flow.
The builder shows the Flow's code on the left and a preview on the right. Select everything in the code editor, delete it, and paste the [booking design](#the-booking-design). The preview should show a **Pick a date** screen.
Select **Save**. Don't publish yet: the Flow needs its data source connected first.
In Ringg, go to **Tools → WhatsApp Business** and select the **Flows** tab. It syncs as it opens. Select **Book a visit**. It shows as **Draft**, which is expected.
In the Flow's details, under **Data source**, select **Set up data source**. Keep **Calendar** and fill in:
| Setting | What to enter |
| - | - |
| **Calendar** | The calendar to read free times from. |
| **Event type link** (Calendly) or **Event type ID** (Cal.com), both optional | The meeting type to offer, for example your *30 minute site visit*. Leave it empty to use the account's first one. In Cal.com, the ID is the number at the end of the address when you edit the event type. For Calendly, it is the event type's API link, which starts with `https://api.calendly.com/event_types/`. |
| **Calendar ID** (optional) and **Slot length (minutes)** (Google Calendar) | Leave the calendar ID empty to use the main calendar. Slot length is how long each appointment is, in minutes. |
| **Date screen** | **Pick a date** |
| **Slots screen** | **Pick a time** |
| **Date field** | `date`. Leave it as it is. |
| **Timezone** | Where your appointments happen, such as `Asia/Kolkata` or `Asia/Dubai`. |
| **Days ahead** | How far ahead customers can book. 30 by default. |
| **Most slots shown** | The most times listed for one day. 20 by default. |
Select **Save**.
After saving, **Data source** shows where things stand:
* Only the calendar, the date screen and the slots screen: everything is connected. Go to the next step.
* ***Meta kept this Flow's own endpoint***, with a URL beneath it. This happens when the Flow was already published. Copy the URL with the copy icon. In WhatsApp Manager, open the Flow, paste the URL as its **endpoint**, and publish it again.
Back in the Flow in WhatsApp Manager:
1. Open the Flow's endpoint settings. The endpoint URL should end in `/exchange`.
2. **Connect your Meta app**: choose the app you connected when you set up WhatsApp Business on Ringg.
3. Run the **health check**. It should pass.
4. Open the **Preview**, pick a date and check that times appear.
5. **Publish** the Flow.
In the **Flows** tab, select the refresh icon. **Book a visit** now shows as **Published**, with **Calendar, via Ringg** under **Live data**.
## Let your assistant send it and book
In the agent editor, select **WhatsApp Flows**, then **Add flow**, and pick **Book a visit**. Write the **Message** and **Button label**, for example *Tap below to pick a time for your visit.* and *Book a visit*.
Keep **Opens on** set to **Loaded by the Flow's endpoint**, so every customer starts on today's dates. Select **Save**.
Select **Tools** in the left menu, then **On-call → Integration**, pick your calendar and add its booking tool:
| Calendar | Booking tool |
| - | - |
| Calendly | **Schedule Event** |
| Google Calendar | **Create Booking** |
| Cal.com | **Create Booking** |
Set the start time, name and email to **Dynamic**, so the assistant fills them in from the Flow's answers. Give fixed settings, such as the event type and timezone, a **Static** value.
Tag both tools in the prompt with `@`:
```text theme={null}
When the customer wants to book a visit, send @||send_book_a_visit||.
When they submit it, book the time they picked with the calendar booking tool,
using "Available times" as the start time and their name and email.
Then confirm the date and time in plain words, like "2 Oct at 10:00 AM".
If the time is no longer free, say so and send @||send_book_a_visit|| again.
```
Open **Test assistant**, scan the QR code and ask to book a visit. Pick a date, check that the times match your calendar, choose one, submit, and look for the booking in your calendar.
The answers reach the assistant like this. The time the customer picked arrives in full, with its date and timezone, which is the format booking tools expect:
```text theme={null}
User submitted the WhatsApp Flow "Book a visit" (sent with send_book_a_visit):
date=2026-10-02, Available times=2026-10-02T10:00:00+05:30, Your name=Priya Sharma, Email=priya@example.com
```
## Change the design safely
You can change the words the customer sees without breaking anything:
* Screen titles, such as `"title": "Pick a date"`.
* Field and button labels, such as `"label": "See times"`.
* Extra questions on the **Pick a time** screen, such as a phone number or notes. Add each one to the `payload` of the **Book** button as well, or its answer won't come back.
Leave these exactly as they are, because Ringg relies on them:
| Keep | Why |
| - | - |
| `"data_api_version": "3.0"` and the `routing_model` | They tell WhatsApp this Flow loads live data. |
| The screen IDs `PICK_DATE` and `PICK_SLOT` | Ringg sends each answer to these screens. If you rename them, pick the new names under **Data source** again. |
| `"name": "date"` on the date picker, and `"date"` in the **See times** payload | That is the **Date field** Ringg reads. |
| `${data.min_date}`, `${data.max_date}`, `${data.slots}`, `${data.date}` and the `data` blocks | These are where Ringg's dates and free times appear. |
To change a published Flow, open it in the **Flows** tab and select **Duplicate & edit**. Edit the copy, set up its data source again, and publish it. See [Change a published Flow](/documentation/build-agents/agents/whatsapp-agents/flow-builder#change-a-published-flow).
## Troubleshooting
| You see | Where | What to do |
| - | - | - |
| *Connect Calendly, Google Calendar or Cal.com in Integrations first.* | Data source setup | Connect a calendar under **Tools**, then come back. |
| *Meta kept this Flow's own endpoint* | Data source, after saving | Paste the URL shown as the Flow's endpoint in WhatsApp Manager, publish, then sync. |
| Health check fails with *Unknown Flow* | WhatsApp Manager | The data source isn't saved on this Flow in Ringg yet. Save it, then run the check again. |
| Health check fails with a signature error (432) | WhatsApp Manager | The wrong Meta app is connected to the Flow. Connect the app you use with Ringg. |
| The Flow says it can't open, or the health check reports a key problem (421) | Phone or WhatsApp Manager | The number's encryption key isn't Ringg's. In Ringg, select **Edit source** under the Flow's **Data source** and save again. This puts Ringg's key back on every number of the account. |
| *No free slots on 2 Oct. Pick another date.* | The customer's phone | The calendar has no free times that day. Check the event type and the calendar's working hours. |
| *Couldn't load free slots. Please try again.* | The customer's phone | Ringg couldn't read the calendar. Reconnect it under **Tools** and check the event type. |
| *Booking isn't available right now.* | The customer's phone | The calendar was disconnected. Reconnect it, then pick it again under **Data source**. |
| Times are an hour or more off | The customer's phone | Set the right **Timezone** under **Data source**. |
## Good to know
WhatsApp encrypts everything a Flow sends, using a key set on each phone number. When you save a data source, Ringg puts its key on every number of the WhatsApp Business account, reusing the key it already has. If a developer connected the same numbers to their own Flow server with a different key, that setup stops working. Talk to them first, or have them use [a server data source](/documentation/build-agents/agents/whatsapp-agents/flows-your-server) instead.
Changing a published Flow's endpoint moves it back to Draft in WhatsApp Manager, so Ringg never changes it for you. If a published Flow isn't already using Ringg's endpoint, saving its data source shows the URL to paste in WhatsApp Manager, and you publish the Flow again there. Setting up the data source before you publish avoids this.
Free times are read when the customer picks a date. If someone else books the same time before they submit, the booking tool returns an error and the assistant can offer another time, as the prompt above tells it to.
Open the Flow in the **Flows** tab, select **Edit source** under **Data source**, then **Remove**. The Flow then has nowhere to load its data from, so stop sending it or remove it from your assistants first.
This documentation is built and hosted on [Mintlify](https://mintlify.com), a developer documentation platform.