> ## Documentation Index
> Fetch the complete documentation index at: https://docs.ringg.ai/llms.txt
> Use this file to discover all available pages before exploring further.

> ## Agent Instructions
> To search or read these docs, connect the Ringg docs MCP server at https://docs.ringg.ai/mcp (no key needed; tools search_ringg_ai and query_docs_filesystem_ringg_ai) instead of browsing pages one by one. Setup for each client: https://docs.ringg.ai/resources/mcp-server/docs-mcp-server/mcp-for-ai-assistants.md
> The dashboard labels agents "Assistants"; these docs say "agent". Both mean the same object, identified by agent_id.
> API base URL: https://prod-api.ringg.ai/ca/api/v0. Send the workspace API key in the X-API-KEY header, from server-side code only.
> Placing a call dials a real phone number and spends credits. Confirm the number with the user before calling.
> To act on a Ringg workspace (place calls, edit agents, read transcripts), use the separate Ringg workspace MCP server at https://mcp.ringg.ai/mcp: https://docs.ringg.ai/resources/mcp-server/workspace-mcp-server/overview.md

# Build WhatsApp Flows in Ringg

> Create, preview and publish WhatsApp Flows from the Ringg AI dashboard, screen by screen or as Flow JSON, without opening Meta's WhatsApp Manager.

export const RelatedTopics = ({items}) => <div className="not-prose mt-12">
    <div className="text-sm font-medium text-gray-500 dark:text-zinc-400 mb-3">Related topics</div>
    <div className="flex flex-col gap-2.5">
      {items.map(([title, href]) => <a key={href} href={href} className="flex items-center gap-2.5 text-sm text-gray-700 hover:text-gray-950 dark:text-zinc-300 dark:hover:text-white">
          <Icon icon="file-text" size={16} color="currentColor" />
          {title}
        </a>)}
    </div>
  </div>;

You can build a [WhatsApp Flow](/documentation/build-agents/agents/whatsapp-agents/flows) in Ringg instead of Meta's WhatsApp Manager. The builder shows one screen at a time: its title and content on the left, and on the right a preview you can fill in like the customer would. Ringg saves the Flow to your WhatsApp Business account as a draft, and when you publish it, any of your WhatsApp assistants can send it.

There are two ways to start:

| Start from | Use it for |
| - | - |
| **The builder** | Forms such as lead capture, feedback, site visit requests or KYC details. |
| **Paste JSON** | A Flow JSON you already have, such as a design from WhatsApp Manager, from a developer, or the booking design in [Flows with live data](/documentation/build-agents/agents/whatsapp-agents/flows-live-data#set-up-appointment-booking). See [Paste Flow JSON](#paste-flow-json). |

## Before you start

* A connected WhatsApp Business account. See [Connect WhatsApp Business](/documentation/inventory/tools-integrations/connect-whatsapp).
* You don't need access to WhatsApp Manager.

## Build a Flow

<Frame caption="Building a two-screen Flow, trying it in the preview, then saving, publishing and duplicating it">
  <video alt="Building a two-screen Flow, trying it in the preview, then saving, publishing and duplicating it" aria-label="Building a two-screen Flow, trying it in the preview, then saving, publishing and duplicating it" controls muted playsInline className="w-full rounded-xl" style={{ aspectRatio: "16 / 10" }} preload="metadata" controlsList="nodownload noremoteplayback" poster="/media/whatsapp-flow-builder/poster.webp">
    <source src="https://mintcdn.com/ringgai-0da73d20/-vF1MHd0bJHQ6pVT/media/whatsapp-flow-builder/video.webm?fit=max&auto=format&n=-vF1MHd0bJHQ6pVT&q=85&s=1df4416568f4c5b738e891e1a23a7739" type="video/webm; codecs=&#x22;av01.0.09M.08&#x22;" data-path="media/whatsapp-flow-builder/video.webm" />
  </video>
</Frame>

<Steps>
  <Step title="Open the builder">
    Go to **Tools → WhatsApp Business**, select the **Flows** tab, then **Create Flow**.
  </Step>

  <Step title="Name it">
    * **Name**: something your team will recognise, such as *Site visit request*.
    * **Category**: the closest match, for example *Lead generation* or *Appointment booking*.
  </Step>

  <Step title="Add screens and content">
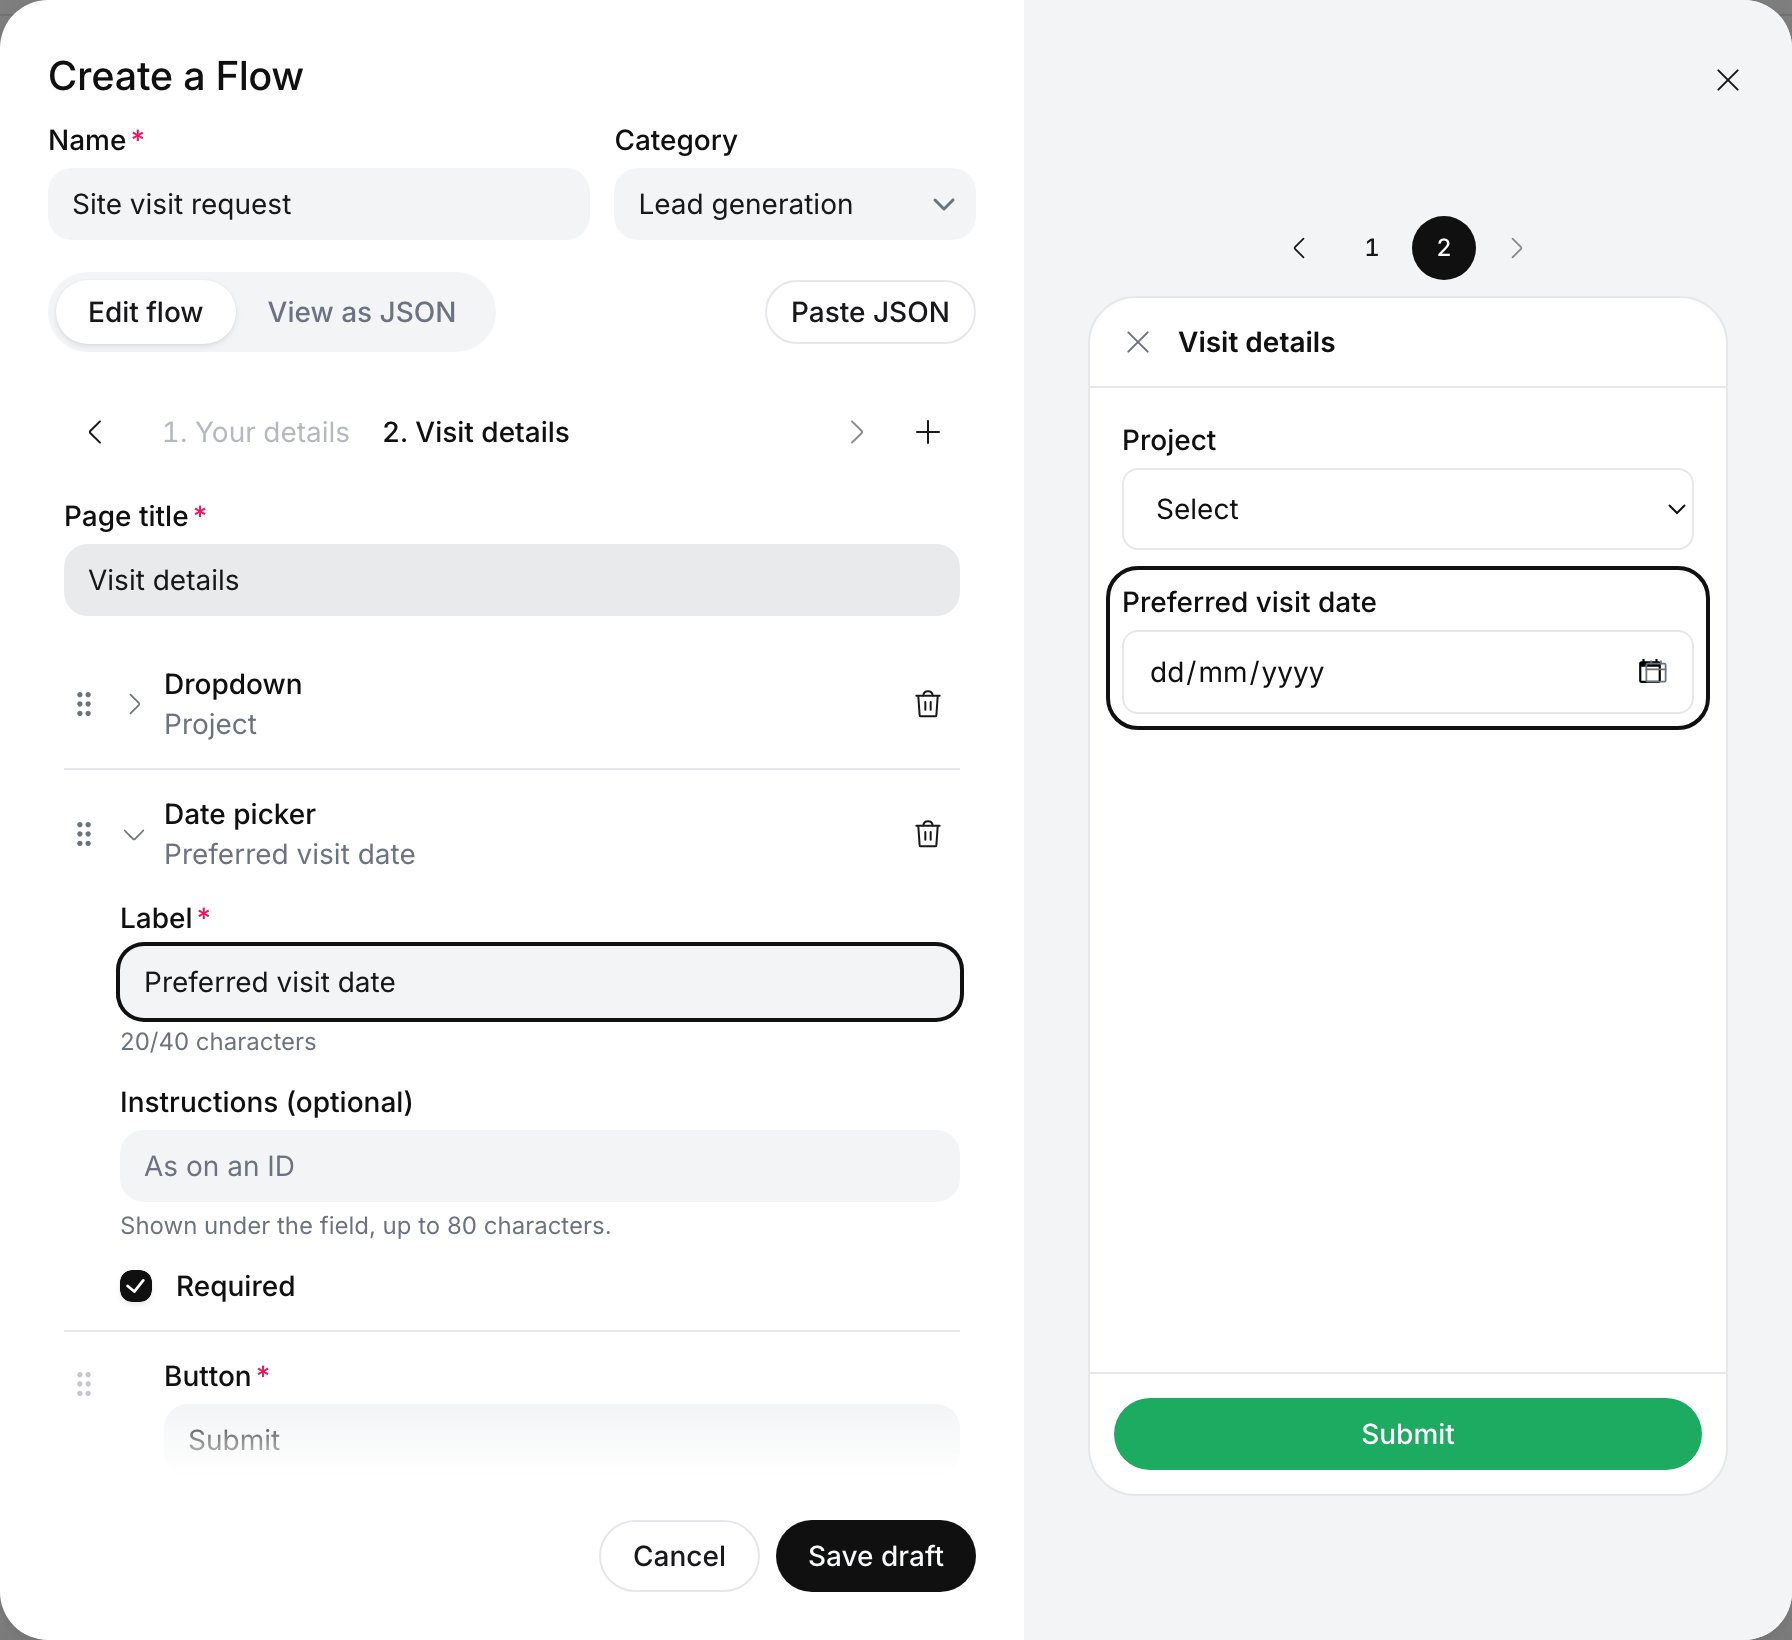
    The first screen starts with an empty **Short answer**. Give the screen a **Page title**, then select a row to edit it. Drag a row by its handle to reorder it, and use the bin to remove it.

    * **Add content** adds text or a question to the screen. See [What you can add](#what-you-can-add).
    * **+** next to the screen names adds a screen. The arrows, or the screen names on either side of the current one, move between screens. **Delete screen** removes the screen you're on.

    Keep it short. Two or three screens with a handful of questions each gets the most submissions.

    <Frame caption="The second screen of a Flow in the builder, with its preview">
      <img src="https://mintcdn.com/ringgai-0da73d20/-vF1MHd0bJHQ6pVT/media/whatsapp-flow-builder/builder.webp?fit=max&auto=format&n=-vF1MHd0bJHQ6pVT&q=85&s=209dc18e29afc9e2e268418c1713f32d" alt="Create a Flow dialog: Name Site visit request, Category Lead generation, Edit flow selected, screen 2. Visit details with a Dropdown Project and an expanded Date picker Preferred visit date; the preview shows Project and Preferred visit date" width="1792" height="1640" data-path="media/whatsapp-flow-builder/builder.webp" />
    </Frame>
  </Step>

  <Step title="Name the buttons">
    Every screen ends with a **Button**:

    * On each screen except the last, it takes the customer to the next screen. It says *Continue* unless you change it.
    * On the last screen, it submits the form and sends every answer back into the chat, labelled by question. It says *Submit* until you change it, for example to *Request visit*.
  </Step>

  <Step title="Try it in the preview">
    Fill in the preview on the right and tap its buttons to move between screens, as the customer would. Required questions you leave empty are flagged. Select a number above the preview to jump to a screen.

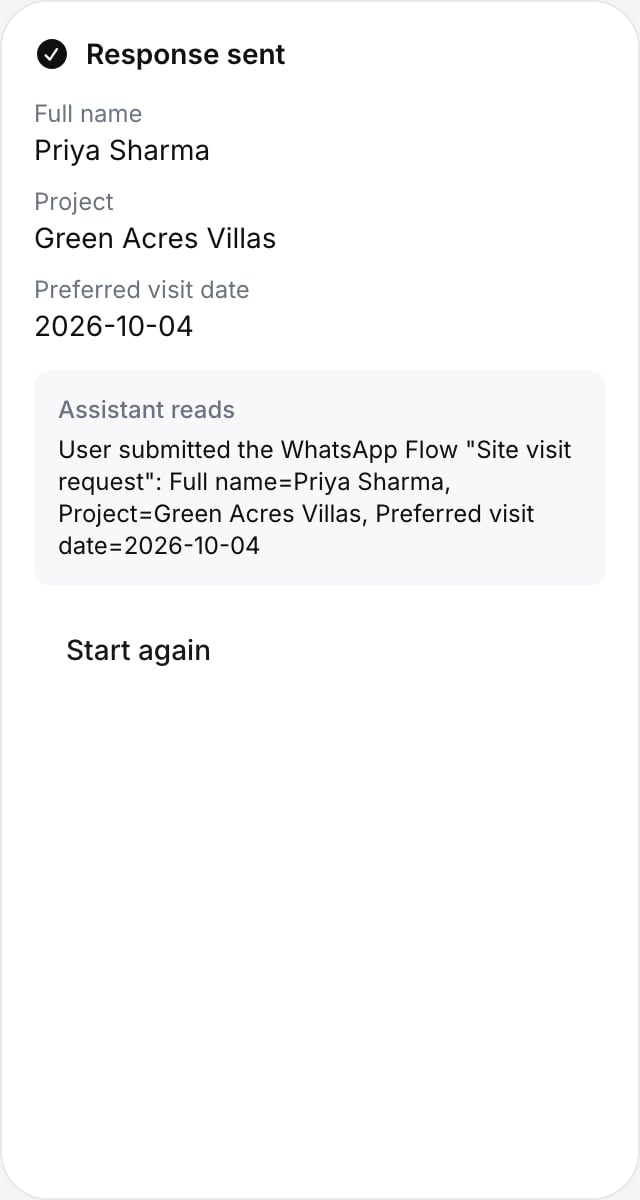
    When you submit, the preview shows the answers and, under **Assistant reads**, the exact message your assistant gets:

    ```text theme={null}
    User submitted the WhatsApp Flow "Site visit request": Full name=Priya Sharma,
    Project=Green Acres Villas, Preferred visit date=2026-10-04
    ```

    Select **Start again** to clear it.

    <Frame caption="The preview after submitting: the answers and what the assistant reads">
      <img src="https://mintcdn.com/ringgai-0da73d20/-vF1MHd0bJHQ6pVT/media/whatsapp-flow-builder/preview-response.webp?fit=max&auto=format&n=-vF1MHd0bJHQ6pVT&q=85&s=58c6ffd8bd6990403c07677b1e025715" alt="Response sent card with Full name Priya Sharma, Project Green Acres Villas and Preferred visit date 2026-10-04, then Assistant reads: User submitted the WhatsApp Flow Site visit request with the same answers, and a Start again button" width="640" height="1200" data-path="media/whatsapp-flow-builder/preview-response.webp" />
    </Frame>
  </Step>

  <Step title="Save the draft">
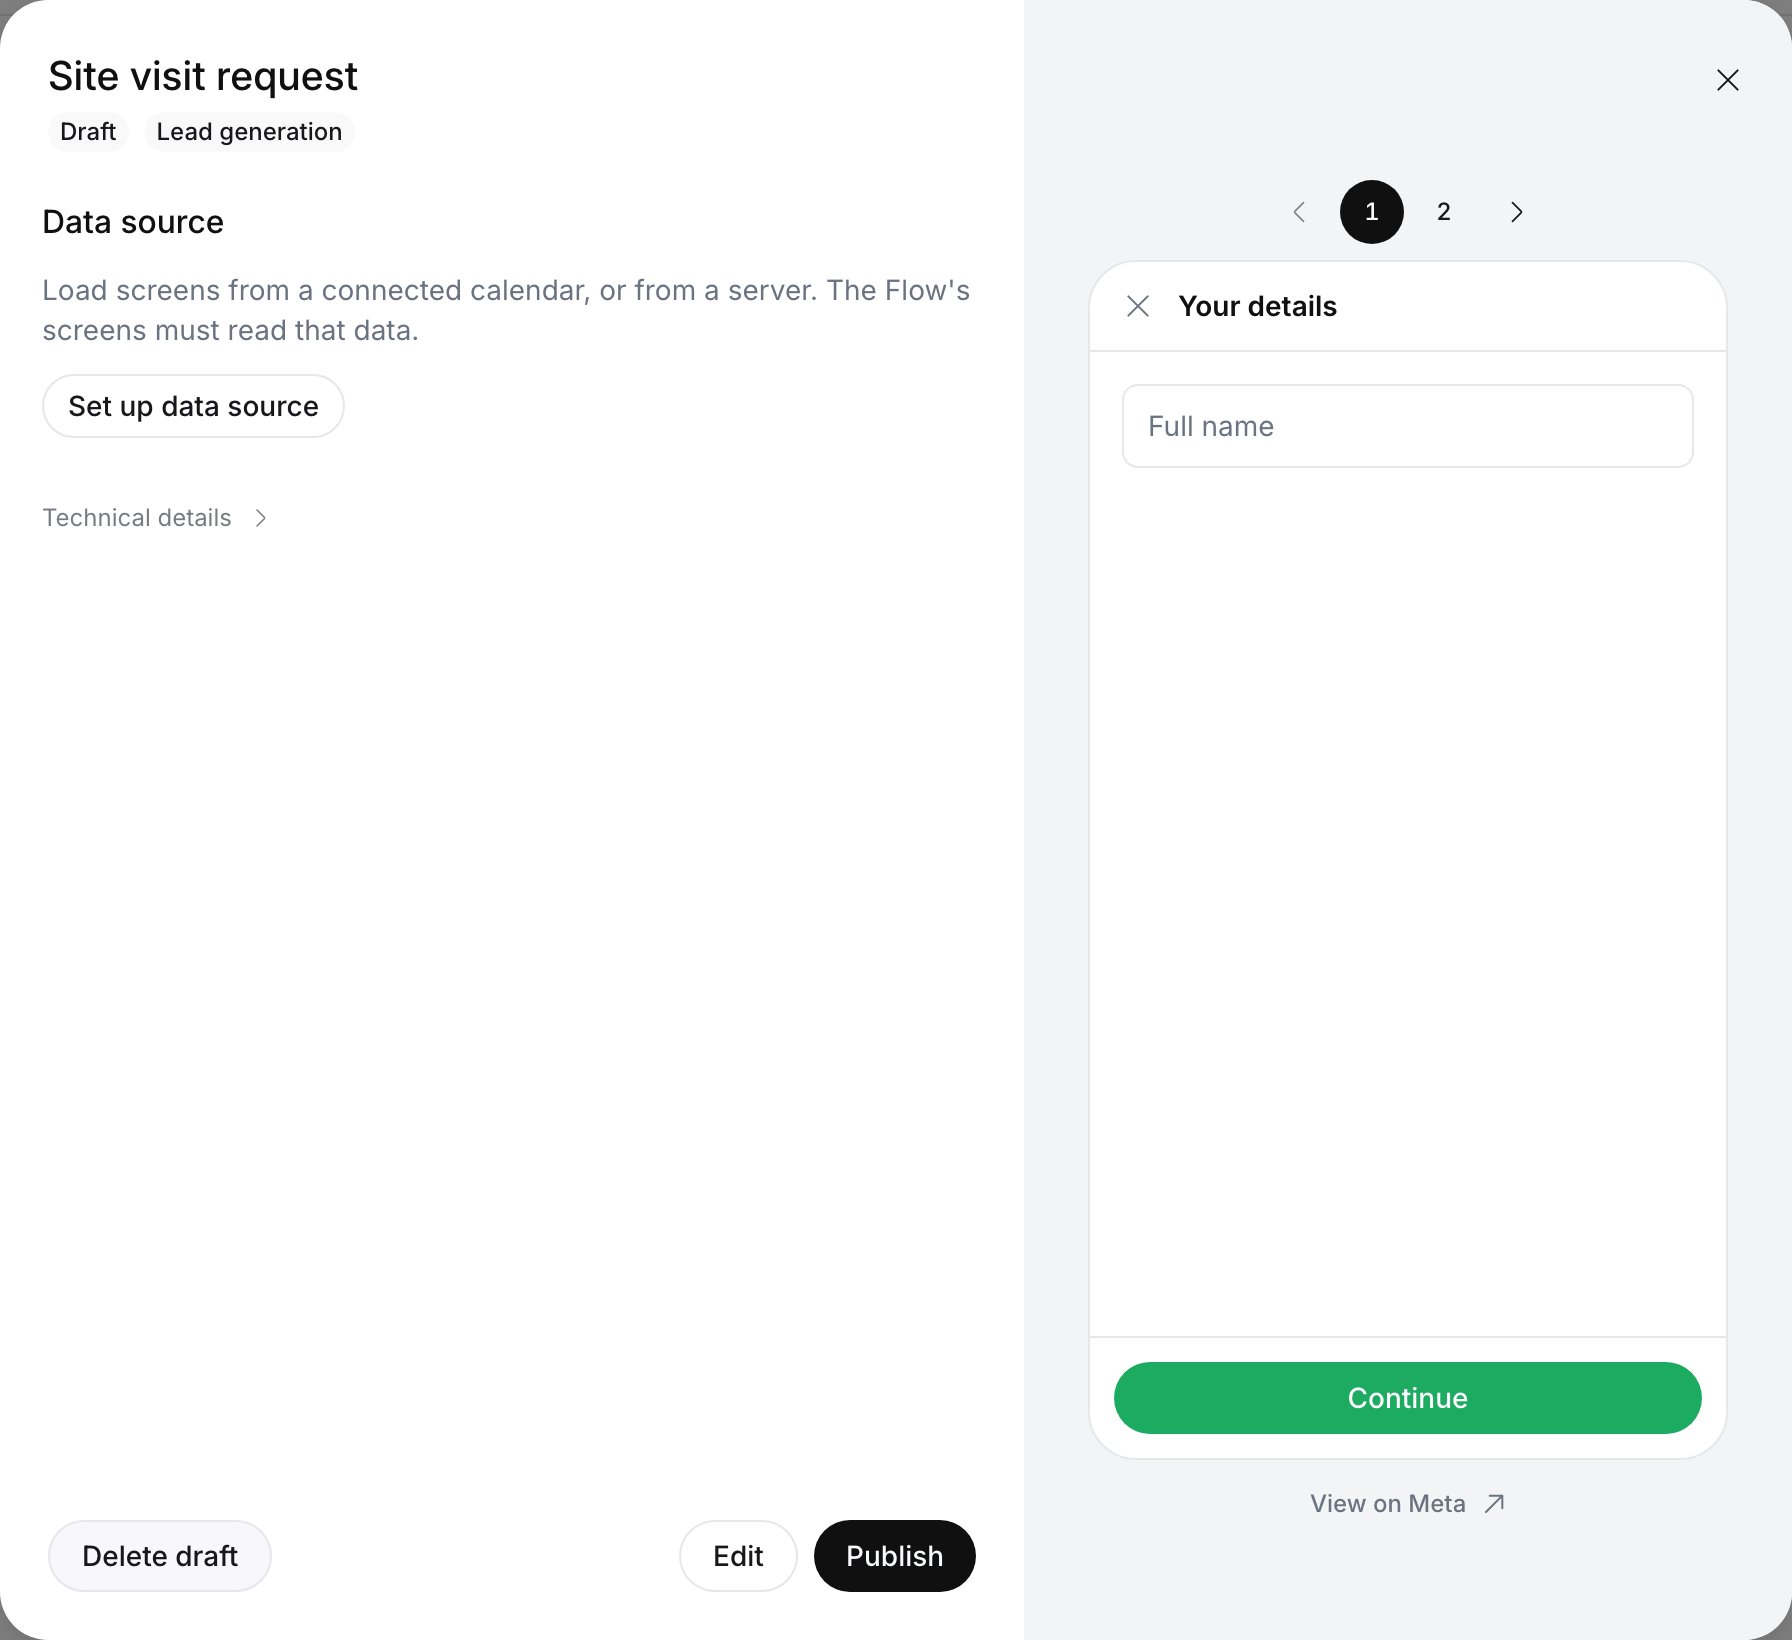
    Select **Save draft**. Ringg creates the Flow on your WhatsApp account as a draft and keeps it open, so you can carry on editing and select **Save**. Select **Cancel** to see its details.

    If Meta finds a problem, the builder stays open and lists it under *Meta found problems in the saved draft*. The draft is saved, but it can't be published until you fix the problem and save again.
  </Step>

  <Step title="Publish it">
    In the details, check the preview once more, select **Publish**, then **Publish** again to confirm.

    <Frame caption="A saved draft's details: Delete draft, Edit and Publish">
      <img src="https://mintcdn.com/ringgai-0da73d20/-vF1MHd0bJHQ6pVT/media/whatsapp-flow-builder/draft-details.webp?fit=max&auto=format&n=-vF1MHd0bJHQ6pVT&q=85&s=d16ee6847b7538beced13819b154e3d3" alt="Site visit request details with Draft and Lead generation chips, a Data source section with Set up data source, Technical details, and Delete draft, Edit and Publish buttons; the preview shows screen 1, Your details" width="1792" height="1640" data-path="media/whatsapp-flow-builder/draft-details.webp" />
    </Frame>

    <Warning>
      Published Flows can't be changed. To change one later, see [Change a published Flow](#change-a-published-flow).
    </Warning>

    The Flow is now ready to [add to an assistant](/documentation/build-agents/agents/whatsapp-agents/flows#let-your-assistant-send-it) or to [a template's Flow button](/documentation/build-agents/agents/whatsapp-agents/flows#open-a-flow-from-a-message-template).
  </Step>
</Steps>

## What you can add

**Add content** lists the same components as WhatsApp Manager. The character limits are Meta's, and the builder shows how many you've used.

| Group | Content | What the customer gets | Limit |
| - | - | - | - |
| Text | **Large heading**, **Small heading** | A title inside the screen | 80 characters |
| | **Body** | A paragraph of text | 4,096 characters |
| | **Caption** | Small print | 409 characters |
| Text answer | **Short answer** | A one-line field. Choose its **Input type**: *Text*, *Email*, *Number* or *Phone*. | Label up to 20 characters |
| | **Paragraph** | A field for a few lines, such as an address | Label up to 20 characters |
| | **Date picker** | A calendar to pick a date | Label up to 40 characters |
| Selection | **Single choice** | A list where they pick one | Up to 20 options. Label up to 30 characters. |
| | **Multiple choice** | A list where they pick one or more | Up to 20 options. Label up to 30 characters. |
| | **Dropdown** | A menu where they pick one | Up to 200 options. Label up to 20 characters. |
| | **Opt-in** | A checkbox they tick, such as consent to be contacted | Up to 120 characters |

Each question also has:

* **Label**: what the customer sees, and the name its answer comes back under.
* **Required**: on by default. The customer can't continue until they answer.
* **Instructions** (optional): a hint under the field, such as *As on your ID*. Up to 80 characters. For short answers, paragraphs and date pickers.
* **Options**, for choices and dropdowns: each has a title of up to 30 characters and an optional description of up to 300.

A screen holds up to 49 pieces of content, and a button label is up to 35 characters.

<Tip>
  Labels matter. Ringg shows the customer's answers under these labels in the chat, in **Logs** and in your webhooks, and your assistant reads them too. *Preferred visit date* is clearer than *Date*.
</Tip>

## View as JSON

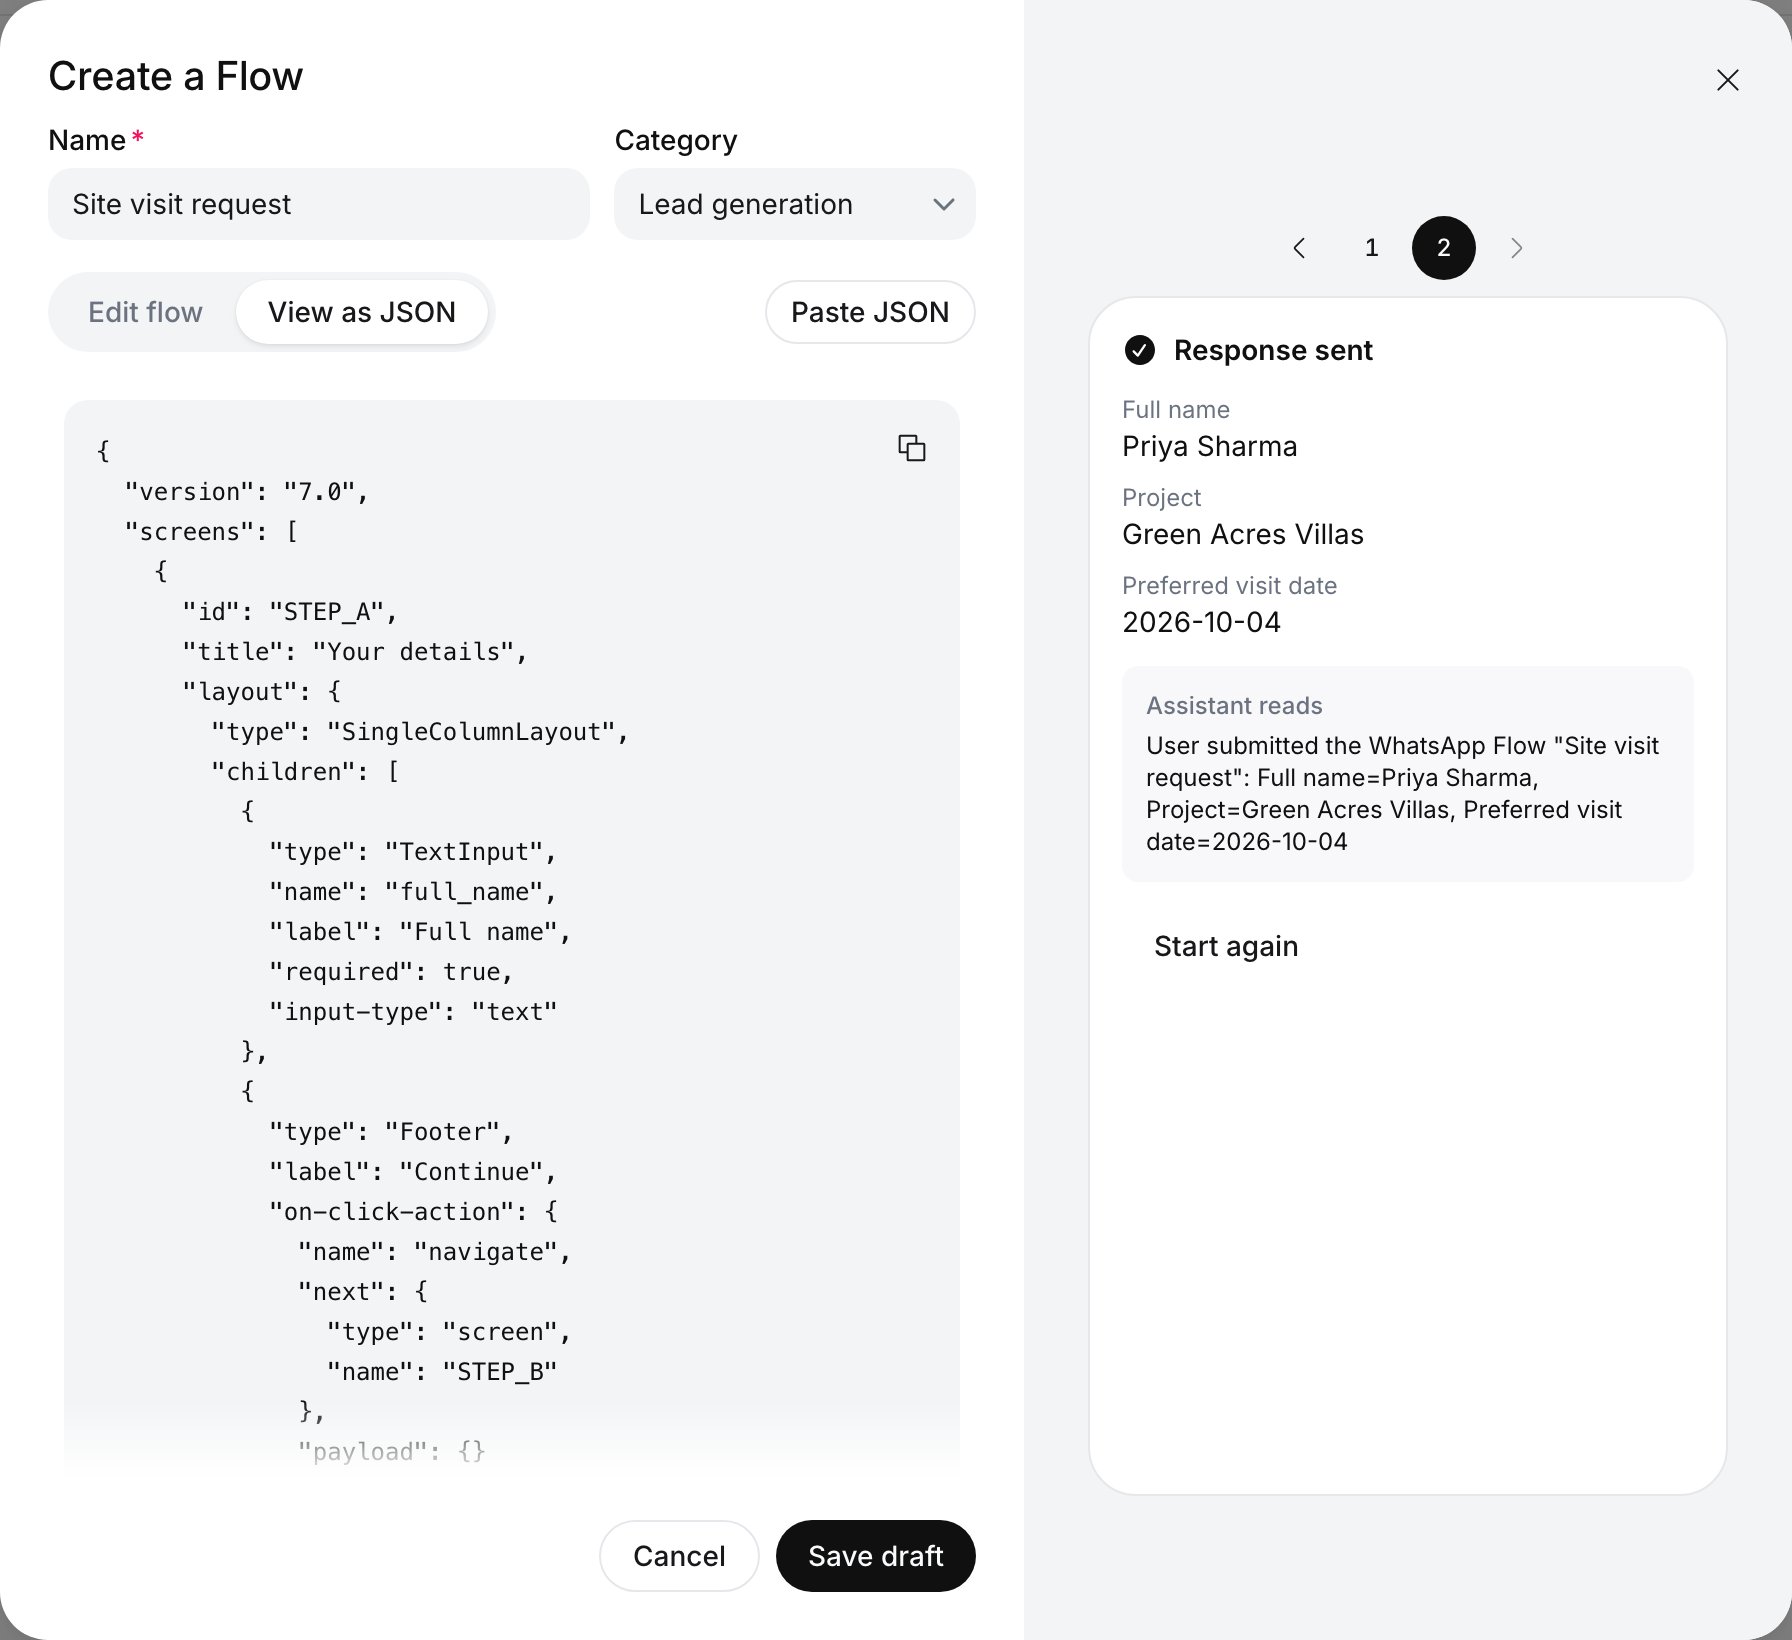
Every Flow is a Flow JSON document that WhatsApp reads. Select **View as JSON** in the builder to see the complete Flow JSON for what you've built. It is read-only: select the copy icon to copy it, for example for a developer or into WhatsApp Manager. Select **Edit flow** to go back.

<Frame caption="View as JSON: the Flow JSON for the Flow being built">
  <img src="https://mintcdn.com/ringgai-0da73d20/-vF1MHd0bJHQ6pVT/media/whatsapp-flow-builder/flow-json.webp?fit=max&auto=format&n=-vF1MHd0bJHQ6pVT&q=85&s=a0924bc9bc78c1aaa27b3ed7a789b864" alt="View as JSON tab showing the Flow JSON with version 7.0, screen STEP_A titled Your details with a TextInput full_name and a Footer that navigates to STEP_B, and a copy icon; the preview on the right shows Response sent" width="1792" height="1640" data-path="media/whatsapp-flow-builder/flow-json.webp" />
</Frame>

## Paste Flow JSON

To build from a Flow JSON you already have, copy it, then select **Paste JSON** in the builder. Pasting replaces everything in the builder:

* Text, text fields, choices, dropdowns, date pickers and opt-ins become rows you can edit, as if you had added them.
* Anything else stays as a **JSON** row: images, components that read screen data such as `${data.min_date}`, buttons that call the Flow's endpoint, and other components from Meta's [Flow JSON reference](https://developers.facebook.com/docs/whatsapp/flows/reference/flowjson). You can open a JSON row to read it, reorder it or remove it, but not edit it.

When a Flow has JSON rows, Ringg sends them to Meta exactly as pasted. To change one, edit the JSON and paste it again.
<Note>
  In a Flow with JSON rows, only the values in the last screen's `complete` action come back into the chat. Add every answer you need to its `payload`, such as `"full_name": "${form.full_name}"`. For a Flow built only from rows you can edit, the builder does this for you.
</Note>

The preview draws text, text fields, choices, dropdowns, date pickers and opt-ins. A JSON row shows only its type, such as *DatePicker*. To see it, save the draft and select **View on Meta** below the preview, which opens the Flow in WhatsApp Manager.

## Drafts

A draft built in Ringg opens in the builder when you select it in the **Flows** tab. Select **Cancel** to see its details, whose buttons are:

* **Edit**: reopens it in the builder.
* **Publish**: makes it ready to send.
* **Delete draft**: removes it from your WhatsApp account. Only drafts can be deleted.

Drafts can't be sent to customers, so an assistant's Flow picker doesn't list them.

## Change a published Flow

Meta locks a Flow once it's published, so you change a copy instead:

<Steps>
  <Step title="Copy it">
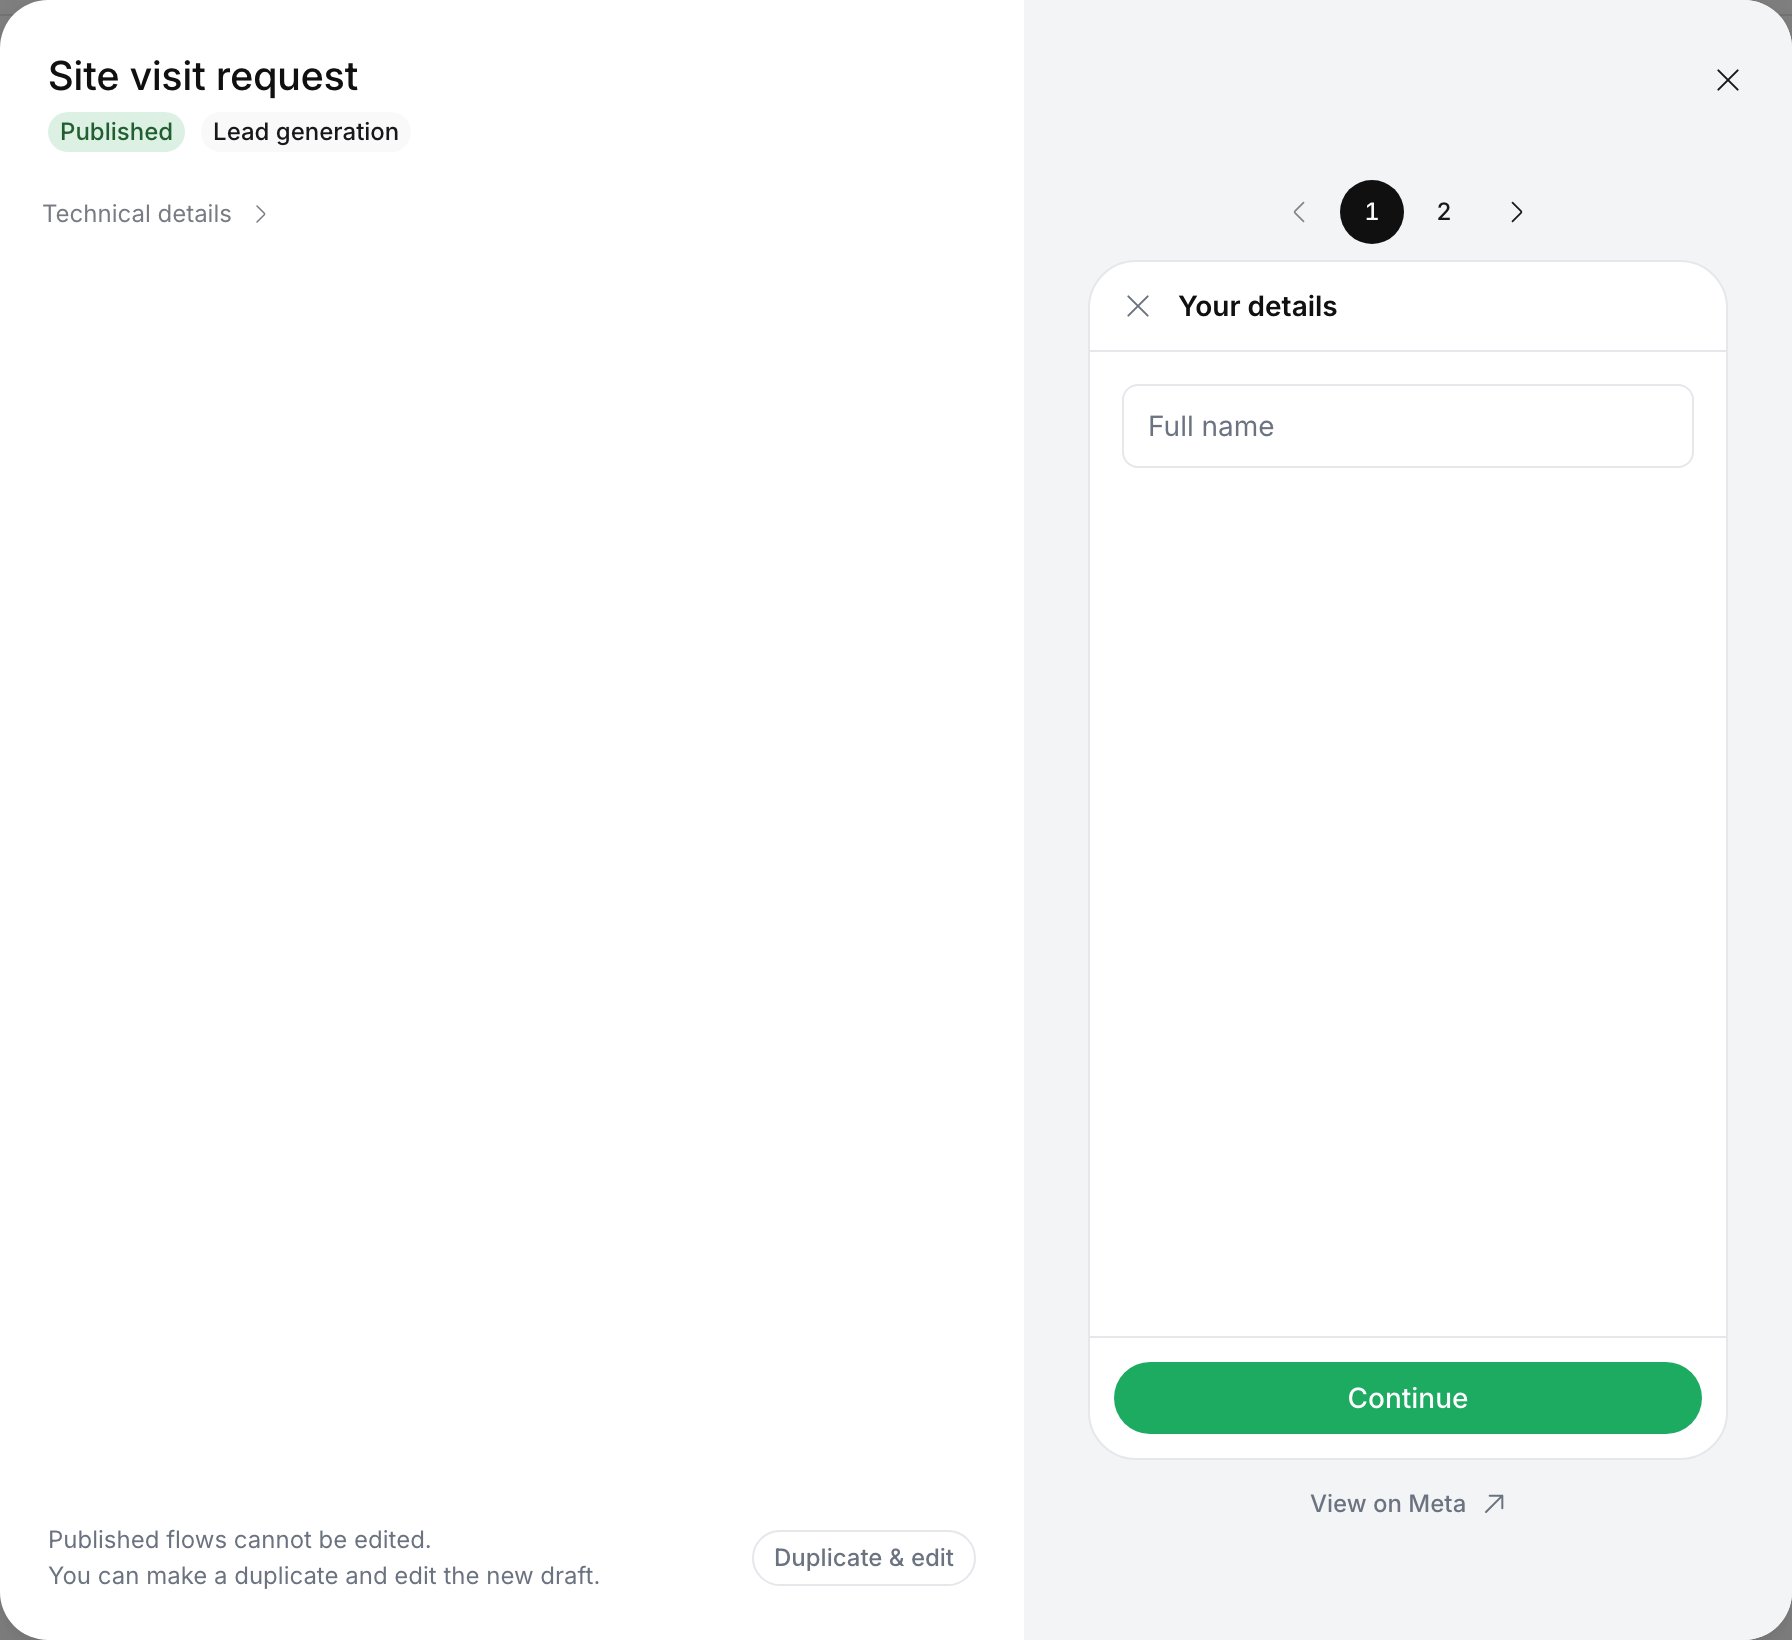
    Open the Flow in the **Flows** tab and select **Duplicate & edit**. This works for Flows made in WhatsApp Manager too.

    The copy is a new draft named after the original, with *(copy)* at the end, and it opens in the builder. A copy of a WhatsApp Manager Flow keeps anything the builder can't edit as JSON rows, as with [Paste JSON](#paste-flow-json). Rename the copy if you like.

    <Frame caption="A published Flow's details, with Duplicate & edit">
      <img src="https://mintcdn.com/ringgai-0da73d20/-vF1MHd0bJHQ6pVT/media/whatsapp-flow-builder/published.webp?fit=max&auto=format&n=-vF1MHd0bJHQ6pVT&q=85&s=23c98f887c9c1902f01445e971ed10b0" alt="Site visit request details with the Published chip and the note Published flows cannot be edited. You can make a duplicate and edit the new draft, next to a Duplicate and edit button" width="1792" height="1640" data-path="media/whatsapp-flow-builder/published.webp" />
    </Frame>
  </Step>

  <Step title="Edit, save and publish the copy">
    Make your changes, select **Save draft**, then publish it from its details. If the original used [live data](/documentation/build-agents/agents/whatsapp-agents/flows-live-data), set up its data source again on the copy before publishing.
  </Step>

  <Step title="Switch to the copy">
    * In each assistant that sent the original, remove the old Flow under **WhatsApp Flows**, add the copy, and update its `@` tag in the prompt.
    * A template's Flow button keeps opening the original. Edit the template to use the copy.
  </Step>
</Steps>

## Troubleshooting

The builder names the first problem it finds at the bottom left, next to **Save draft**, which stays greyed out until it's fixed.

| You see | Where | What to do |
| - | - | - |
| *Give the Flow a name.* or *Give screen 2 a title.* | Builder | Fill in the **Name** or the **Page title**. |
| *Every question on screen 2 needs a label.* | Builder | Fill in the question's **Label**, or remove the question. |
| *"Preferred date of the site visit" is longer than 40 characters.* | Builder | Shorten it. The limits are Meta's. See [What you can add](#what-you-can-add). |
| *"Project" needs at least one option.* | Builder | Add an option, or remove the question. |
| *Add some content to screen 2.* | Builder | Add a question or text, or select **Delete screen**. |
| *Meta found problems in the saved draft* | Top of the builder | The draft is saved, but Meta lists what it won't accept. Fix each one and select **Save** again. |
| *Clipboard is not Flow JSON* or *Clipboard is empty* | A pop-up message after **Paste JSON** | Copy the whole Flow JSON, including its `screens` list, and paste again. |
| *Clipboard access denied* | A pop-up message after **Paste JSON** | Allow clipboard access for the dashboard in your browser, then paste again. |
| *Could not save the Flow* | A pop-up message | The reason is shown under it. Fix it and save again. |
| *This step asks the endpoint for the next screen. Only WhatsApp can run it.* | Builder preview | Steps that load live data only run in WhatsApp. Select the next screen's number above the preview, or use **View on Meta** after saving. |

## Good to know

<AccordionGroup>
  <Accordion title="Drafts also appear in WhatsApp Manager">
    A Flow built in Ringg lives on your WhatsApp Business account, like one made in WhatsApp Manager, so you can see it there too. If you change a draft in WhatsApp Manager, saving it again in Ringg replaces those changes.
  </Accordion>

  <Accordion title="How answers are named">
    Each answer comes back under its question's label, such as *Full name=Priya Sharma*. If you change a label in a copy, update any prompt or analysis that mentions the old one.
  </Accordion>

  <Accordion title="Flows belong to one WhatsApp Business account">
    A Flow is created on the account whose **Flows** tab you build it in. Only assistants with a number on that account can send it.
  </Accordion>
</AccordionGroup>

<RelatedTopics items={[["WhatsApp agents", "/documentation/build-agents/agents/whatsapp-agents/overview"], ["Connect WhatsApp", "/documentation/inventory/tools-integrations/connect-whatsapp"], ["Create a WhatsApp agent", "/documentation/build-agents/agents/whatsapp-agents/create-an-agent"], ["WhatsApp Flows", "/documentation/build-agents/agents/whatsapp-agents/flows"], ["Flows with live data", "/documentation/build-agents/agents/whatsapp-agents/flows-live-data"], ["Live data from your server", "/documentation/build-agents/agents/whatsapp-agents/flows-your-server"], ["WhatsApp tools", "/documentation/build-agents/customize-agent-behaviour/tools/whatsapp-tools"], ["WhatsApp chat events", "/documentation/build-agents/customize-agent-behaviour/webhooks/whatsapp-chat-events"], ["Start a conversation", "/documentation/deploy/whatsapp/start-a-conversation"], ["WhatsApp Relay", "/documentation/deploy/whatsapp/relay-overview"], ["WhatsApp Relay integration guide", "/documentation/deploy/whatsapp/relay-integration-guide"], ["WhatsApp Relay troubleshooting", "/documentation/deploy/whatsapp/relay-troubleshooting"], ["WhatsApp chats in Logs", "/documentation/monitor/logs#whatsapp-chats"]]} />


This documentation is built and hosted on [Mintlify](https://mintlify.com), a developer documentation platform.