
> ## Documentation Index
> Fetch the complete documentation index at: https://docs.ringg.ai/llms.txt
> Use this file to discover all available pages before exploring further.

> ## Agent Instructions
> To search or read these docs, connect the Ringg docs MCP server at https://docs.ringg.ai/mcp (no key needed; tools search_ringg_ai and query_docs_filesystem_ringg_ai) instead of browsing pages one by one. Setup for each client: https://docs.ringg.ai/resources/mcp-server/docs-mcp-server/mcp-for-ai-assistants.md
> The dashboard labels agents "Assistants"; these docs say "agent". Both mean the same object, identified by agent_id.
> API base URL: https://prod-api.ringg.ai/ca/api/v0. Send the workspace API key in the X-API-KEY header, from server-side code only.
> Placing a call dials a real phone number and spends credits. Confirm the number with the user before calling.
> To act on a Ringg workspace (place calls, edit agents, read transcripts), use the separate Ringg workspace MCP server at https://mcp.ringg.ai/mcp: https://docs.ringg.ai/resources/mcp-server/workspace-mcp-server/overview.md

# Create a WhatsApp agent

> Create a Ringg AI WhatsApp agent, attach a registered WhatsApp number, set the chat session timeouts, let it send approved templates and test it by QR code.

export const RelatedTopics = ({items}) => <div className="not-prose mt-12">
    <div className="text-sm font-medium text-gray-500 dark:text-zinc-400 mb-3">Related topics</div>
    <div className="flex flex-col gap-2.5">
      {items.map(([title, href]) => <a key={href} href={href} className="flex items-center gap-2.5 text-sm text-gray-700 hover:text-gray-950 dark:text-zinc-300 dark:hover:text-white">
          <Icon icon="file-text" size={16} color="currentColor" />
          {title}
        </a>)}
    </div>
  </div>;

A WhatsApp agent answers messages on one registered WhatsApp Business number, from the same create dialog as every other [agent type](/documentation/build-agents/agents/agent-types#agent-types-by-channel). A [voice agent](/documentation/build-agents/agents/create-an-agent) that only needs to *send* WhatsApp messages uses the [WhatsApp tools](/documentation/build-agents/customize-agent-behaviour/tools/whatsapp-tools#on-call) instead.

In the dashboard: **Assistants → Create agent → WhatsApp**.

## Before you start

<Columns cols={2}>
  <Card title="WhatsApp Business connected" icon="plug" href="/documentation/inventory/tools-integrations/connect-whatsapp" horizontal>
    With at least one registered (**Ready**) number.
  </Card>

  <Card title="Approved templates" icon="message-circle" href="/documentation/inventory/tools-integrations/connect-whatsapp#message-templates" horizontal>
    Optional: only if the agent sends templates in a chat.
  </Card>
</Columns>

## Create the agent

The form is the one described in [Create an agent](/documentation/build-agents/agents/create-an-agent); these are the WhatsApp-specific choices.

<Frame caption="Creating a WhatsApp agent, picking a template it may send, setting the session timeouts and opening the test QR code">
  <video alt="Creating a WhatsApp agent, picking a template it may send, setting the session timeouts and opening the test QR code" aria-label="Creating a WhatsApp agent, picking a template it may send, setting the session timeouts and opening the test QR code" controls muted playsInline className="w-full aspect-video rounded-xl">
    <source src="https://mintcdn.com/ringgai-0da73d20/XUOcNie5hfK3q--Y/media/whatsapp-create-agent/video.webm?fit=max&auto=format&n=XUOcNie5hfK3q--Y&q=85&s=d92b7f32bcc190f87bb3625c28e0ac96" type="video/webm; codecs=&#x22;av01.0.09M.08&#x22;" data-path="media/whatsapp-create-agent/video.webm" />
  </video>
</Frame>

<Steps>
  <Step title="Choose the WhatsApp tab">
    Go to **Assistants**, select **Create agent**, and choose the **WhatsApp** tab. Under **Create from scratch**, pick the single-prompt WhatsApp template; its prompt already carries WhatsApp's formatting rules.
  </Step>

  <Step title="Fill in the basics">
    Enter the **Agent Name**, **Primary Language** and optional **Secondary Language**, and pick a voice (the form requires one; the agent speaks with it when a customer calls the number from WhatsApp). Select **Next**.
  </Step>

  <Step title="Describe the business and goal">
    Fill in the **Call context** fields: what the business is and what the chat should achieve. Ringg writes the first version of the prompt from them. Add any **Custom variables** and **Knowledge Base** the agent needs.
  </Step>

  <Step title="Select the WhatsApp number">
    Under **Select WhatsApp Number**, pick the registered number this agent answers on ([which numbers are listed](#attach-a-whatsapp-number)); an empty list reads **No WhatsApp numbers connected**. You can leave it empty and attach one later.

    <Frame caption="The WhatsApp number step of the create form">
      <img src="https://mintcdn.com/ringgai-0da73d20/XUOcNie5hfK3q--Y/media/whatsapp-create-agent/select-number.webp?fit=max&auto=format&n=XUOcNie5hfK3q--Y&q=85&s=4725e7df53e13bbd5b8fe68459c2261f" alt="Select WhatsApp Number section of the create form with a WhatsApp Number dropdown showing +919876540322 selected" width="1480" height="272" data-path="media/whatsapp-create-agent/select-number.webp" />
    </Frame>
  </Step>

  <Step title="Create">
    Select **Create Assistant**.

    <Check>The agent editor opens. On the **Assistants** page, set **Channels** to **WhatsApp** to find it again.</Check>
  </Step>
</Steps>

## Attach a WhatsApp number

A WhatsApp agent answers on exactly one number, and each number serves one agent at a time. Messages to a number with no agent attached get no reply. The list offers a number only when it belongs to the connected WhatsApp Business account, shows **Ready**, and no other agent uses it.

1. In the agent editor's left menu, expand **Attach Number** (in the top group, below **WhatsApp Templates**).
2. Open **WhatsApp Number** and choose a number. It saves as soon as you choose. The last option, **Connect WhatsApp Number**, takes you to [add and register one](/documentation/inventory/tools-integrations/connect-whatsapp#add-a-number).

To move a number to another agent, clear it on the agent that has it, then attach it on the new agent. De-registering or archiving a number detaches it, and the agent stops answering until you attach another.

## What's different in the editor

| Section | For a WhatsApp agent |
| - | - |
| **Prompt** | The first message is sent as a WhatsApp message when the chat starts. |
| **WhatsApp Templates** | Templates the agent may send during a chat. See [Send a template during a chat](#send-a-template-during-a-chat). |
| **Attach Number** | In the top group, offering only WhatsApp numbers. |
| **Chat → Settings** | The WhatsApp session timeouts. See [Set the session timeouts](#set-the-session-timeouts). |
| **Tools** | Pre-call, on-call and post-call tools as usual. Pre-call tools run on the customer's first message without holding up the reply; a field a tool didn't return resolves to "not available". **End Chat** sits under **Chat Tools** in the on-call side panel. |
| **Event Subscription** | Chat events instead of call events. See [Events](/documentation/build-agents/customize-agent-behaviour/webhooks/whatsapp-chat-events#whatsapp-chat-events). |
| Not shown | **Embed & Widgets**, **Keyword Boosting**, and A/B testing (except to finalize one already running). |

## When a chat opens and closes

A WhatsApp conversation is one chat. The customer's first message opens it, and it stays open while messages keep flowing. It closes when:

| Trigger | What happens |
| - | - |
| The agent ends it | The agent calls **End Chat**, writes a closing message and closes the chat. |
| The customer goes quiet | After the idle timeout (3 hours by default) with no customer message, the chat ends. Their next message opens a new chat. |
| It reaches the maximum length | After the maximum length (24 hours by default), however active, the next message opens a new chat. |

A new chat starts without the previous chat's messages. Closing the chat is what runs post-call tools and analysis and fires `chat_completed`, so when a customer stops replying, those results arrive after the idle timeout.

### Set the session timeouts

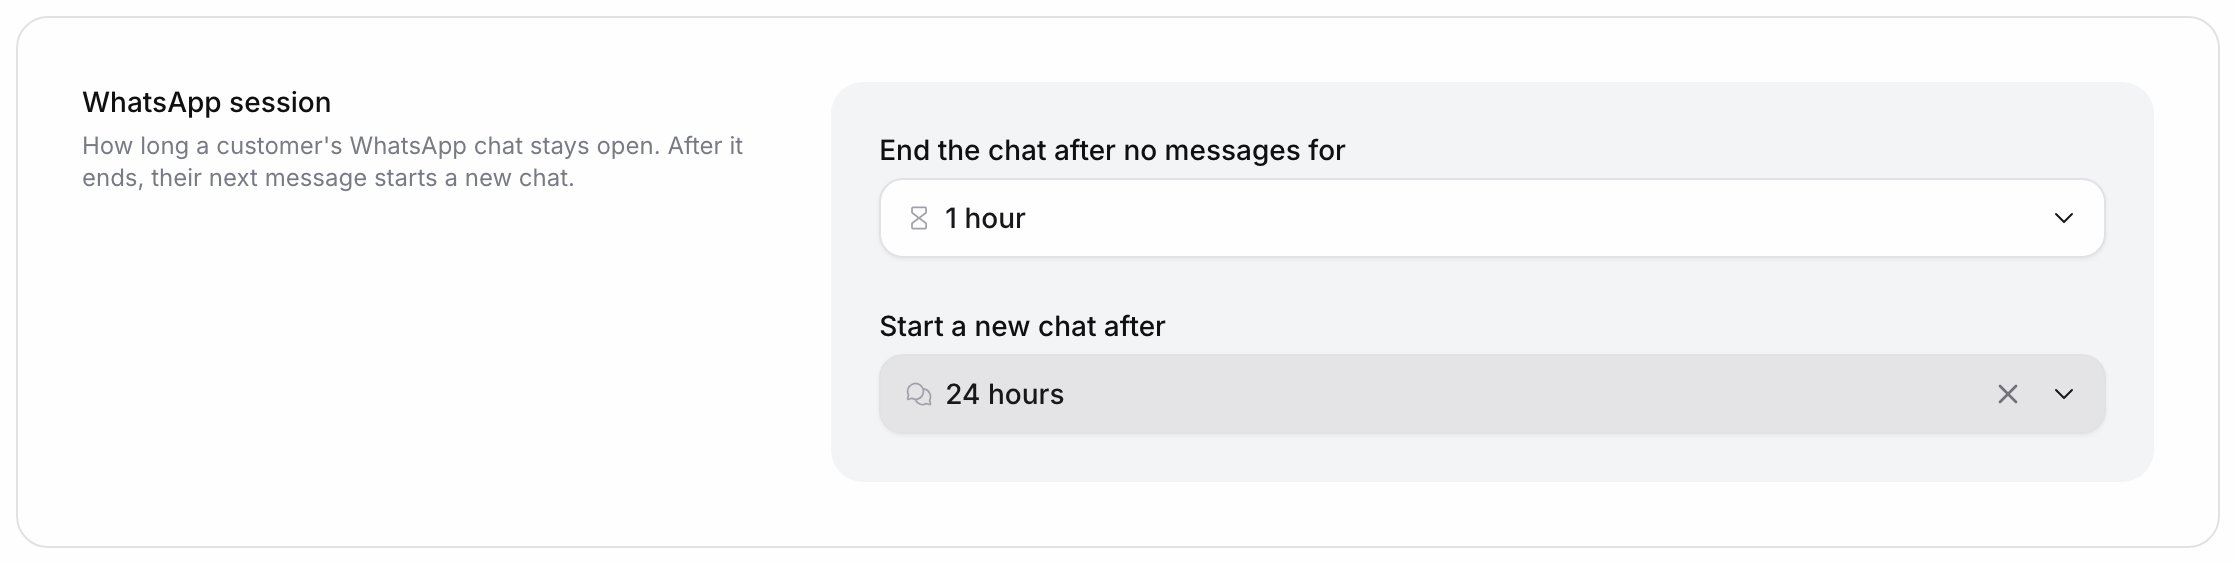
Shorter timeouts give you post-call results and webhooks sooner; longer ones keep context for customers who take hours to reply. A chat keeps the timeouts it started with, so a change applies to chats that open afterwards.

In the agent editor, open **Chat → Settings**. Under **WhatsApp session**:

| Setting | Default | Options |
| - | - | - |
| **End the chat after no messages for** | 3 hours | 15 or 30 minutes; 1, 2, 3, 6, 12 or 24 hours |
| **Start a new chat after** | 24 hours | 1, 6, 12 or 24 hours; 2, 3, 5 or 7 days |

Each change saves immediately. The second dropdown only offers values at or above the first; raising the idle timeout above the session length raises the length in the same save.

<Frame caption="The WhatsApp session settings under Chat → Settings">
  <img src="https://mintcdn.com/ringgai-0da73d20/XUOcNie5hfK3q--Y/media/whatsapp-create-agent/whatsapp-session.webp?fit=max&auto=format&n=XUOcNie5hfK3q--Y&q=85&s=5f3852ba6976abb1b52182f12acc4451" alt="WhatsApp session settings with two dropdowns: End the chat after no messages for, set to 1 hour, and Start a new chat after, set to 24 hours" width="2236" height="564" data-path="media/whatsapp-create-agent/whatsapp-session.webp" />
</Frame>

### Set the session timeouts with the API

[Edit Assistant](/api-reference/endpoint/assistant/edit-assistant) with `operation: "edit_chat_settings"`. Send both fields; one you leave out resets to its default.

| Field | Default | Allowed |
| - | - | - |
| `idle_timeout_minutes` | 180 | 5 to 1440 |
| `max_duration_minutes` | 1440 | 60 to 10080, at least `idle_timeout_minutes` |

```bash theme={null}
curl --request PATCH "https://prod-api.ringg.ai/ca/api/v0/agent/v1" \
  --header "X-API-KEY: $RINGG_API_KEY" \
  --header "Content-Type: application/json" \
  --data '{
    "operation": "edit_chat_settings",
    "agent_id": "your-agent-id",
    "chat_settings": {
      "whatsapp_session": { "idle_timeout_minutes": 1440, "max_duration_minutes": 4320 }
    }
  }'
```

### End the chat

**End Chat** closes the chat straight away, so post-call tools and analysis run without waiting for the idle timeout. Mention it in the prompt as `@||end_chat||` where the conversation should end. Use it instead of `@||end_call||`: **End Call** and the other call tools don't run during a chat.

## Write a prompt for WhatsApp

* Keep replies short, one to three small paragraphs. WhatsApp folds long messages behind "Read more".
* Use WhatsApp formatting only: `*bold*`, `_italic_`, `~strike~`, and lines starting with `- ` or `1. ` for lists.
* Skip Markdown headings, tables and `[label](url)` links. Send the bare URL; WhatsApp makes it clickable.
* Don't mention calls, audio, holding or keypad input. The customer is typing.
* Mention every on-call tool and template with `@` where it should be used, and `@||end_chat||` where the chat ends.

```text theme={null}
You are Neha, a WhatsApp assistant for Acme Insurance. You help customers renew
their health policy.

- Greet the customer by name if {{name}} is available, and ask how you can help.
- Answer plan questions from the knowledge base. Keep each reply under 80 words.
- When the customer is ready to renew, send the renewal link with
  @||send_renewal_reminder|| and tell them it has been sent.
- Use *bold* for plan names and prices. Never use headings or tables.
- When the customer says they're done, thank them and end the chat with
  @||end_chat||.
```

## Send a template during a chat

A WhatsApp agent can send an approved template mid-chat: a brochure, a payment link, a quick-reply menu. Use **WhatsApp Templates** for this. The **Send WhatsApp Template** integration tool can't send templates in a chat; it is for voice agents and post-call sends.
<Steps>
  <Step title="Select the templates">
    In the editor's left menu, expand **WhatsApp Templates** and select **Select Template**. The list shows the approved templates of the attached number's account; tick each one the agent may send. **Manage templates** opens [Message templates](/documentation/inventory/tools-integrations/connect-whatsapp#message-templates).

    If the section says **Attach a WhatsApp number to this assistant first**, [attach one](#attach-a-whatsapp-number). Rows the agent can't send yet are disabled with the reason: Authentication templates, location headers, text headers with more than one variable, buttons with a variable link, copy-code and Flow buttons.
  </Step>

  <Step title="Fill in the variables">
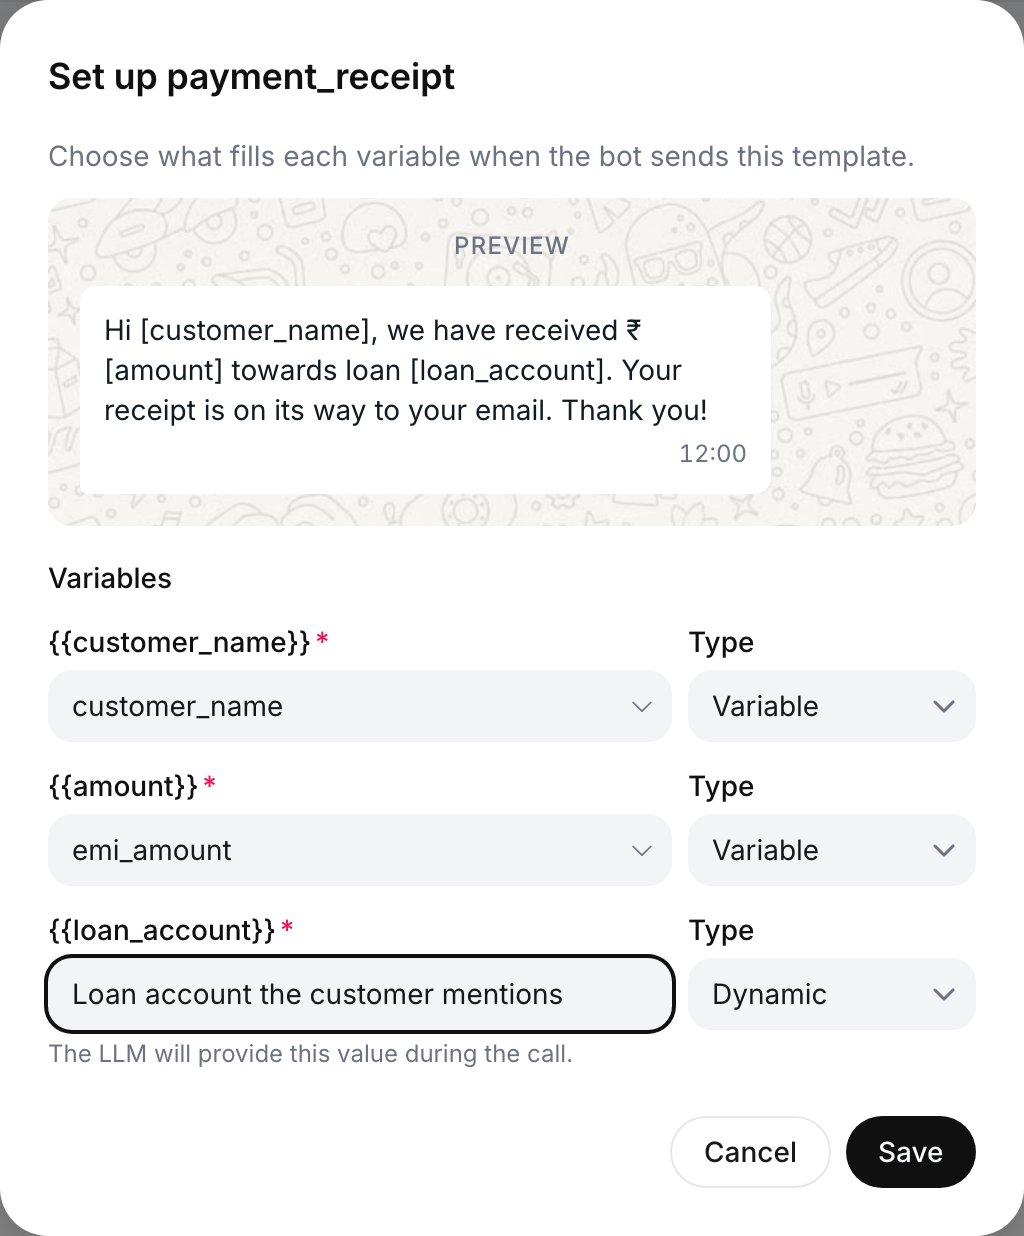
    If the template has variables or a media header, a dialog asks what fills each variable:

    * **Static**: fixed text, sent as written.
    * **Variable**: a custom variable such as `{{name}}`, filled when the chat starts.
    * **Dynamic**: the agent fills it from the conversation, for example the plan the customer chose.

    For an image, video or document header, paste a public `https://` link; the same file goes out on every send.

    <Frame caption="Setting up a template with named variables">
      <img src="https://mintcdn.com/ringgai-0da73d20/XUOcNie5hfK3q--Y/media/whatsapp-create-agent/template-variables.webp?fit=max&auto=format&n=XUOcNie5hfK3q--Y&q=85&s=ea9611786059092df52ecc0e0e0d3d20" alt="Set up payment_receipt dialog with a preview of the template and three variable rows: customer_name mapped to the customer_name variable, amount mapped to emi_amount, and loan_account set to Dynamic with a description for the model" width="1024" height="1236" data-path="media/whatsapp-create-agent/template-variables.webp" />
    </Frame>
  </Step>

  <Step title="Tag the template in the prompt">
    Type `@` in the prompt and pick the template under **WhatsApp Templates**. Its tool name is `send_` plus the template name, for example `@||send_renewal_reminder||`; if that name is already taken, the language code is appended.
  </Step>
</Steps>

Each selected template is listed under **WhatsApp Templates** with its language; the pencil re-opens the variable dialog and the bin removes it. A line under the name flags one that can no longer be sent as set up: **Not in this WhatsApp account**, **Template rejected** (or another non-approved status), or **Variables changed, edit to re-map**.

The template is the agent's whole reply for that turn, and each send appears in the chat transcript under **Logs → WhatsApp**. If a **Variable** isn't available in a chat, the agent fills it from the conversation. When the customer taps a quick-reply button or swipes to reply to an earlier message, their reply reaches the agent with a short quote of that message, so "yes, this one" is understood in context.

## Test from your phone

Select **Test assistant** in the editor's top bar. A QR code for the attached number appears with "Scan to start a WhatsApp chat". Scan it with your phone's camera, or use **Open in WhatsApp**, and send a message. If the dialog says "No number attached", [attach a number](#attach-a-whatsapp-number) and reopen **Test assistant**.

<Check>Your conversation appears under [Logs → WhatsApp](/documentation/monitor/logs#whatsapp-chats).</Check>

## Common questions

<AccordionGroup>
  <Accordion title="Can one number serve two agents?">
    No. A number is attached to one agent at a time; [move it](#attach-a-whatsapp-number) by clearing it on the first agent.
  </Accordion>

  <Accordion title="Why is my test chat still Ongoing in Logs?">
    It stays **Ongoing** until it [closes](#when-a-chat-opens-and-closes), and post-call tools, analysis and `chat_completed` wait with it. Lower **End the chat after no messages for** while testing.
  </Accordion>

  <Accordion title="Can a WhatsApp agent be multi-prompt?">
    No. The **Multi Prompt** card is hidden on the WhatsApp tab and **Convert to multi-prompt** isn't offered for WhatsApp agents.
  </Accordion>
</AccordionGroup>

## Next steps

<Columns cols={3}>
  <Card title="Add WhatsApp tools" icon="send" href="/documentation/build-agents/customize-agent-behaviour/tools/whatsapp-tools#on-call">
    Send templates or text from voice agents and after chats.
  </Card>

  <Card title="Message customers first" icon="message-circle" href="/documentation/deploy/whatsapp/start-a-conversation">
    Open a chat with a template from your backend.
  </Card>

  <Card title="Read the chats" icon="scroll-text" href="/documentation/monitor/logs#whatsapp-chats">
    Every conversation in Logs, with transcript and export.
  </Card>
</Columns>

<RelatedTopics items={[["WhatsApp agents", "/documentation/build-agents/agents/whatsapp-agents/overview"], ["Connect WhatsApp", "/documentation/inventory/tools-integrations/connect-whatsapp"], ["WhatsApp tools", "/documentation/build-agents/customize-agent-behaviour/tools/whatsapp-tools"], ["WhatsApp chat events", "/documentation/build-agents/customize-agent-behaviour/webhooks/whatsapp-chat-events"], ["Start a conversation", "/documentation/deploy/whatsapp/start-a-conversation"], ["WhatsApp Relay", "/documentation/deploy/whatsapp/relay-overview"], ["WhatsApp Relay integration guide", "/documentation/deploy/whatsapp/relay-integration-guide"], ["WhatsApp Relay troubleshooting", "/documentation/deploy/whatsapp/relay-troubleshooting"], ["WhatsApp chats in Logs", "/documentation/monitor/logs#whatsapp-chats"]]} />


This documentation is built and hosted on [Mintlify](https://mintlify.com), a developer documentation platform.